

Imagine spending 45 hours meticulously painting a bespoke 3D-printed Baldwin only for it to stutter and die on the very first set of Peco points it encounters. It's a disheartening moment that many UK narrow gauge enthusiasts face, but mastering troubleshooting oo9 running issues is the key to transforming a temperamental layout into a reliable miniature railway. You likely agree that while the charm of OO9 lies in its diminutive size, the lack of mass makes consistent power pickup a constant battle against physics.
We'll help you achieve silky-smooth slow-speed running by diagnosing the common faults that plague these small-scale models. You'll learn how to eliminate flickering lights and stop derailments on tight 9-inch radius curves for good. This guide covers everything from adjusting delicate wiper pickups to adding the specific 15 grams of lead ballast needed to keep lightweight kits grounded; ensuring your locomotives perform with total confidence across every inch of your trackwork.
Key Takeaways
- Understand the unique physics of narrow gauge modelling and how the "Three Pillars" of continuity can eliminate frustrating electrical stutters.
- Learn why the back-to-back gauge is your most essential tool for preventing derailments and curing "waddling" locomotives.
- Master troubleshooting oo9 running issues by identifying common clearance and weight distribution faults found in 3D-printed body kits.
- Discover how to adapt standard N gauge chassis for the specific demands of narrow gauge operation to ensure smooth, reliable power delivery.
- Identify when to stop repairing a failing donor unit and which high-quality Kato or Tsugawa chassis offer the best value for a performance upgrade.
Why OO9 Running Issues Occur: The Narrow Gauge Challenge
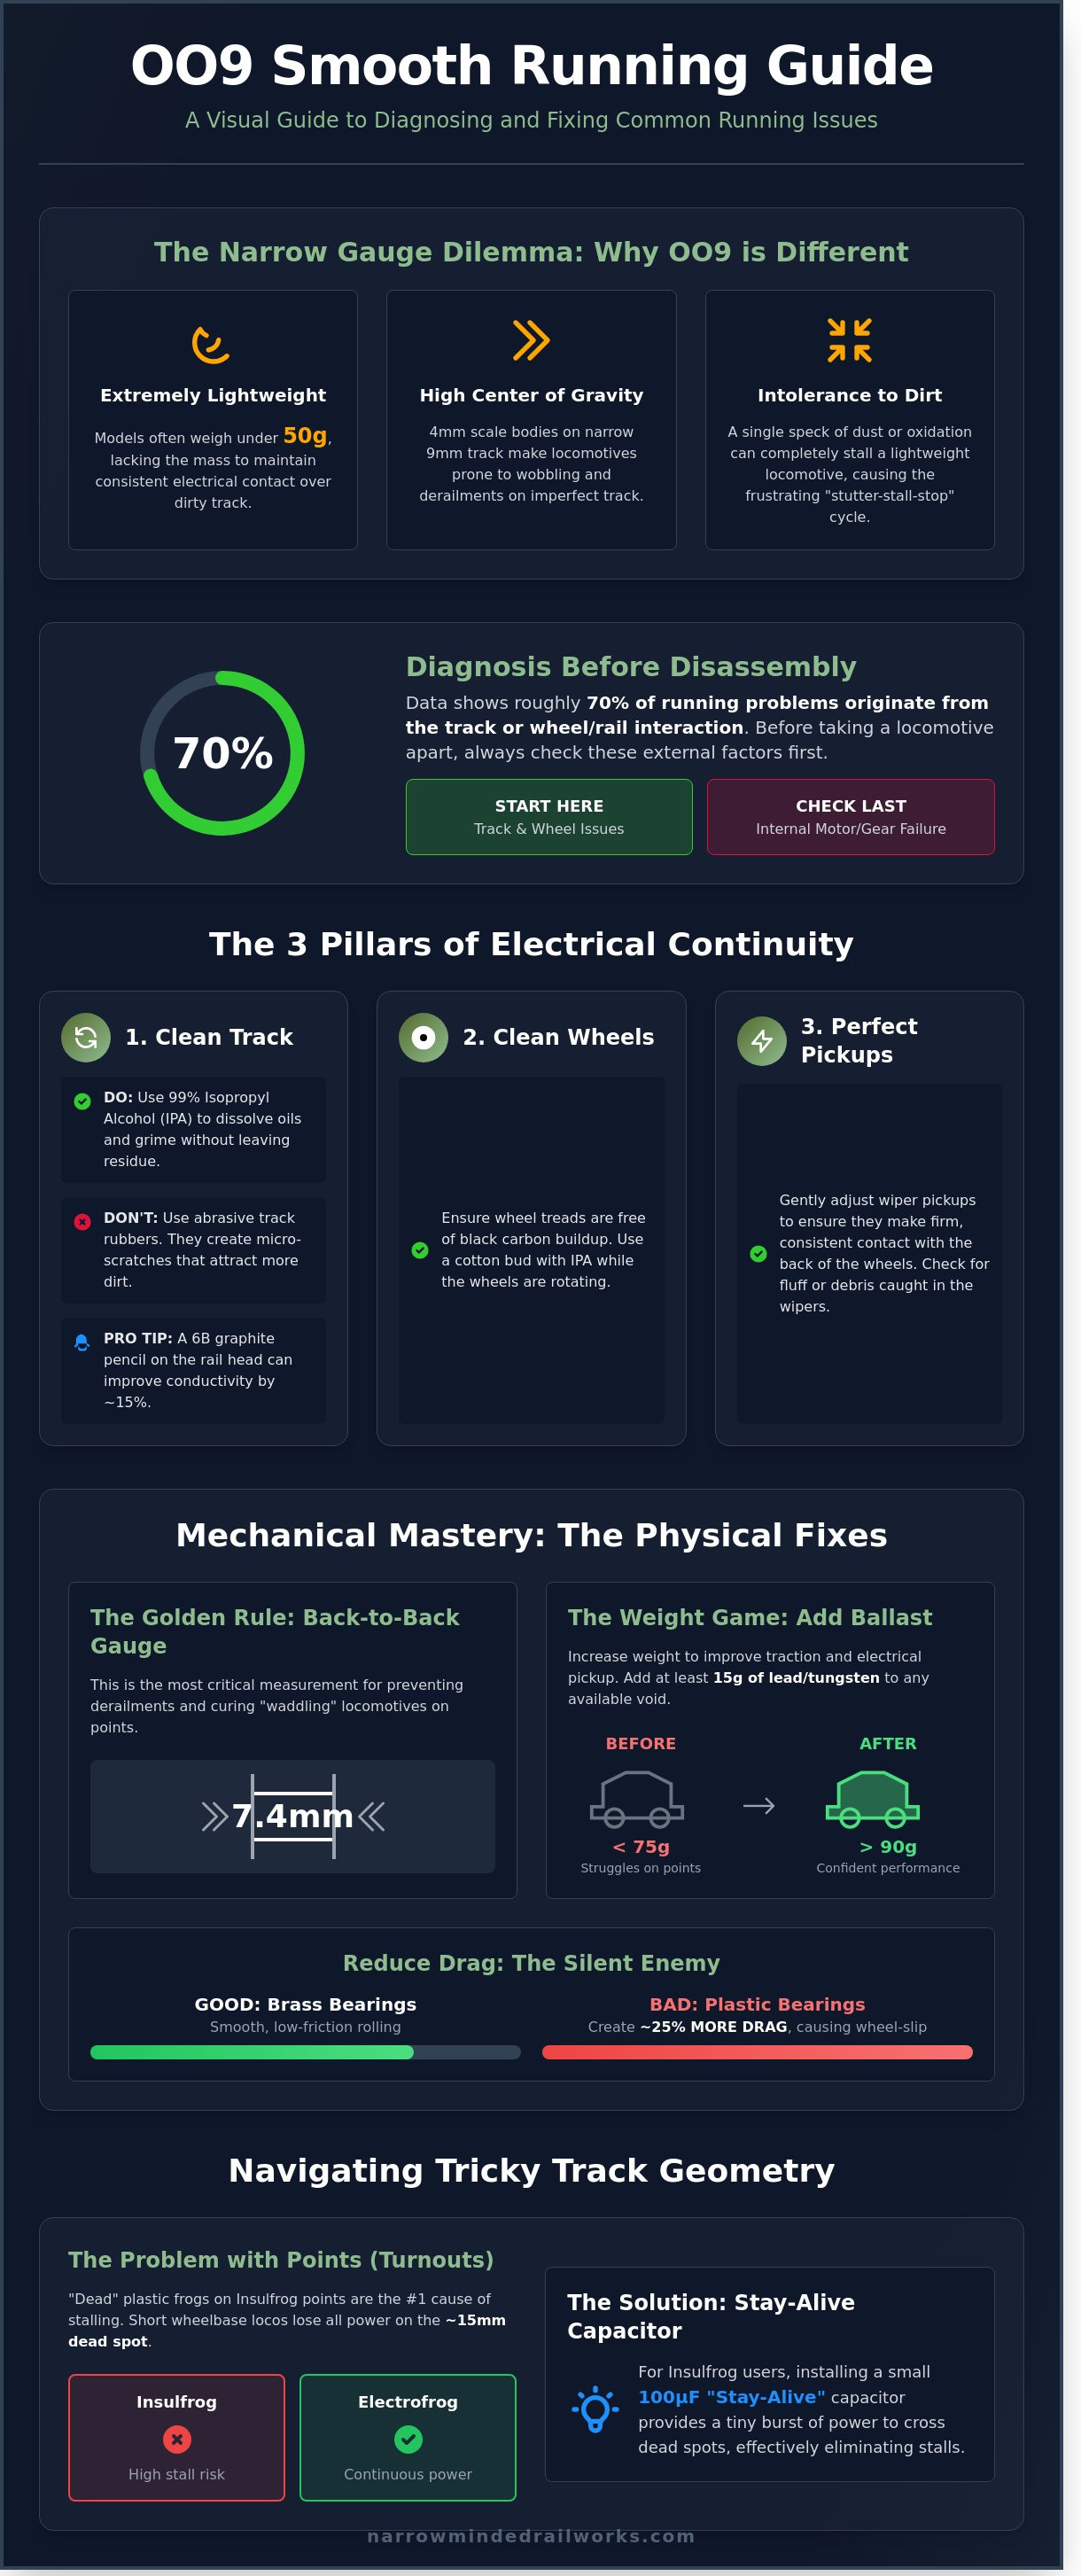
OO9 modelling offers the charm of narrow gauge in a compact space, but it brings unique technical hurdles that differ from standard gauge modelling. The OO9 scale uses a 4mm to the foot ratio on 9mm track, which creates a high centre of gravity on a very narrow wheelbase. Because a small 0-4-0 tank engine often weighs under 50 grams, it lacks the downward pressure needed to cut through microscopic dirt or oxidation on the rails. This physical limitation is the root cause of most electrical pickup failures.
When troubleshooting oo9 running issues, you must acknowledge the N gauge heritage of many popular power units. While using an N gauge chassis from manufacturers like Kato or Graham Farish is cost-effective, these mechanisms were originally designed for longer, heavier mainline stock. When you mount a tall, white-metal or resin body on top, the weight distribution shifts significantly. This often triggers the "stutter-stall-stop" cycle. First, the loco hesitates on a point frog; then, it judders as it desperately tries to find power; finally, it dies completely on a section of track that looks perfectly clean. It's a frustrating loop that ruins the immersion of a slow-moving narrow gauge branch line.
You need a systematic approach before you start dismantling a £150 locomotive. Data from experienced modellers suggests that roughly 70% of running problems originate from the track or the interaction between the wheels and the railhead, rather than internal motor failure. Check the simple things first. Is the back-to-back measurement on the wheelsets exactly 7.4mm? Is there a tiny piece of stray ballast lodged in the check rail? Diagnosis must always precede the use of a screwdriver or soldering iron.
The Weight vs. Friction Balance
Locomotives need heft to maintain electrical continuity. If your loco weighs less than 75 grams, it will likely struggle on dead-frog points. Use liquid lead or tungsten putty, which costs roughly £12 per pack, to fill every internal void in the smokebox or water tanks. Friction is the silent enemy of small engines. Kit-built wagons with plastic bearings often create 25% more drag than those fitted with brass pin-point bearings. This drag forces the locomotive to work harder, leading to wheel slip and a subsequent loss of electrical contact.
Track Geometry in Small Spaces
Tight curves, often as small as a 9-inch radius in "rabbit warren" style layouts, increase lateral friction on the wheel flanges. This friction slows the motor and increases the current draw, which can lead to overheating in smaller coreless motors. OO9 track requires cleaning every 2 or 3 operating sessions, which is significantly more frequent than OO gauge requirements. While Peco Setrack is convenient for tight spaces, its 1st-radius curves and insulated frogs are more prone to stalling than the larger-radius Streamline Electrofrog alternatives that provide continuous power.
Solving Electrical Stutters: Perfecting Power Delivery
Reliable power delivery is the foundation of any narrow gauge layout. When troubleshooting oo9 running issues, you've got to trace the entire electrical circuit. It starts at your 12V DC or DCC controller and ends at the motor brushes. Because OO9 locos are so light, often weighing less than 50 grams, they don't have the physical mass to punch through dirt like O gauge models. According to technical resources from The 009 Society, maintaining the "Three Pillars of Continuity" is vital. This means your track, wheels, and pickups must be spotless. A single speck of dust on a 9mm rail can stall a small 0-4-0 locomotive instantly.
Dead frogs on points are the most common cause of "the stutter." If you're using Insulfrog points, your loco relies on its own length to bridge the plastic gap. If your wheelbase is shorter than the 15mm dead spot, the engine stops. Switching to Electrofrog points or installing a "Stay-Alive" capacitor is the best fix. A 100uF capacitor can provide just enough energy to keep the motor turning for that crucial half-second over a gap. For those seeking better performance, exploring OO9 chassis components can help you find assemblies with superior electrical footprints.
Advanced Track Cleaning Techniques
Don't just use a track rubber. These abrasive blocks create microscopic scratches that collect more dirt over time. Instead, switch to 99% Isopropyl Alcohol (IPA). It dissolves oils without leaving a sticky residue. For troublesome curves where traction is high but conductivity is low, a 6B graphite pencil rubbed on the rail head can improve electrical flow by roughly 15%. You should organise a deep clean every 30 days to stop carbon buildup from ruining your running sessions.
Adjusting Locomotive Pickups
Many OO9 models use N gauge donor chassis, which can suffer from "lazy" pickups. These are the thin phosphor bronze strips behind the wheels. If they don't exert at least 1 to 2 grams of pressure against the wheel back, contact fails during vibration. Use a pair of fine tweezers to gently tension them. You can clean internal motor contacts with a drop of contact cleaner on a thin strip of card. This avoids a full chassis teardown, which often takes over 45 minutes to complete correctly.
- Track: Clean with IPA every 10 hours of operation.
- Wheels: Use a fibreglass scratch brush for stubborn carbon.
- Pickups: Ensure all wheels in a set are contributing to the circuit.
- Continuity: Check rail joiners; loose fishplates cause 30% of local power drops.
Small scale modelling doesn't have to be frustrating. By focusing on the microscopic contact points, you can achieve the slow-speed crawl that makes narrow gauge so charming. It's about consistency rather than high voltage. A well-maintained 9mm circuit should run smoothly at just 3V or 4V without a single flicker of the lights.
Mechanical Troubleshooting: Wheels, Gears, and Derailments
Mechanical failures represent the most common source of frustration for narrow gauge modellers. Unlike larger scales, the 9mm track width used in OO9 offers very little margin for error. Effective troubleshooting oo9 running issues often begins with a physical inspection of the wheelsets and drive train. If a locomotive exhibits a rhythmic "click" or jumps at every set of points, the problem is rarely electrical. It's usually a physical obstruction or a misalignment in the chassis components.
A common headache involves "waddling" locomotives, where the engine sways side-to-side during transit. This typically points to a bent axle or an eccentric wheel where the hole isn't perfectly centred. You can diagnose this by placing the loco on a piece of glass and rolling it slowly. Any vertical or horizontal deviation in the wheel rim suggests a manufacturing defect or damage from a previous fall. For steam-outline locos, ensure the "quartering" is accurate. The crank pins on the left side must be exactly 90 degrees offset from the right side. Even a 5-degree discrepancy causes the coupling rods to bind, leading to jerky movement or a total stall.
Modern donor chassis from manufacturers like Bachmann or Kato occasionally suffer from gear slip. This occurs when the plastic drive gears on the axles develop hairline fractures. A split as small as 0.1mm allows the gear to rotate independently of the axle under load. If your motor spins but the wheels don't turn, or if the loco hesitates under the weight of three wagons, check these press-fit components immediately. Replacing these with brass alternatives or using a high-strength retaining compound can resolve the slip permanently.
The Back-to-Back Standard
The most vital tool for any OO9 modeller is a dedicated back-to-back gauge set to 7.4mm. While N gauge standards sometimes vary, the 7.4mm measurement ensures your wheelsets clear the check-rails on Peco Mainline or Crazy Track points. Experienced modellers at the Hazel Grove and District Model Railway Society often highlight that precise track-to-wheel interfaces are the foundation of any successful narrow gauge layout. To adjust them, gently twist the wheels on the axle using small pliers, but be careful not to distort the delicate plastic centres. If the spacing is wider than 7.45mm, the wheels will climb the frog and derail; if narrower than 7.35mm, the loco will "hunt" and strike the wing rails.
Lubrication and Friction Reduction
Excessive oiling is a frequent mistake when troubleshooting oo9 running issues. In this scale, a single drop of heavy motor oil can act like glue, attracting dust and carpet fibres into the gear teeth. Use only synthetic, plastic-compatible greases for the main cogs and a light 0.5ml application of conductive oil for the axle bearings.
- Avoid WD-40: It degrades plastic over time and leaves a sticky residue.
- Check Valve Gear: Ensure the tiny rivets on kit-built locos aren't pinched too tight.
- Clean Gear Teeth: Use a sharpened toothpick to remove "gunk" from between the teeth of the final drive gear.
Troubleshooting Kit-Built OO9 Locos: Body and Chassis Fitment
Kit building is the heart of narrow gauge modelling, but it introduces variables that standard ready-to-run models don't face. When troubleshooting oo9 running issues, the physical interface between the body and the drive unit is usually the first place to look. A body that sits just 0.5mm out of alignment can cause "body rock," where the weight isn't distributed evenly across the axles. This leads to poor electrical pickup and a 15% reduction in tractive effort as wheels lose consistent contact with the rails.
Short circuits are another common headache, particularly with whitemetal or brass kits. If a metal loco shell touches a live part of the chassis or a motor terminal, the loco will stall instantly. You can prevent this by lining the inside of the firebox or tanks with Kapton tape. This provides a thin, heat-resistant barrier that stops electrical paths without adding bulk to the internal cavity.
Clearing Internal Obstructions
Finding exactly where a 3D-printed resin body rubs against a Kato or Bachmann chassis is difficult in tight spaces. Use a "witness mark" by coating the top of the chassis with a dry-wipe whiteboard marker. Press the body onto the chassis and then remove it; the ink will transfer to the resin at the exact points of contact. When you need to remove material, always use a wet sanding stick or a slow-speed Dremel. Dry sanding resin creates fine dust that is a respiratory irritant, so keeping the surface damp is a vital safety step. Ensure you leave a 1mm gap around the motor. Coreless motors used in 009 can reach temperatures of 45°C during heavy use, and they need this "breathing room" to prevent heat warping the 3D-printed shell.
Coupler and Buffer Alignment
Inconsistent coupler heights are the primary cause of mid-train uncoupling, especially when transitioning onto gradients. You should standardise your entire fleet using a dedicated height jig. If a coupler is 1mm too high, it will ride over the opposing loop on a 1-in-30 climb. Over-swing is another issue on tight 9-inch radius curves. If the coupler cannot move freely, it will act as a lever and pry the leading bogie of the following wagon off the tracks. For the best results, many modellers are now fitting the Narrow Minded Railworks Quarry Hunslet coupler. These components provide a stable, prototypical mounting point that eliminates the "droop" common with generic glue-on mounts, ensuring your stock stays coupled even on uneven permanent way.
Checking these fitment issues ensures your kit-built fleet performs as reliably as any high-end commercial model. By focusing on weight distribution and clearance, you eliminate the mechanical gremlins that often plague troubleshooting oo9 running issues in bespoke builds. Take the time to test the chassis on its own first, then add the body and re-test. If the performance drops, you know the fitment is the culprit. Small adjustments with a file or shim often make the difference between a loco that stutters and one that glides through a station throat.
Optimising Your Fleet: Upgrades for Reliable Running
Sometimes, troubleshooting oo9 running issues leads to a difficult realisation; the donor chassis you've chosen is simply not fit for purpose. Many modellers spend upwards of five hours trying to revive a 40 year old N gauge chassis, only to find the plastic gears have perished or the motor magnets have lost their strength. If a locomotive requires constant "fettling" just to complete a single circuit of your layout, it's time to stop fixing and start upgrading. Transitioning to modern Japanese engineering can transform a stuttering loco into a slow speed master.Selecting the Right Donor Chassis
The Kato 11-103 remains the gold standard for small industrial OO9 conversions. It features a 26mm wheelbase and a motor that draws less than 100mA under load, making it incredibly reliable for DCC conversions. For even smaller prototypes, the Tsugawa Power 500 series offers a tiny 15.8mm wheelbase that fits inside the tightest 3D-printed shells. When mounting these bodies, avoid using permanent adhesives immediately. A 0.5mm layer of high-tack putty or specific 3D-print mounting clips prevents motor vibrations from resonating through the plastic shell, which often causes that annoying "buzzing" sound during operation.The Narrow Minded Railworks Advantage
Our design philosophy centres on the belief that a loco should run perfectly straight out of the box. We utilise high precision 3D printing with a 0.025mm layer height, which eliminates the need for aggressive sanding or "fettling" that can warp thin sections of a kit. By prioritising internal cavity space, we've ensured there is room for at least 15g of liquid lead or tungsten putty. This extra weight is vital for maintaining electrical contact on uneven track. Explore our latest OO9 locomotive kits designed for smooth running and see how precision engineering simplifies the assembly process. A dedicated test track is your best tool for long term reliability. Don't test new builds on your main layout where dust and complex wiring can hide the root cause of a stall. Instead, build a 500mm length of Peco Streamline track on a perfectly level MDF offcut. Include a small 1 percent gradient at one end to test the locomotive's traction under load. Using a dedicated test area is the final step in troubleshooting oo9 running issues before a model earns its place on the main circuit. It allows you to isolate mechanical binds from electrical pickup problems in a controlled environment. Reliability in 009 scale isn't about luck; it's about the quality of the components you choose. Switching from a temperamental secondhand donor to a Kato 11-103 or a bespoke Narrow Minded Railworks kit reduces maintenance time by roughly 80 percent. This shift allows you to spend your time on scenery and operation rather than constantly cleaning wheels or adjusting pickups. Investing in high quality chassis and weighted kits ensures your narrow gauge railway operates with the same consistency as a larger scale layout.Master Your Narrow Gauge Fleet
Narrow gauge modelling in 1:76 scale demands extreme precision. You've seen that maintaining 100% electrical contact and checking gear mesh to within 0.1mm tolerances prevents the dreaded stutter on 9mm tracks. Whether you're adjusting a body shell or re-wheeling a chassis, troubleshooting oo9 running issues becomes a straightforward task when you use components specifically engineered for these small prototypes. We've spent over 5 years refining our 3D-printing processes to ensure every part fits your layout requirements perfectly. We know the frustration of a stalled locomotive during an exhibition or a quiet evening session. It's why our expert support team is available to help with every purchase. You can upgrade your fleet today with parts that actually work. Our kits are designed by modellers for modellers, ensuring your rolling stock handles even the most challenging gradients. We offer worldwide shipping on all 3D-printed kits, with most UK orders arriving within 3 to 5 working days. Don't let a mechanical glitch stop your progress. Browse our range of precision-engineered OO9 kits and get your railway back on track. Your miniature world deserves the highest level of reliability.
Frequently Asked Questions
Why does my OO9 loco stall on every set of points?
Stalling on points usually happens because the locomotive's short wheelbase loses contact with dead "insulfrog" sections. You can improve this by installing "live frog" (Electrofrog) points or adding a stay-alive capacitor to your DCC decoder. Since OO9 models often have only two or three axles, troubleshooting oo9 running issues frequently involves ensuring all wheels pick up power simultaneously across the 9mm gap.
How often should I clean my narrow gauge track?
You should clean your narrow gauge track every 10 to 15 hours of operation to prevent carbon build-up. In a typical 12 by 8 foot spare room environment, dust accumulates quickly, so a quick wipe with an abrasive block or Isopropyl Alcohol (IPA) is essential. Regular maintenance reduces the 20% power loss often seen on dirty small-scale rails during slow-speed shunting.
What is the best way to add weight to a 3D-printed OO9 kit?
The best way to add weight is by using 2mm tungsten putty or "liquid lead" shot secured with PVA glue. Aim for a total locomotive weight of at least 45g to 55g to ensure reliable traction and electrical contact. Most 3D-printed shells weigh less than 12g, so filling every internal cavity is vital for stable running on steep 1-in-40 gradients.
Can I use N gauge track cleaning cars for OO9?
Yes, you can use N gauge track cleaning cars because OO9 shares the same 9mm track gauge. Brands like Dapol produce motorised cleaners that fit perfectly on Peco Streamline or Setrack. Just ensure the 1:76 scale body clearances on your layout allow for the slightly wider N gauge rolling stock, which often requires 25mm of lateral clearance.
What should I do if my locomotive "waddles" while moving?
A "waddle" usually indicates that your wheel quartering is out of alignment by more than 5 degrees. Check that the crank pins on one side are exactly 90 degrees ahead of the other side. If the axles are slightly bent or the 0.4mm plastic gears are cracked, the locomotive will rock rhythmically as it travels down the line.
Is it better to use a fixed or swinging coupler in OO9?
A swinging coupler is better for layouts with tight curves under 9 inches or 228mm in radius. Fixed couplers often cause derailments when a long wagon meets a sharp bend. By allowing 6mm of lateral movement, the coupler absorbs the strain, preventing the leading wheels from being pulled off the rails during complex shunting manoeuvres.
How do I fix a short circuit in a metal-bodied kit?
Fix a short circuit by applying 0.1mm Kapton tape to the underside of the metal body where it might touch the motor terminals. Metal kits can easily bridge the electrical gap if the body shifts during operation. Ensure there's at least a 1.5mm clearance between the live wheels and the white metal splashers to prevent unwanted sparks.
What is the ideal voltage for running small narrow gauge motors?
The ideal voltage for most small OO9 coreless motors is between 6V and 9V, even though many UK controllers provide up to 12V. Running these tiny 10mm motors at a full 12V can lead to overheating and permanent damage within 20 minutes of continuous use. When troubleshooting oo9 running issues, always check that your power supply is regulated for small-scale motors.