

Your model railway scenery likely looks like a flat, lifeless carpet because you're fighting the laws of physics without a proper electrostatic circuit. It's common to feel frustrated when fibers refuse to stand upright or when the grounding clip seems to have no effect on your layout's finish. While a basic DIY applicator can be built for approximately $20, these entry-level tools often struggle with the 10mm or 12mm fibers required for wilder terrain. This static grass applicator guide provides the technical clarity you need to master realistic scenery, from selecting a device that fits your budget to perfecting pro-level layering techniques for narrow gauge dioramas.
We recognize that the wide price range for equipment, which spans from $14.99 for budget models to over $270 for professional Peco units, creates confusion for many hobbyists. We'll resolve this by comparing the performance of industry leaders like Woodland Scenics and WWScenics against your specific modeling goals. You'll learn how to secure the crocodile clip for a perfect bond and which fiber lengths accurately represent your chosen scale. This article details the exact steps to transform flat patches into vertical, museum-quality landscapes that bring your narrow gauge kits to life.
Key Takeaways
- Identify how high-voltage electrostatic charges align synthetic fibers vertically to ensure your scenery never looks flat or unrealistic.
- Select the appropriate tool for your scale, utilizing handheld hoppers for precise narrow gauge detailing or large-capacity units for expansive backgrounds.
- Master the "bottom-up" layering method by applying dead thatch fibers before adding lush greens to achieve professional, multi-toned realism.
- Use this static grass applicator guide to troubleshoot common performance issues by systematically verifying battery levels and grounding connections.
- Recognize why specialized adhesives are superior to standard PVA for maintaining the electrostatic circuit required for fibers to stand upright.
Understanding the Science: How Static Grass Applicators Work
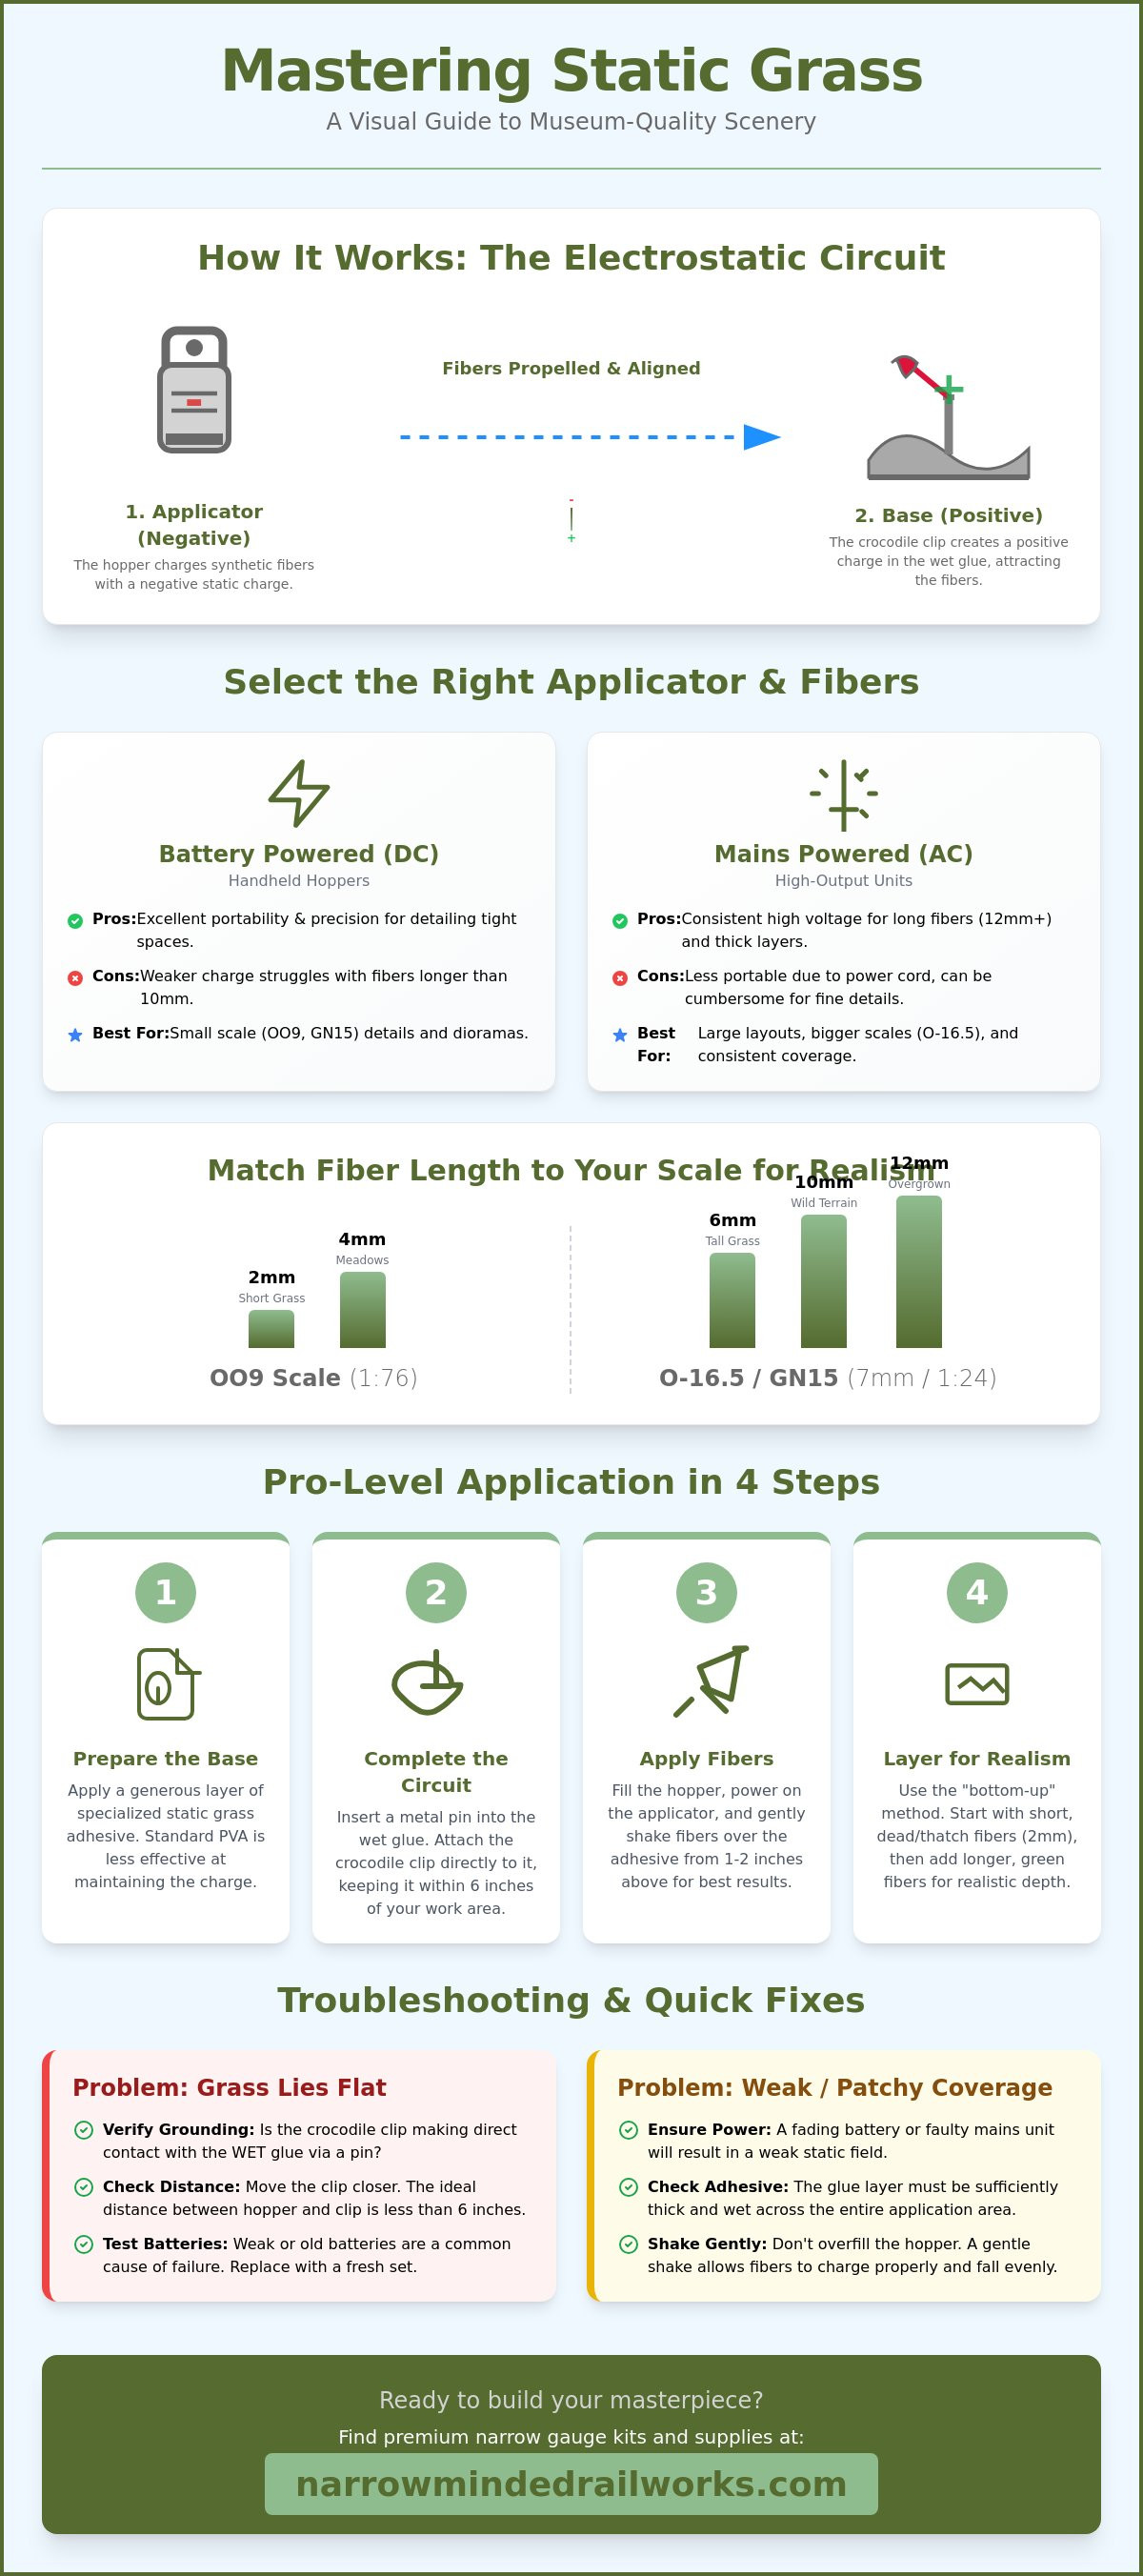
A static grass applicator is a specialized tool that uses high-voltage electrostatic charges to align synthetic fibers vertically. It functions by creating a localized electric field between the hopper and the terrain. By understanding How Flocking Works, you can see that the fibers are polarized as they pass through the metal mesh. This static grass applicator guide emphasizes that the fibers don't simply drop onto the layout; they're physically propelled toward the adhesive. This process is vital for achieving the rugged, overgrown look typical of OO9 or GN15 narrow gauge environments where tall weeds and unkempt sidings are common.
Handling high-voltage equipment requires a basic understanding of safety. While the amperage is low enough to be non-lethal for most hobbyists, the shock is uncomfortable and can startle you into dropping your equipment. We suggest avoiding contact with the metal mesh when the power is on. If you have a pacemaker, consult a medical professional before use, as the electromagnetic field can interfere with such devices. Keeping your workspace dry and using insulated tools are proactive steps to maintain a safe modeling environment while you build your diorama.
To better understand this concept, watch this helpful video:
The Role of the Crocodile Clip
The crocodile clip is often misunderstood as a traditional "earth" or ground. In reality, it acts as the positive terminal of the circuit. If you fail to connect this clip to your wet adhesive, the electrostatic bond won't form, and your grass will lie flat. We recommend inserting a small metal pin into the scenery base and attaching the clip to it. Ensure the pin makes direct contact with the wet glue. A common constraint is a weak charge over large areas, but you can solve this by moving the pin as you work across the layout to keep the distance between the hopper and the clip under six inches. This maintains the intensity of the field and ensures your fibers stand at a perfect 90-degree angle.
DC vs. AC Powered Applicators
Selecting the right power source depends on the scale of your project and the length of the fibers you intend to use. Battery-operated units provide the portability needed for detailing small OO9 locomotive and wagon kits within tight spaces. However, 9V batteries often lack the voltage required to stand up the 12mm fibers used in larger O-16.5 / 7mm scale kits. Mains-powered units offer a constant, high-output performance that handles thick layering with ease. If you're working on a large layout background, the constraint of a fading battery will ruin the consistency of your grass. A proactive solution is to use a mains-powered unit for bulk work and save the handheld battery hoppers for precision detailing around delicate scenery kits.
Selecting Your Equipment and Grass Fibres
Selecting the right tool is the first hurdle in this static grass applicator guide. Handheld hoppers are the superior choice for precision work around a narrow gauge railway scene. These smaller units allow you to navigate the tight clearances of an OO9 locomotive shed or a GN15 industrial siding without disturbing existing structures. Large capacity units exist for expansive layout backgrounds, but they lack the maneuverability required for detailed diorama work. If you find a large unit too cumbersome for small scenes, a handheld hopper offers the control needed for delicate placement.
Realism depends heavily on matching fiber length to your modeling scale. In OO9 scale (1:76), 2mm and 4mm fibers are your primary tools. They represent well-maintained embankments or short meadow grass perfectly. For GN15 (1:24) or O-16.5 (7mm) scale kits, you should utilize 6mm and 10mm fibers to maintain correct proportions. Using fibers that are too short for larger scales results in a "velvet" look that lacks depth. We suggest mixing lengths to create a layered undergrowth effect. Start with a base of 2mm "dead" fibers before adding taller, vibrant strands to mimic the wild, rural nature of narrow gauge lines.
Nature is rarely a uniform shade of emerald green. Relying on a single color creates a toy-like appearance that detracts from your high-quality diorama tools and scenery. Professional modellers blend at least three shades. Use beige or brown for the "thatch" layer, a mid-green for the bulk, and a bright lime for new growth or highlights. This variety breaks up the visual plane and adds the complexity seen in real-world landscapes.
Choosing Lengths for Narrow Gauge Scales
The proportions of your scenery must align with your locomotive kits. While 12mm fibers create impressive "wild reeds" in 7mm scale, they'll look like giant beanstalks in OO9. We recommend a "bottom-up" approach for narrow gauge rural lines. By starting with a foundation of 1mm "moss" fibers and layering up to 4mm or 6mm, you simulate the dense, tangled undergrowth found along neglected trackbeds. This method ensures your scenery doesn't dwarf your rolling stock.
Hopper Mesh Sizes
Your choice of mesh head dictates the flow and charge of the fibers. Fine mesh is designed for 1mm to 2mm fibers to prevent clumped "tufts" from ruining the finish. Conversely, 6mm or 10mm fibers require a coarse mesh to allow the strands to pass through while receiving a full electrostatic charge. Many budget applicators lack interchangeable heads, which limits your creative options. A versatile applicator with multiple heads ensures you can switch between textures without the frustration of a clogged hopper.
The Step-by-Step Application Process
Successful application starts long before you power up the device. A common constraint is the appearance of white plaster through the grass, which ruins the illusion of depth. You can solve this by painting your base with a dark "earth" acrylic or matte brown emulsion before applying any fibers. Once the paint is dry, apply a specialized static grass adhesive. While standard PVA is accessible, it often skins too quickly. This breaks the electrostatic circuit described earlier in this static grass applicator guide and results in flat, lifeless textures.
Hold the applicator 2cm to 5cm above the layout surface. This distance is the "sweet spot" for most handheld units to maintain a strong charge. Gently shake the device to release the fibers through the mesh. You'll see them stand up instantly as they strike the wet glue. If the coverage looks sparse, don't attempt to fix it with one heavy coat. Once the glue is fully cured, use a vacuum with a fine mesh or stocking over the nozzle to reclaim excess fibers. This proactive step saves material and pulls any leaning fibers into a vertical position.
Protecting 3D Printed Scenery
Static fibers are notorious for clinging to resin surfaces due to residual static electricity. When painting 3d printed models, ensure you mask off delicate loco bodies, wagons, or buildings with low-tack tape before grassing nearby. Stray fibers in narrow gauge track flangeways are a particular nuisance that can cause derailments for lightweight OO9 or GN15 rolling stock. A small, stiff brush is the best tool for clearing these paths while the adhesive is still tacky. If you wait until the glue is dry, you'll find it much harder to remove these obstructions without damaging the surrounding scenery.
Adhesive Mastery
Managing glue conductivity is a frequent challenge for modellers. If you apply adhesive to the entire layout at once, the surface will dry before you finish, and the fibers won't stand up. We recommend working in small 10x10cm sections to ensure the glue remains wet and conductive. For the initial base layer, use the glue at full strength for maximum grip. If you're adding fine "moss" layers on top of existing grass, a light spray of diluted adhesive works best. This ensures the static grass applicator guide principles of a closed circuit remain effective even through multiple layers of terrain.
Advanced Layering for Natural Realism
A common constraint in model landscaping is the "flat" look caused by applying a single, uniform layer of green fibers. You can solve this by adopting a multi-stage "Bottom-Up" approach that mimics the natural lifecycle of wild vegetation. Start by applying a foundation of dead grass or thatch using 1mm or 2mm beige and brown fibers. This initial layer provides the organic depth seen at the base of real-world meadows. Once this base is secure, you can introduce your "Lush" layer. Instead of a total coat, apply vibrant greens in irregular patches to simulate areas of high moisture or active growth. This static grass applicator guide encourages modellers to avoid symmetry, as nature is fundamentally chaotic.
Highlighting is the final step in achieving professional-level realism. Use longer 6mm or 10mm fibers in a pale straw or light green shade to represent sun-bleached tips or seed heads. These taller strands should be concentrated in areas that would naturally catch more light, such as the crests of embankments. To move beyond the applicator and add true 3D depth, integrate pre-made tufts and shrubs into your scenes. This variety of textures breaks up the visual plane and creates a museum-quality finish for your layouts. For the best results, browse our range of diorama tools and scenery to find the perfect materials for your next project.
Creating Depth in Narrow Gauge Dioramas
Scale-appropriate layering is particularly vital for GN15 scale layouts where the larger proportions make scenery flaws more obvious. You can achieve a convincingly overgrown track bed by using "spot-gluing." Apply small dots of adhesive between the sleepers and use your applicator to create tall, isolated weeds that look as though they are reclaiming the line. For added detail, try the "mist and scatter" technique. Lightly mist the tops of your dry grass with a fine adhesive spray and scatter colorful foam flocks to create wildflower accents. This method adds a splash of color without overwhelming the delicate proportions of your narrow gauge scene.
The Verticality Test
It is difficult to judge the success of your application under standard overhead room lighting. You can solve this by using a low-angle light source to perform a verticality test. Place a light at the edge of your layout so the beam skims across the surface of the grass. This technique highlights the shadows of every individual strand, making it easy to identify "flat" spots where the electrostatic bond failed. If you catch these areas before the glue sets, a quick pass with the applicator can often pull the fibers upright. Placing a simple LED torch at a low angle reveals scenery flaws that are otherwise invisible to the naked eye.
Troubleshooting and Equipment Maintenance
Every modeller eventually faces a session where the fibers refuse to stand, regardless of how much they shake the hopper. While equipment malfunctions are frustrating, most issues stem from simple environmental factors or interrupted circuits. This static grass applicator guide prioritizes a proactive approach to maintenance to ensure your tools remain as reliable as your OO9 locomotive and wagon kits. By identifying the specific point of failure, you can implement a quick fix and return to building your narrow gauge landscape without wasting expensive scenery materials.
A common constraint is a weak electrostatic charge that fails to lift 6mm or 10mm fibers. You can solve this by verifying your power source first. Standard 9V alkaline batteries often lose the necessary voltage for high-end applicators long before they are fully drained. If your fibers are drooping, try a fresh battery or switch to a mains-powered unit for consistent output. Additionally, check the crocodile clip for oxidation or dried glue. Even a small layer of residue on the clip acts as an insulator, which breaks the circuit and prevents the fibers from polarizing correctly.
Humidity is the silent enemy of realistic scenery. When the air is too damp, static fibers absorb microscopic amounts of moisture, causing them to clump together in the hopper. If you notice "tufts" falling instead of individual strands, your fibers likely need drying. You can solve this by placing your grass bags in a sealed container with desiccant packets or using a hairdryer on a low, cool setting to gently move the air around the fibers before loading the applicator. Keeping your workspace at a stable temperature prevents these clumping issues from ruining the fine detail on your GN15 locomotive and scenery kits.
Common Electrical Failures
Budget applicators often suffer from broken internal wires caused by the vibration of regular use. If your unit powers on but produces no results, you may have a loose connection between the high-voltage generator and the metal mesh. You can verify your unit is generating voltage by performing a "spark test." With the power on, carefully bring the crocodile clip within 1cm of the hopper mesh using an insulated tool. A visible blue spark confirms the electronics are functioning. If no spark appears, the internal soldering has likely failed, and the unit will require a professional repair or replacement to restore the electrostatic field.
Hopper Hygiene
Residual "static cling" inside the hopper walls prevents fibers from flowing smoothly through the mesh. After each session, use a soft, dry brush or a dedicated anti-static cloth to wipe down the interior surfaces. We suggest avoiding wet wipes, as any lingering moisture will cause future clumping. Cleaning the mesh is equally vital. Use a stiff toothbrush to remove trapped fibers that can block the charge. For safe storage, always remove the batteries to prevent leakage and keep the device in a padded case. This protects the delicate mesh from being bent, ensuring your static grass applicator guide techniques remain effective for years of layout building.
Transform Your Model Landscapes Today
While achieving a museum-quality finish on narrow gauge sidings can feel daunting, you can solve this by applying the technical principles of vertical fiber alignment and multi-toned layering. We've explored how proper grounding of the crocodile clip and selecting the correct power source prevents the common issue of flat grass. By following this static grass applicator guide, you can now confidently select fiber lengths from 2mm to 12mm to match the specific proportions of your layout. These small adjustments to your technique will transform static dioramas into vibrant, realistic environments that showcase your modeling skills.
If you're ready to take your scenery to the next level, enhance your layout with our range of narrow gauge kits and diorama tools. We offer expertly designed 3D printed kits and provide specialist support for OO9 and GN15 modellers. With worldwide shipping from the UK, we ensure you have access to the best materials regardless of your location. Your path to professional results is clear; it's time to start building the landscape your models deserve.
Frequently Asked Questions
Do I really need a static grass applicator, or is hand-scattering enough?
You definitely need an applicator if you want fibers to stand vertically. While hand-scattering works for fine ground foam or flock, it fails to provide the electrostatic charge required to lift synthetic fibers. You can solve this by following a static grass applicator guide to ensure your scenery doesn't look like a flat, matted carpet. This tool is the only way to achieve the realistic, upright textures seen on professional narrow gauge layouts.
Can I make my own static grass applicator from an electronic fly swatter?
You can build a basic unit using a fly swatter circuit, but these DIY tools often lack sufficient voltage. While they work for 2mm fibers, they usually struggle to lift the 6mm or 10mm strands used in GN15 scale scenes. You can solve this by investing in a dedicated commercial unit that provides a consistent, high-output charge. Professional tools offer better safety features and more reliable results for long-term layout building.
Why does my static grass keep falling over after it dries?
Fibers typically fall because the adhesive "skinned" over and lost its conductivity before the grass was applied. While standard PVA is a common choice, it often dries too quickly to maintain the electrostatic circuit. You can solve this by working in small 10x10cm sections and using specialized static grass glue. This ensures the fibers remain polarized and upright until the adhesive fully cures and locks them into position.
Is the shock from a static grass applicator dangerous?
The static discharge is generally not dangerous for healthy adults, but it can be quite startling. While the amperage is very low, the high voltage produces a sharp "snap" if you touch the mesh during operation. You can solve this by keeping your fingers away from the energized hopper and ensuring the unit is switched off before refilling. Individuals with pacemakers or other medical devices should consult a doctor before using these electronic tools.
What is the best glue to use for static grass?
Specialized static grass adhesives are the superior choice because they are formulated to stay "open" and conductive for longer periods. While wood glue is accessible, its high solids content can create an insulating barrier that ruins the electrostatic effect. You can solve this by selecting a dedicated scenery adhesive that allows for a stronger bond. This static grass applicator guide recommends avoiding cheap school glues that lack the strength to hold tall fibers upright.
How do I get static grass out of my model locomotive's gears?
You should use a vacuum with a fine mesh covering or a small, stiff-bristled brush to gently extract stray fibers. While these strands are lightweight, they can cause significant friction if they enter the moving parts of your OO9 or GN15 locomotive kits. You can solve this by masking off your track and locomotive chassis with low-tack tape before you begin. Taking this proactive step prevents fibers from migrating into sensitive mechanical areas during the application process.
Can I layer static grass on top of existing grass?
Layering is the best way to create realistic depth, but the second layer requires a new conductive surface. While the first layer looks good, it acts as an insulator once dry, which prevents new fibers from standing up. You can solve this by lightly misting the area with a layering spray or diluted adhesive. This reconnects the electrostatic circuit, allowing you to add taller highlights or dead thatch over your base greenery.
How much static grass do I need for a 4x2 foot layout?
A layout of this size typically requires between 100g and 150g of fibers for full coverage. While this depends on the density of your vegetation, it's always better to have a surplus to allow for blending different colors. You can solve the problem of uniform scenery by purchasing several 20g bags in varying lengths and shades. This variety ensures you can create the complex, overgrown look typical of rural narrow gauge lines.