

You’ve found the perfect OO9 locomotive kit, a beautiful prototype you can't wait to bring to life on your layout. But then comes the daunting part: choosing the right chassis. Staring at a sea of N gauge mechanisms, trying to decipher technical terms like 'wheelbase' and 'scale', can quickly turn excitement into anxiety. The fear of spending your hard-earned cash on a chassis that simply won’t fit is a common hurdle for many modellers. This is precisely why we've created the ultimate oo9 chassis guide - to remove the guesswork and get you building with confidence.
In this comprehensive article, we will walk you through the most popular and reliable ready-to-run chassis options available right here in the UK. You'll learn the simple steps to measure your kit and match its dimensions perfectly to a mechanism, understand which models offer the best performance, and know exactly where to look for them. Our goal is to empower you to make an informed choice, ensuring your next narrow gauge project results in a stunning model that runs as smoothly as it deserves.
Key Takeaways
- Understand that OO9 uses N gauge (9mm) track, allowing you to power your kits with reliable, mass-produced chassis.
- Identify the most popular ready-to-run chassis that experienced modellers recommend for straightforward conversions and reliability.
- Master the essential measurements needed to match a chassis to your kit with our comprehensive oo9 chassis guide.
- Gain the confidence to make simple chassis modifications, a common and achievable step in building your perfect locomotive.
Understanding the Foundation: What is an OO9 Chassis?
Welcome to the first section of your essential oo9 chassis guide. At its heart, OO9 modelling is a clever blend of two popular scales. It involves running 4mm to the foot (OO scale) models of narrow-gauge prototypes on 9mm wide track. For a detailed background, this article on Understanding OO9 Scale is an excellent resource. This 9mm track gauge is identical to that used by N gauge models, and this simple fact is the key that unlocks a world of possibilities for narrow-gauge modellers.
To see how a ready-to-run chassis is used to build a locomotive kit, this video provides a fantastic visual overview:
Instead of scratch-building a complex and temperamental mechanism, modellers can use a reliable, mass-produced N gauge chassis to power their OO9 locomotive kits. This is known as the 'donor chassis' concept-you are taking the powerful and smooth-running mechanism from one model to use with the body of another. Every chassis, whether a donor or purpose-built, consists of the same key components: a motor to provide power, gears to transfer it, wheels to grip the rails, and a frame holding it all together.
Key Terminology for Beginners
Getting to grips with a few key terms will make selecting a chassis much easier:
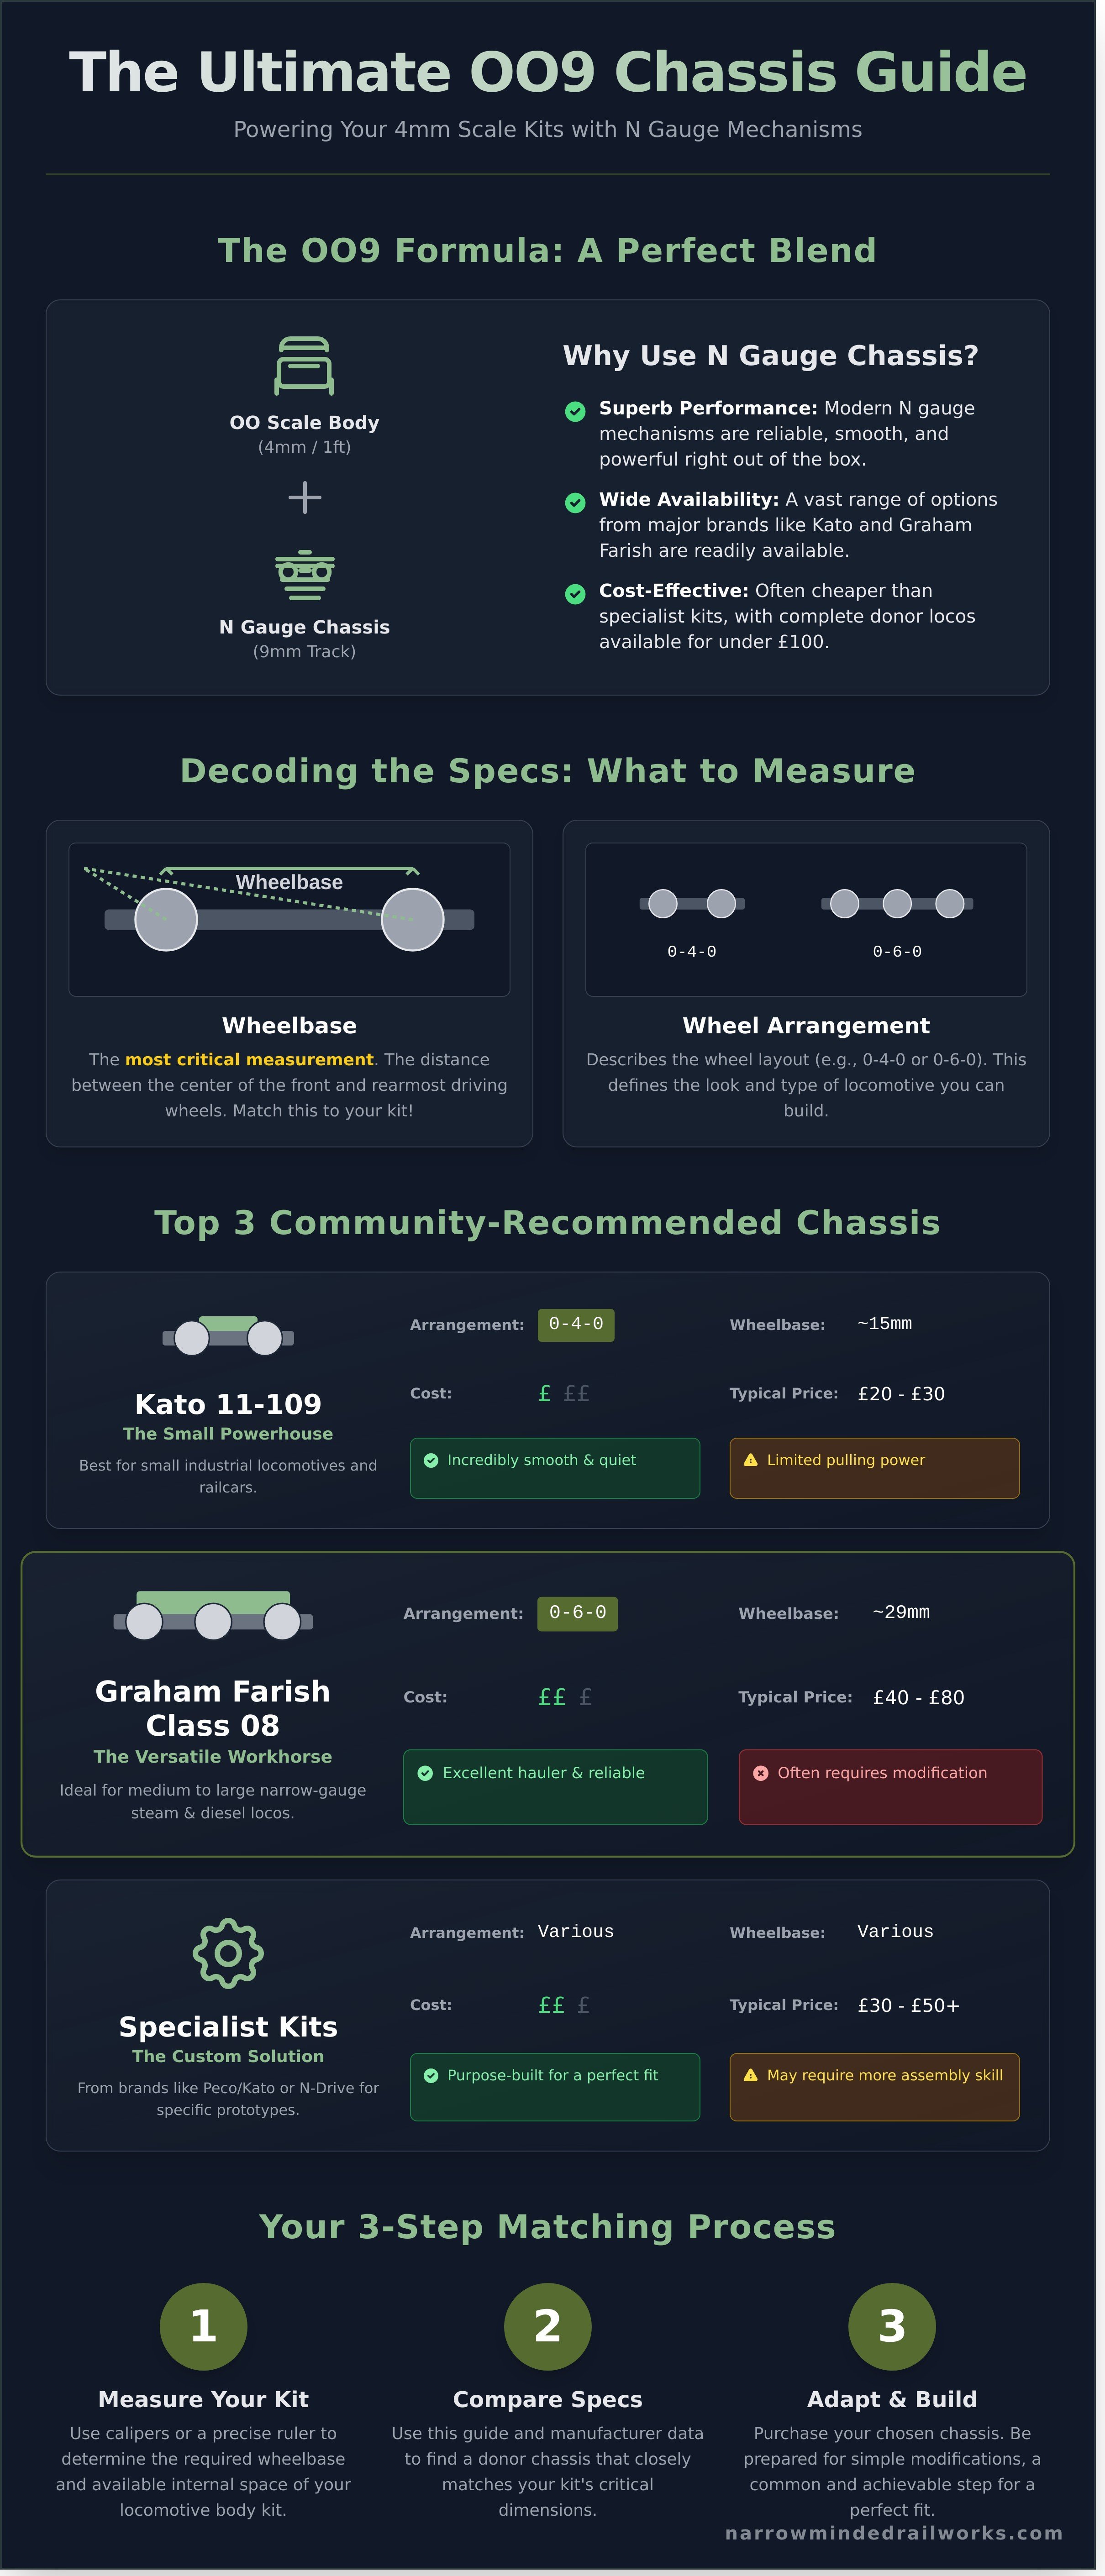
- Wheelbase: This is the distance between the centre of the front and rearmost driving wheels. It is the single most critical measurement you need to match between your chosen chassis and the body kit you intend to use.
- Wheel Arrangement: Using the Whyte notation system, this describes the wheel layout. An 0-4-0 has zero leading, four powered driving, and zero trailing wheels. An 0-6-0 has six driving wheels.
- Inside vs. Outside Frames: This describes whether the main structural frames of the chassis are located inside or outside the wheels. It's a key visual feature that you'll want to match to the prototype locomotive.
- DCC Ready vs. DCC Fitted: A 'DCC Ready' chassis has a socket to easily plug in a digital chip for Digital Command Control. 'DCC Fitted' means it already has the chip installed.
Why N Gauge is the Go-To for OO9
Using N gauge mechanisms as a foundation for OO9 projects has become standard practice for several compelling reasons. Firstly, the availability is vast. Major brands like Graham Farish and Kato produce a wide variety of reliable locomotives, offering numerous wheelbase and wheel arrangement options. Secondly, the quality of modern N gauge mechanisms is outstanding, providing smooth, quiet, and powerful performance straight from the box. Finally, it's incredibly cost-effective. A complete, brand-new N gauge locomotive can often be found for under £100, providing a superb chassis for significantly less than many specialist, hard-to-build OO9 kits.
The Top 3 Most Popular Chassis for OO9 Conversions
Choosing the right chassis is the foundation of any successful OO9 locomotive conversion. While countless N gauge models can be adapted, a few stand out as firm favourites within the modelling community. This section of our oo9 chassis guide focuses on the three most recommended options, selected for their superb reliability, ease of conversion, and widespread availability. The choices we'll explore are widely endorsed, and you can often find detailed conversion guides and support through The 009 Society resources. We'll examine the pros, cons, and ideal applications for each.
| Model | Wheelbase | Drive Type | Typical Cost (Donor) |
|---|---|---|---|
| Kato 11-109 (or similar) | 15mm (approx) | 0-4-0 | £20 - £30 |
| Graham Farish Class 08 | 29mm (approx) | 0-6-0 | £40 - £80 |
| Peco/Kato or N-Drive | Various | Various (0-4-0/0-6-0) | £30 - £50+ |
The Kato 11-109 (and variants): The Small Powerhouse
Renowned for its incredibly smooth, quiet, and reliable performance straight out of the box, the Kato 11-109 (and its siblings like the 11-105/106/107) is the go-to chassis for small industrial locomotives. Its very short 0-4-0 wheelbase is perfect for freelance quarry engines or models of small prototypes. While its performance is excellent, its main drawback is its light weight, which can limit pulling power. Most modellers add liquid lead or other weights inside the locomotive body to improve traction. It forms the basis for many popular kits, including several from the Narrow Minded Railworks range.
The Graham Farish Class 08 Shunter: The Versatile Workhorse
For medium-sized locomotives, the Graham Farish Class 08 chassis is a superb choice. Its 0-6-0 wheelbase, excellent slow-speed control, and impressive pulling power make it suitable for larger tank engines or small tender locomotives. The key consideration is its width; the chassis block often needs to be milled or filed down to fit inside the narrower confines of a typical OO9 body shell. Despite this required work, its robust mechanism and availability, both new and second-hand from online marketplaces, make it a hugely popular and versatile option.
The Peco/Kato 'Kato-Chassis' & N-Drive Chassis
If you prefer to avoid modifying a donor locomotive, specialist chassis are an excellent alternative. Products like the Peco/Kato "Kato-Chassis" or dedicated units from N-Drive are designed specifically for kit builders. They are supplied as 'bare' motorised units in a variety of wheelbase configurations, ready to have a body fitted with minimal fuss. While they are often more expensive than a second-hand donor model, they save a significant amount of time and effort, making them a fantastic choice for getting a project running quickly and reliably.
How to Perfectly Match a Chassis to Your Loco Kit
Selecting the right chassis is the most critical step in any locomotive kit build. The golden rule is simple but essential: measure twice, buy once. A few millimetres can be the difference between a smooth-running model and a frustrating, non-functional paperweight. While many high-quality kits recommend a specific ready-to-run (RTR) chassis from manufacturers like Kato or Bachmann, you may want to use an alternative or find your kit lacks a suggestion. This part of our oo9 chassis guide will walk you through the process of ensuring a perfect fit.
Essential Measurements and How to Take Them
Before you even browse for a chassis, grab a set of digital calipers. Accuracy is key. Focus on these three critical dimensions of your locomotive body shell:
- Wheelbase: Measure the distance from the centre of the front wheel arch to the centre of the rearmost wheel arch on your kit. This must match the chassis's axle-to-axle measurement for the wheels to align correctly.
- Internal Length & Width: Don't just measure the overall external size. You need to identify the narrowest and shortest points inside the body shell where the chassis block will sit. Account for any interior detailing or strengthening ribs that might get in the way.
- Ride Height: Check the height from the bottom of the bodyshell to the centre of the buffer beams. You'll need to compare this with the chassis's frame height and wheel diameter to ensure your couplings will align with your rolling stock.
Reading a Chassis Specification Sheet
Reputable sellers provide key dimensions for the chassis they sell. When comparing these specs to your measurements, pay close attention to the details. A typical spec sheet might look like this:
- Wheelbase: 24.5mm
- Length over Frame: 48mm
- Width over Frame: 8.5mm
- Wheel Diameter: 7mm
Cross-reference these against your notes. A potential red flag is a large, exposed flywheel on the motor. While excellent for smooth running, it can easily foul the inside of a boiler or cab interior on a small narrow-gauge loco. For more in-depth technical information on standards and modifications, resources like the Peco technical guides can be an invaluable reference point for any serious modeller.
Common Pitfalls to Avoid
Even with careful measurement, small oversights can cause big problems. Watch out for these common issues:
- Internal Obstructions: 3D printed bodies can have internal support structures or thick walls that aren't immediately obvious. Always inspect the inside of the shell carefully.
- Forgetting "Extra" Space: A chassis might fit perfectly, but will there be room for DCC decoder wires, a speaker, or lighting? Always allow a little extra wiggle room.
- Weight Mismatch: A very lightweight chassis may struggle to pull a long rake of whitemetal wagons. Consider if the chassis has space to add extra weight if needed for better traction.
Feeling confident in your ability to choose the right foundation for your model? Browse our OO9 Loco Kits to find your next exciting project.
Beyond the Basics: Adapting and Modifying Your Chassis
One of the most rewarding aspects of OO9 modelling is creating something unique. This often involves modifying a ready-to-run chassis to fit a specific kit or body shell. Don't be intimidated; this is a normal part of the process, and most adjustments are surprisingly straightforward. The key is to work slowly and carefully, removing only a little material at a time.
You only need a few basic tools to get started:
- A set of small needle files (flat and round are essential)
- A sharp craft knife or scalpel
- A fine-toothed razor saw
Always prioritise safety: wear eye protection when cutting or filing metal, and work in a well-lit area. Remember the golden rule: you can always take more off, but you can't put it back on!
Trimming the Chassis Block for a Better Fit
Many OO9 body kits are designed to fit over a specific N gauge chassis, but sometimes the metal chassis block is slightly too long or too tall. Using a razor saw or a coarse file, you can carefully trim the ends of the block. If the body sits too high, you may need to file down the top surface of the chassis. Be extremely careful to avoid the motor, gear towers, and any electrical pickups. It's often wise to temporarily remove the plastic keeper plate and wheels to get better access and prevent damage.
Adding Weight for Improved Performance
OO9 locomotives are tiny, and a lightweight chassis will struggle to pull more than one or two wagons without its wheels slipping. Adding weight is crucial for improving traction and ensuring reliable running. Materials like lead shot, car tyre weights, or dedicated products like Deluxe Materials' 'Liquid Gravity' are perfect. Find empty spaces inside the loco body-such as the smokebox, boiler, or side tanks-and glue the weight in place with PVA or epoxy, ensuring it doesn't foul the motor or wheels.
Changing Couplings and Buffer Beams
The standard N gauge 'Rapido' couplings on donor chassis are often oversized for OO9 and need to be removed. They can usually be unclipped or carefully cut away from the bogie. You can then fit more appropriate OO9 couplings (such as Greenwich or Peco) to either the loco body or a new buffer beam attached to the chassis. This is a vital step in any oo9 chassis guide, as checking the final coupling height against your wagons with a gauge is essential for smooth operation.
For custom components or further advice on your build, explore the range of kits and parts at Narrow Minded Railworks.
Your OO9 Masterpiece Awaits
Building a superb OO9 locomotive truly starts from the wheels up. As we've explored, understanding that the chassis is the critical foundation, selecting a reliable option like a Kato or Tomytec, and knowing how to perfectly match it to your kit's dimensions are the keys to a smooth-running, satisfying model. We hope this oo9 chassis guide has demystified the process and given you the confidence to tackle your next project.
Now that you're armed with chassis knowledge, the exciting part begins: choosing a body to bring to life. At Narrow Minded Railworks, we specialise in unique 3D printed designs you won't find anywhere else. Our kits are expertly designed to fit the popular and reliable chassis you’ve just learned about, taking the guesswork out of your build. With worldwide shipping available for all our model railway kits, your next narrow-gauge project is closer than you think.
Ready to get building? Find the perfect loco kit for your chosen chassis in our OO9 collection. There's nothing more rewarding than watching a locomotive you've built yourself glide down the track. Happy modelling!
Frequently Asked Questions about OO9 Chassis
Can I use a Z gauge chassis for OO9 modelling?
No, a Z gauge chassis is not suitable for OO9. OO9 models run on 9mm gauge track, which is the same as N gauge. Z gauge, however, uses a much narrower 6.5mm track gauge. While both are small scales, the fundamental difference in wheel spacing means a Z gauge chassis will not run on OO9 track. For OO9 projects, you should always look for an N gauge donor chassis as the starting point for your model.
What is the difference between a chassis and a bogie?
A chassis is the entire motorised underframe of a locomotive, containing the motor, gears, and wheels that provide power and motion. In contrast, a bogie is a smaller, pivoting wheeled truck found under longer vehicles like coaches or diesel locomotives. While some locomotives use a rigid chassis, others are built with two powered bogies, each with its own set of wheels and sometimes its own motor, to navigate curves more effectively.
Do I need a DCC-ready chassis if I only use DC control?
No, a DCC-ready chassis is not essential for DC (analogue) operation. Any DCC-ready chassis will run perfectly well on a traditional DC layout right out of the box. The "DCC-ready" label simply means it has a socket for easy installation of a digital decoder later. If you are confident you will stick with DC control, a standard non-DCC model is perfectly fine and can sometimes be a little cheaper.
Where is the best place to buy second-hand donor chassis?
In the UK, the best places to find second-hand donor chassis are model railway exhibitions and swapmeets, where you can often inspect the item before buying. Online, various model railway marketplaces and auction sites can be good sources, though it's always wise to check seller reviews and item descriptions carefully. Specialist second-hand model railway retailers, both online and on the high street, are also excellent sources as they often test the running quality of their stock before listing it for sale.
How do I fix a chassis to the 3D printed body kit?
The method depends on the kit's design. Many kits are designed to be a simple clip-fit or are secured with small screws that either come with the kit or the donor chassis. For a more permanent bond, a strong adhesive like two-part epoxy resin is recommended. Always perform a 'dry run' to test the fit and ensure the body sits level and the wheels turn freely before applying any glue or final fixings.
Are there any ready-to-run OO9 chassis available?
Yes, while bespoke ready-to-run OO9 chassis are rare, many modellers adapt ready-to-run N gauge chassis. Japanese manufacturers like Kato and Tomytec produce a wide variety of excellent-running, compact chassis that are very popular for OO9 conversions. This oo9 chassis guide recommends these as a great starting point, and UK suppliers often import the most suitable models for narrow gauge projects, saving you the trouble of sourcing them from abroad.