

There's nothing more disheartening than watching a beautifully detailed 3D printed signal box separate at the seams, or seeing fine rivet details vanish under a messy blob of the wrong adhesive. You've spent hours meticulously printing and countless pounds on high-quality resin or PLA, only for the final assembly to be plagued by weak joints, stringy residue, or that dreaded white ‘frosting’ from a superglue that just isn’t up to the job. It’s a common frustration that can turn a rewarding project into a delicate disaster waiting to happen on your layout.
Fear not, because achieving a flawless, robust build is easier than you think once you have the right tool for the job. This guide is your definitive resource for finding the best glue for 3d printed models, tailored specifically for the unique demands of the railway modeller. We’ll delve into the top choices for bonding both resin and PLA, sharing expert tips to create incredibly strong, clean, and permanent bonds. Get ready to assemble your next kit with absolute confidence and achieve the professional finish your models deserve.
Key Takeaways
- Always match your adhesive to the plastic type; the right glue for resin is often different from what you need for PLA parts.
- Finding the best glue for 3d printed models means learning the specific jobs for which super glue, two-part epoxy, and solvent cements are best suited.
- Achieve flawless, permanent bonds by following a simple preparation workflow, as surface cleaning and test-fitting are crucial for a strong join.
- Learn to easily fix common mishaps like foggy residue from super glue or weak joints with our simple troubleshooting tips for a professional finish.
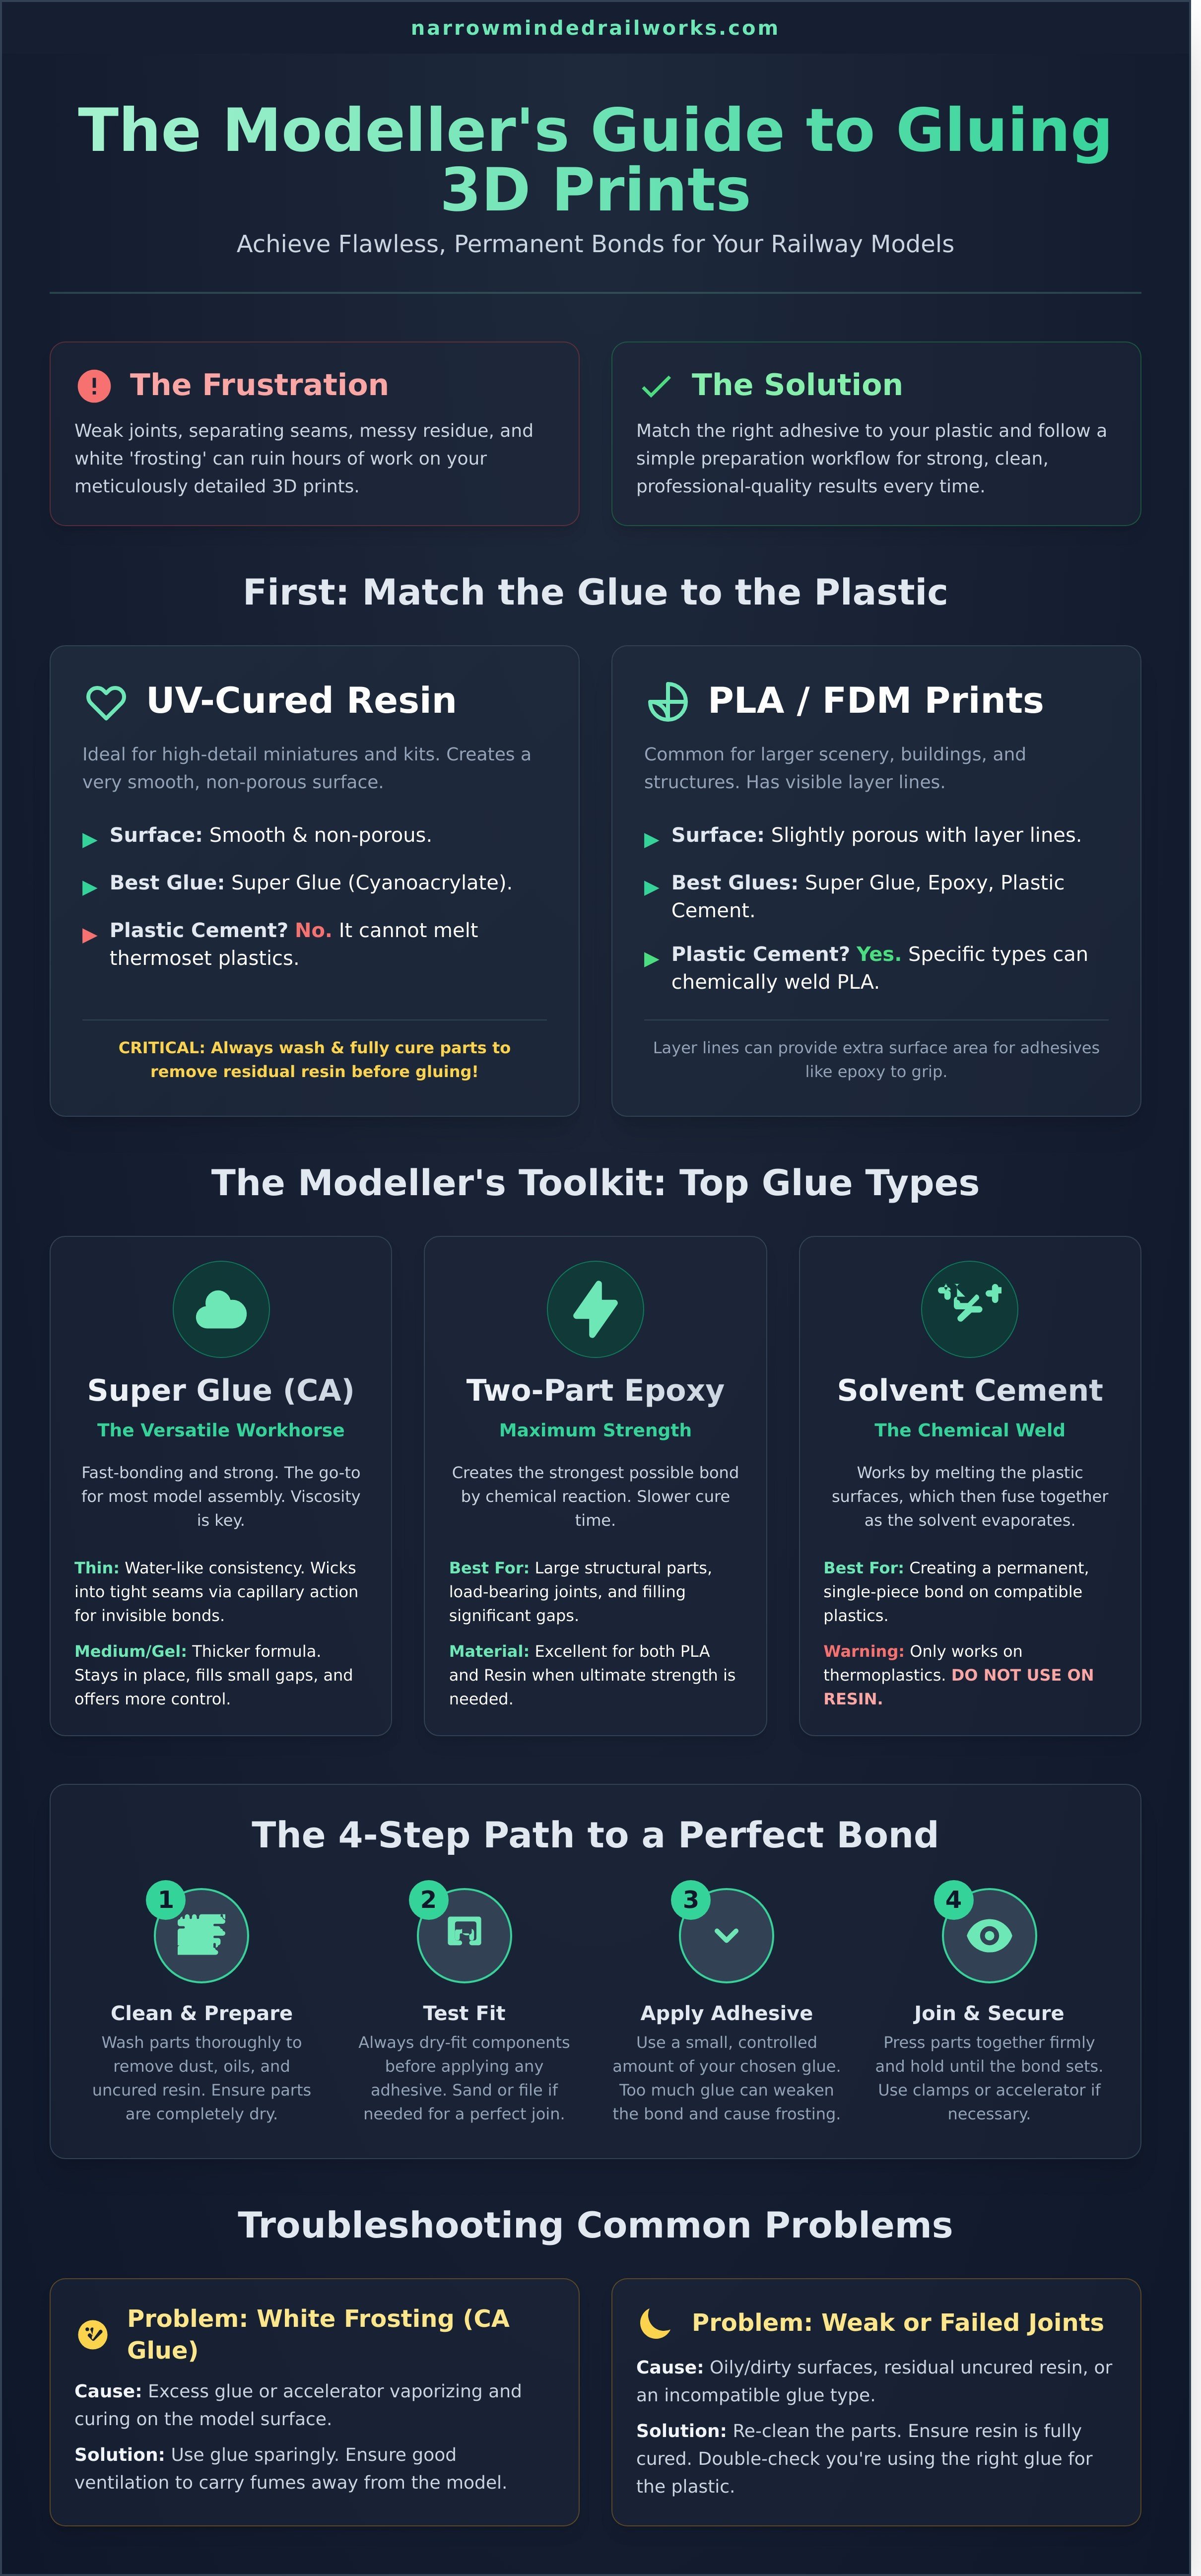
First, Match the Glue to the Plastic: Resin vs. PLA
Before you even think about brands or applicators, the first step in finding the best glue for 3d printed models is to identify the plastic you're working with. Different materials have vastly different chemical properties, which dictates how they can be bonded. The secret to a strong, permanent bond lies in understanding how different types of adhesives interact with specific plastics. For hobbyists and modellers, this usually comes down to two main players: UV-cured resin and PLA.
To see these concepts in action, this video provides an excellent overview of the options available.
Most high-detail kits and miniatures are printed from UV-cured resin, while larger scenery pieces or simpler hobbyist prints are often made from PLA filament. Here’s a quick comparison to help you choose the right approach:
| Property | UV-Cured Resin | PLA (FDM Prints) |
|---|---|---|
| Surface Texture | Very smooth, non-porous | Slightly porous, visible layer lines |
| Primary Glue Type | Super Glue (Cyanoacrylate) | Super Glue, Epoxy, Plastic Cement |
| Plastic Cement Works? | No (it's a thermoset plastic) | Yes (specific types can weld it) |
Gluing UV-Cured Resin Prints (The Modeller's Choice)
High-detail miniatures, like the ones we specialise in, are almost always printed from UV-cured resin. This material creates an incredibly smooth, non-porous surface. Because of this, traditional plastic cements that work by melting and fusing plastic have no effect. Your go-to adhesive here is a high-quality super glue (Cyanoacrylate or 'CA' glue). Crucially, always wash and fully cure your resin parts before gluing to remove any residual liquid resin, which will prevent any adhesive from bonding properly.
Gluing FDM/PLA Prints (Common for Scenery & Structures)
PLA (Polylactic Acid) is a thermoplastic commonly used in FDM (Fused Deposition Modeling) printers, perfect for larger items like terrain, buildings, or simpler props. While super glue is still an excellent and reliable choice for PLA, its slightly more porous nature opens up other options. Some specific solvent-based plastic cements can chemically weld PLA parts together for an exceptionally strong bond. The visible layer lines inherent to FDM printing can also provide extra surface area, giving adhesives like two-part epoxy more to grip onto.
The Modeller's Toolkit: Top Glue Types Compared
Walk into any hobby shop in the UK, and you'll be faced with a wall of adhesives. The secret isn't finding one magic bottle, but understanding which glue to use for which task. The best glue for 3d printed models often depends entirely on the part you're working on. A truly prepared modeller will have at least two of the following types on their workbench for maximum versatility.
Cyanoacrylate (CA / Super Glue): The Versatile Workhorse
Cyanoacrylate, commonly known as super glue, is the fast-bonding adhesive most people reach for first. It creates a strong, rapid bond by reacting with moisture in the air. However, not all CA glues are created equal; their viscosity (thickness) is key.
- Thin CA: This water-like glue is perfect for tight-fitting parts. It works via capillary action, wicking itself deep into a seam for a clean, strong bond before you can blink.
- Medium & Gel CA: These thicker glues are your general-purpose assembly tools. They are easier to control, stay where you put them, and can fill small gaps between imperfectly joined parts.
For an almost instant cure, you can use a CA accelerator or 'kicker'. Be warned: while it saves time, it can sometimes create a more brittle bond and may cause a white residue known as 'frosting'.
Two-Part Epoxy: For Maximum Structural Strength
When you need a bond that is arguably stronger than the plastic itself, it's time for epoxy. This adhesive comes in two parts-a resin and a hardener-that you mix together to begin a chemical reaction. It's the ultimate choice for high-stress joints like attaching a heavy chassis, wings, or load-bearing components. Epoxies offer different curing times, such as 5-minute for quick jobs and 30-minute for a stronger final bond and more time to position parts perfectly. Its main drawbacks are the messy mixing process and longer curing time.
Specialty Glues: For Windows and Clear Parts
Never use standard CA glue on clear plastic parts like canopies, windows, or headlights. The fumes from curing CA will react with the transparent surface, creating a permanent, ugly 'fog' or 'frosting'. Instead, use a specialty canopy glue (like Formula 560) or even a high-quality clear PVA glue. These adhesives dry crystal clear, won't damage the plastic, and are water-based for easy cleanup. They also offer a longer working time, giving you a chance to perfectly position small, delicate details without commitment.
Step-by-Step Guide to a Perfect, Permanent Bond
You've chosen your adhesive, but even the best glue for 3d printed models will fail without the right technique. Professional model makers agree that preparation is 90% of the work. Following a methodical process ensures your beautifully printed wagon or loco body assembles into a strong, seamless, and lasting model. Rushing this stage is the number one cause of weak joints and visible glue marks.
Step 1: Surface Preparation is Non-Negotiable
Before a single drop of glue is applied, your parts must be perfectly clean. This step removes any residual mould release agents, finger oils, or dust that can prevent the adhesive from forming a strong chemical bond with the plastic.
- Wash: Gently clean all parts in warm, soapy water and rinse thoroughly. An old toothbrush can help get into detailed areas.
- Scuff: Lightly sand or scuff the surfaces that will be joined with fine-grit sandpaper (400-600 grit is ideal). This creates a 'key' for the glue to grip onto.
- Dry: Ensure every component is 100% dry. Leave them to air dry completely or use a lint-free cloth.
- Final Wipe: For a chemically pure surface, wipe the joint areas with a cotton bud dipped in Isopropyl Alcohol (IPA) just before gluing.
Step 2: Test Fitting and Applying the Glue
Always test fit your components without glue first. This dry run confirms everything aligns correctly and reveals any tight spots that may need a little extra sanding. When you're ready to commit, remember that less is more. For a strong bond, you need only a minimal amount of the best glue for 3d printed models. Apply a tiny drop of CA glue to one surface, using the tip of a pin or a toothpick for precision, then bring the two parts together firmly and accurately.
Step 3: Clamping, Jigs, and Curing Time
Holding the parts steady while the glue cures is critical for a strong joint. Any movement can break the initial bond before it has a chance to fully harden. You don't need expensive tools; simple items work perfectly:
- Rubber bands
- Clothes pegs
- Small hobby clamps
For ensuring perfect 90-degree angles, such as when joining the sides of a wagon body, a simple jig made from LEGO bricks is an invaluable tool. Finally, be patient. Respect the manufacturer's recommended full cure time, not just the initial 'handling' or 'set' time. This can be up to 24 hours, but it guarantees maximum bond strength for your model.
Troubleshooting Common Gluing Problems
Even with careful preparation and the best glue for 3d printed models, things can occasionally go wrong. Don't panic! Most common issues are easy to fix with a bit of know-how. This guide will help you rescue your project from the brink and turn a potential disaster into a learning experience.
Problem: White Residue or 'Frosting' Around Joints
That chalky white film that sometimes appears around a superglue joint is called 'frosting' or 'blooming'. It’s caused by cyanoacrylate vapours curing too quickly in the air and settling on the model's surface. To prevent it, ensure your workspace has good ventilation. If you use a CA accelerator, apply it sparingly. Opting for a thicker, gel-type CA glue also reduces fumes and minimises the risk. If frosting has already occurred, you can often remove it by gently rubbing the area with a cotton bud dipped in a mild polish or acetone, but always test on a hidden spot first.
Problem: The Glue Won't Stick or the Joint is Weak
A bond that fails almost immediately is incredibly frustrating. This is almost always a surface preparation issue. Before you blame the glue, try these steps:
- Re-clean the parts: Use isopropyl alcohol to remove any lingering dust, oils from your fingers, or mould release agents.
- Scuff the surfaces: Lightly sand the contact points with fine-grit sandpaper (400-600 grit is ideal). This creates microscopic peaks and valleys for the glue to grip onto.
- Check the expiry date: All glues have a shelf life, especially CA glues which can lose their potency over time.
Problem: Filling Gaps Between Poorly Fitting Parts
Sometimes 3D printed parts don't align perfectly. For minor gaps, a thick gel CA or a two-part epoxy works wonders, as they have gap-filling properties. For larger voids, you'll need a dedicated filler like Milliput or Green Stuff. A popular modeller's trick for a strong, instant filler is to apply a drop of thin CA glue into the gap and then sprinkle it with baking soda. The reaction creates a hard, plastic-like substance that can be sanded smooth once cured.
Problem: Accidentally Gluing Your Fingers Together
It's a rite of passage for every modeller. If you find your fingers stuck together with CA glue, do not pull them apart by force, as this can tear your skin. Instead, reach for a CA debonder or acetone (most nail polish removers contain it). Apply a small amount to the bonded area and gently work your fingers apart as the glue dissolves. Wash your hands thoroughly afterwards. Of course, the best way to avoid fixing is to start with great parts. Focus on building, not fixing. Browse our easy-to-assemble OO9 kits.
Bringing It All Together: Your Final Guide to Flawless Assembly
Choosing the right adhesive is as crucial to your project's success as the print itself. As we've covered, the path to a perfect model begins by matching your glue to the specific plastic, whether you're working with versatile PLA or finely detailed resin. By understanding the unique strengths of cyanoacrylate (CA), two-part epoxies, and applying the proper techniques for surface preparation, you guarantee a permanent, seamless bond every time. Armed with this knowledge, you are now fully equipped to select the best glue for 3d printed models and troubleshoot any issues, ensuring your creations are built to last.
Now that your confidence is high, put your skills to the ultimate test. Our kits are the perfect canvas for your newfound expertise. Each one is meticulously designed for clean assembly and a perfect fit, and made from high-quality UV-cured resin that provides an ideal surface for bonding. Trusted by discerning railway modellers across the UK and worldwide, they are the perfect foundation for your next masterpiece.
Feel confident to start your next project? Browse our detailed 3D printed model kits!
Frequently Asked Questions
What is the absolute best single glue for assembling a Narrow Minded Railworks resin kit?
For resin kits like those from Narrow Minded Railworks, the best choice is a cyanoacrylate (CA) adhesive, commonly known as super glue. We recommend using a medium viscosity CA glue, such as Loctite Super Glue Power Gel Control, as it provides a few seconds of positioning time before setting. For an instant, rock-solid bond, you can also use a CA accelerator spray, which cures the glue immediately upon contact, speeding up your assembly process significantly.
Can I use a hot glue gun on 3D printed models?
Using a hot glue gun on 3D printed models is generally not recommended, especially for common materials like PLA. The low melting point of PLA (around 60-65°C) means the hot adhesive can easily warp or melt the plastic surface, ruining fine details. While it might be used for temporary tacking on higher-temperature materials like ABS or PETG, the bond is weak and bulky, making it unsuitable for creating clean, permanent seams on detailed models.
How do I remove super glue from my model without damaging it?
To remove cured super glue (cyanoacrylate) without harming your model, use a specialised debonder product. Apply a small amount of the debonder directly to the glue using a cotton bud or fine brush and allow it to soften the adhesive before gently scraping it away. Always test the debonder on a hidden part of your model first, as it can sometimes affect paint or certain types of plastic. For uncured spills, isopropyl alcohol can often clean the area effectively.
Do I need to prime my model before or after gluing the parts together?
For the strongest bond, you should glue parts together before priming. Glues like plastic cement and super glue work best on bare plastic, creating a much stronger connection than when applied to a layer of primer. Assemble your model into its main sub-assemblies, then apply your primer. This ensures maximum bond strength at the joints and provides a uniform base coat for painting, which can also help to hide minor seam lines from the gluing process.
How long should I wait for the glue to cure before I start painting my model?
While most super glues create an initial bond within seconds, they require much longer to achieve maximum strength. To be safe, you should wait at least 12-24 hours for the glue to fully cure before you begin handling the model extensively for priming and painting. This ensures the joints are completely stable and won't shift or break under pressure. For solvent-based plastic cements, a 24-hour cure time is also highly recommended to allow the plastic to fully re-harden.
Is Gorilla Glue good for 3D printed models?
Yes, but you must choose the right type. Gorilla Super Glue Gel is an excellent choice and a top contender for the best glue for 3d printed models made from PLA, PETG, or ABS, offering a strong, clean bond. However, you should avoid the original brown, expanding polyurethane Gorilla Glue. This type foams up as it cures, which will push your parts apart and create a messy, difficult-to-sand seam line, making it entirely unsuitable for model assembly.