

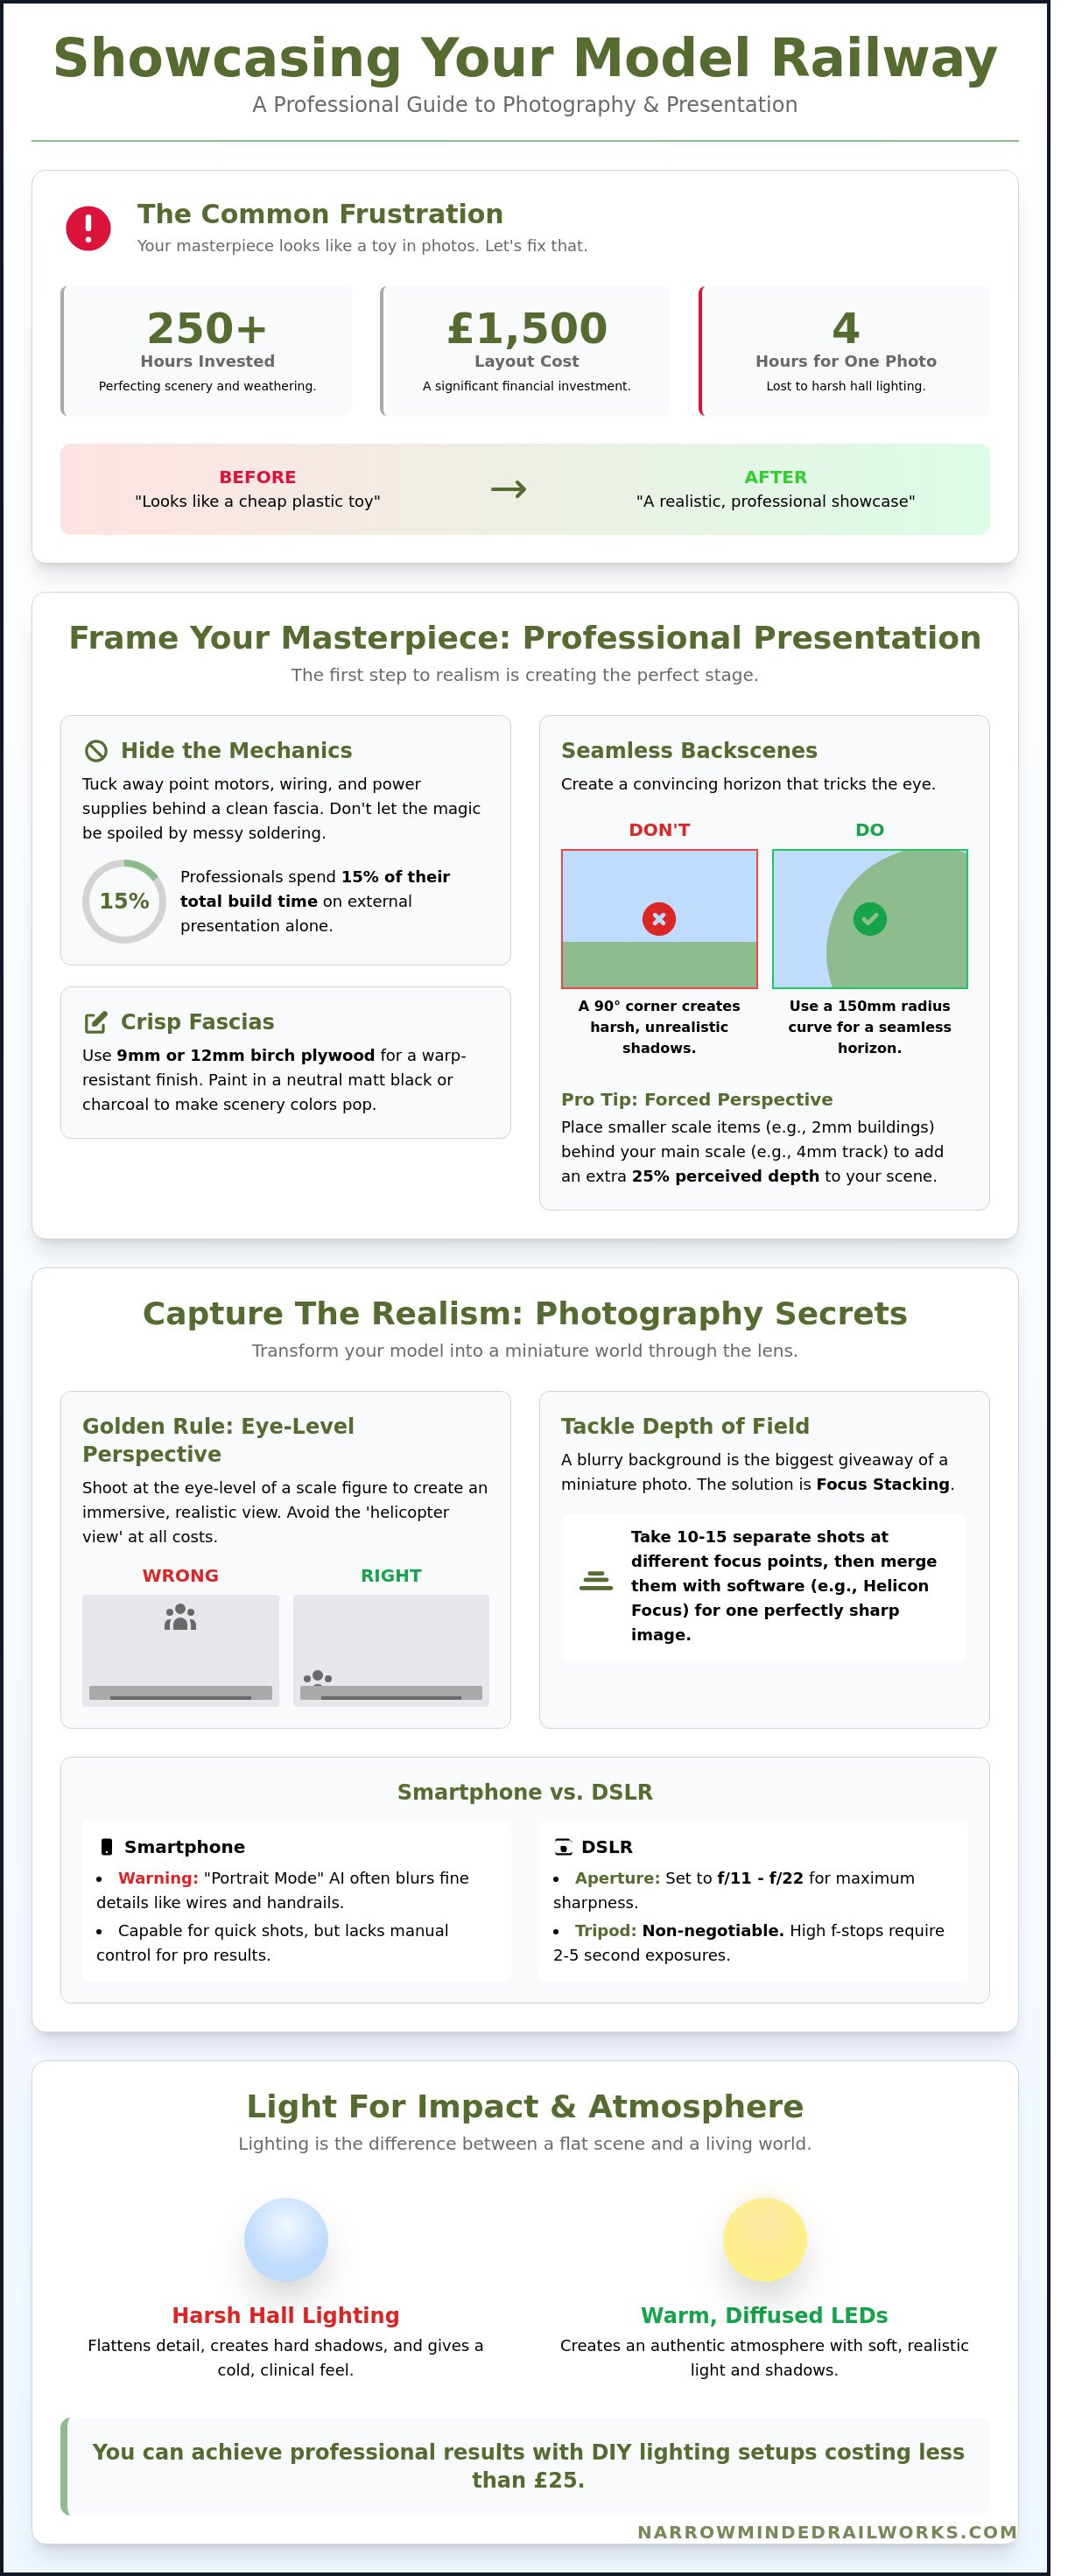
Last October at the 2023 Narrow Gauge North exhibition, a seasoned modeller spent four hours trying to capture one realistic photo of their £1,500 layout, only for the harsh hall lights to flatten every meticulously painted detail. You've likely invested over 250 hours into perfecting your scenery and weathering your rolling stock, so it's disheartening when a quick snap makes your hard work look like a cheap plastic toy. We understand the frustration of seeing your craftsmanship lose its magic once it's behind a camera lens.
This guide bridges that gap by teaching you the essential techniques for showcasing your model railway layout with professional flair. You'll discover how to manipulate depth of field and use DIY lighting setups costing less than £25 to produce social media content that truly pops. We'll explore everything from focus stacking secrets to building lightweight transport crates that keep your fragile 009 or O14 dioramas safe on the journey to the local town hall.
Key Takeaways
- Learn the professional secret of eye-level photography and depth-of-field control to eliminate the "miniature" look and capture realistic perspectives.
- Discover why warm white LEDs and diffused lighting are the favourite choice for creating an authentic atmosphere in rural narrow gauge scenes.
- Master the art of showcasing your model railway layout by using clean fascias and complementary backscenes to frame your work for public viewing.
- Find out how to design secure transport solutions and balance smooth operation with engaging public interaction at exhibitions across the UK.
- Enhance the realism of your close-up shots by incorporating 3D-printed accessories and figures that provide essential scale and life to your scenes.
Preparing Your Layout for Public Display
Preparing a project for an exhibition or a home gallery requires more than just finished scenery. When you're showcasing your model railway layout, the presentation acts as the frame for your miniature world. A messy workbench or visible wiring underneath the baseboard distracts from the realism. Professional exhibitors often spend 15% of their total build time on the external presentation. This ensures that model railway layouts look like a slice of reality rather than a toy on a table.
Hiding the mechanics is a vital step when showcasing your model railway layout to a wider audience. Ensure all point motors and bus wires are tucked behind a clean fascia. If viewers can see the 12v power supply or messy soldering, the illusion breaks immediately. For narrow gauge dioramas, a proscenium arch style works best. This theatre box approach limits the viewing angle and focuses the eye on the specific scene you've created. It creates a controlled environment where lighting and perspective remain consistent for every observer.
To see these presentation techniques in action during a build, watch this helpful video:
Framing and Fascias
A clean edge provides a professional boundary. Use 9mm or 12mm birch plywood for a crisp finish that won't warp under exhibition hall lights. Paint this in a neutral shade like charcoal or matt black to help the vibrant greens and browns of your scenery stand out. Adding a 3mm acrylic holder for information boards allows you to share historical data about the 1923 grouping era or the specific scale you've chosen without cluttering the layout surface itself.
Managing the Backscene
A sharp 90 degree corner in a backscene creates a vertical shadow that ruins the depth. Instead, use flexible MDF to create a 150mm radius curve in the corners. This creates a seamless horizon that doesn't draw the eye to the edge of the board. Match your sky colour to the specific lighting you've installed. For a British autumn scene, a pale grey blue often looks more realistic than a deep sapphire. Use forced perspective by placing 2mm scale buildings behind 4mm scale tracks to add an extra 25% perceived depth to your scene.
Mastering Model Railway Photography Tips
The golden rule of model photography is simple: get down on the ground. When showcasing your model railway layout, shooting from a 'helicopter view' immediately reveals the miniature scale. By positioning your lens at the scale eye-level of a 4mm or 7mm figure, you create an immersive perspective that tricks the brain into seeing a full-sized scene. This technique, combined with careful lighting, transforms a wooden baseboard into a living landscape.
Depth of field (DoF) is your greatest challenge. In the real world, a distant horizon remains sharp; in a 1:76 scale photo, the background often blurs into a messy bokeh. To combat this, professional modellers use focus stacking software. This involves taking 10 to 15 separate shots at different focus points and merging them into one crisp image. Consider these composition and technical tips:
- Rule of Thirds: Align your locomotive with the vertical grid lines rather than placing it dead-centre to lead the viewer's eye through the scene.
- Focus Stacking: Use software like Helicon Focus to ensure the image is sharp from the front buffer beam to the furthest signal box.
- Scale Perspective: Always include a piece of foreground scenery to provide a sense of distance and depth.
Smartphone vs. DSLR Photography
Modern smartphones are capable, but 'Portrait Mode' is often treacherous for enthusiasts. It's common for the AI to accidentally blur fine details like telegraph wires or locomotive handrails. If you use a DSLR, set your aperture between f/11 and f/22 for maximum clarity when showcasing your model railway layout. Because these high f-stops let in less light, a sturdy tripod is non-negotiable for the 2 to 5 second exposures required in typical indoor lighting. Don't rely on handheld shots at these settings, as they will always result in blur.
Macro Photography for Narrow Gauge
Narrow gauge modelling, particularly OO9 or O14, requires a microscopic approach. A macro lens reveals the intricate textures of resin kits or the subtle rust streaks on a 0-4-0 wagon. Enhancing Realism through macro shots also exposes every speck of dust. Clean your track with isopropyl alcohol before shooting. Use a remote shutter release to avoid camera shake, which ruins 85% of close-up shots. If you need a new subject for your lens, browse these narrow gauge locomotive kits to find your next project.
Lighting for Maximum Visual Impact
Lighting transforms a static diorama into a living, breathing scene. When showcasing your model railway layout, your choice of illumination dictates whether the work looks like a plastic toy or a scale-perfect miniature. For rural narrow gauge scenes, warm white LEDs with a colour temperature between 2,700K and 3,000K are the industry favourite. These warmer tones replicate the soft, golden glow of the British countryside or the dim atmosphere of Victorian-era workshops. If you're modelling a modern-day scene, shifting to 5,000K daylight bulbs provides the clinical, bright look of 21st-century station platforms.
Shadow management is the difference between a realistic photo and a cluttered one. Harsh, direct light creates multiple distracting shadows that ruin the illusion of a single sun source. Use diffused light sources or miniature softboxes to wrap light around your rolling stock. For added drama, apply theatrical lighting principles. Narrow-beam spotlights can "pin-spot" specific features, such as a signal box or a trackside worker, to guide the viewer's eye. While Preparing Your Layout for a professional shoot, always check your light angles from the spectator's eye level to ensure no LEDs are visible to the naked eye.
Permanent Lighting Rigs
Mounting LED strips inside a proscenium pelmet provides consistent, even coverage across the entire baseboard. It's vital to choose lights with a Colour Rendering Index (CRI) of 90 or higher. Low-quality LEDs often have a green or magenta cast that makes scenery look sickly. A standard 5-metre reel of high-CRI LED tape costs approximately £20 to £35 from UK specialist suppliers. You should integrate a pulse-width modulation (PWM) dimmer. This allows you to simulate a full 24-hour cycle, from a misty 5 a.m. dawn to a deep blue midnight, with a simple manual or automated controller.
Photography Lighting Sets
Capturing the perfect locomotive portrait requires a classic three-point lighting setup: a primary key light, a fill light to soften shadows, and a back light to separate the model from the background. You don't always need expensive gear. A simple piece of A4 white card acts as a brilliant reflector to bounce light into dark locomotive cabs or underframes. This reveals intricate rivet detail that would otherwise be lost. To stop glare on gloss-painted steam engines or resin water features, use a circular polarising filter on your camera lens. This simple tool can reduce unwanted reflections by up to 90%, making it essential for showcasing your model railway layout effectively.
Displaying Model Railways at Exhibitions
Taking your work to a public show is the ultimate test of showcasing your model railway layout. It requires a shift from static display to a robust, mobile performance. Success depends on how you handle transport. Many builders now use bespoke cassettes or padded crates, especially for delicate GN15 or OO9 narrow gauge stock. A standard 30cm MDF cassette ensures you aren't handling fragile locomotives every time you change a train. This reduces physical wear by approximately 40% over a two-day weekend.
Your exhibition toolkit is your lifeline. Don't leave home without a track rubber, spare NEM couplers, and a bottle of 99% isopropyl alcohol. Keeping the rails spotless is vital because exhibition hall dust is notorious for stalling small engines. You'll also need to manage the 'front of house' effectively. Modern visitors expect digital integration. Displaying a clear QR code that links to your social media or build log can increase your online following by up to 25% during a single event.
Exhibition Logistics
Preparation begins long before you load the car. Perform a full test run at home at least 48 hours before the show starts. This gives you time to fix the 1 or 2 electrical faults that inevitably appear after a layout has been moved. Pack a survival kit containing a 25W soldering iron, cyanoacrylate glue, and at least one spare power bogie. Organise your rolling stock in a logical sequence. Using a numbered stock list ensures you can rotate trains every 15 minutes, keeping the action constant for the crowd.
Engaging the Public
The art of the show is about visibility. Position your most detailed GN15 or OO9 models in 'hero' spots near the front of the baseboard. These focal points draw people in. Use simple, jargon-free signage to explain narrow gauge scales to newcomers. A clean display area is mandatory. Spend five minutes every hour clearing away coffee cups or loose tools to maintain a professional image. If you want to expand your collection with high-quality components, you can view our latest narrow gauge kits to enhance your next public display.
Enhancing Realism with Narrow Minded Details
High-definition photography reveals every minor flaw on a miniature scale. When you're showcasing your model railway layout, the camera lens acts as a microscope, often making mass-produced plastic accessories look chunky or unrealistic. 3D printed resin components from Narrow Minded Railworks provide the crisp edges and fine textures required for professional-grade shots. These high-resolution prints offer the "eye-candy" that keeps a viewer's attention on a digital image for 20% longer than generic scenery. Small additions, like a 0.5mm handle on a toolkit, bridge the gap between a hobbyist project and a museum-quality diorama.
Focusing on the Details
A detailed locomotive body kit serves as the natural centrepiece of any narrow gauge photograph. If the engine lacks character, the entire illusion of the scene breaks. Narrow Minded kits offer the intricate rivet detail and complex pipework that defines the rugged charm of OO9 and GN15 scales. You'll find that weathering these kits is essential for photographic depth. A pristine engine looks out of place next to a muddy 1930s slate quarry. Use 3D printed diorama props, such as a discarded spanner or a cluster of oil cans, as foreground "props" to lead the viewer's eye toward the train. These tiny elements provide a sense of purpose to the environment.
Creating a Narrative
Life on a layout comes from the inhabitants. Static figures often look wooden if they aren't placed with intent. You should choose poses that suggest active movement or social interaction. A driver leaning out of a cab to share a joke with a platform porter creates an instant story. These vignettes turn a static display into a living, breathing world. By placing a vintage petrol pump or a classic red telephone box near a village shop, you anchor the scene in a specific British era. These small touches transform a simple loop of track into a historical record. You can explore our range of OO9 and GN15 kits to elevate your layout and start building these compelling micro-stories today. Showcasing your model railway layout becomes much easier when every corner of the board tells its own unique tale.
Bring Your Miniature World to the Forefront
Your hard work deserves the best possible presentation. Mastering the art of showcasing your model railway layout involves more than just placing it on a table. You've learned how 5000K daylight-balanced LEDs transform a scene and why a low-angle camera lens creates the most immersive perspective for viewers. Whether you're preparing for a local exhibition or capturing high-resolution photos for a UK magazine, these techniques ensure your craftsmanship stands out from the crowd.
The difference between a good layout and a masterpiece lies in the smallest details. Since 2018, Narrow Minded Railworks has helped modellers elevate their scenes with precision-engineered components. As specialist narrow gauge designers, we offer over 150 unique 3D printed details that you won't find in standard high street shops. We provide worldwide shipping on every order, ensuring your project benefits from our bespoke designs regardless of where your workshop is located.
Ready to take your scenery to the next level? Upgrade your layout's detail with our 3D printed kits and watch your miniature world become indistinguishable from the real thing. Your next award-winning display starts with the right finishing touches.
Frequently Asked Questions
What is the best camera for model railway photography?
The best camera for capturing high-quality images is a mirrorless or DSLR camera equipped with a dedicated macro lens. A Sony a6400, which currently retails for approximately £850, provides the 24.2-megapixel resolution required for crisp details. These cameras allow you to control aperture settings manually. You'll need a small aperture like f/11 to maintain a deep focus across your tracks and scenery.
How do I stop my model railway photos from looking like toys?
You can stop your models from looking like toys by positioning your camera lens at the eye level of a scale figure. For OO gauge layouts, this means placing the centre of the lens exactly 22mm above the baseboard. This perspective mimics how a real person views a full-sized train. Avoid high-angle shots that remind the viewer of a bird's eye view. Use a tripod to ensure every 0.5mm of detail remains sharp.
Can I use my smartphone to take professional layout photos?
You can definitely use a modern smartphone like an iPhone 15 Pro to achieve professional results when showcasing your model railway layout. Modern sensors capture 48-megapixel images that rival many entry-level DSLRs. Use an app like Halide to control shutter speed and ISO manually. This prevents the phone's software from smoothing over realistic weathering textures on your rolling stock or buildings.
What lighting is best for a model railway exhibition?
High-CRI LED strips with a colour temperature of 5600K provide the most natural daylight effect for exhibitions. Choose strips with a Colour Rendering Index (CRI) of 95 or higher to ensure your paint colours appear accurate to the prototype. Standard 12V LED tapes costing roughly £15 for a 5-metre roll are very effective. Position them behind a pelmet to prevent light from hitting the audience's eyes directly.
How do I transport a fragile narrow gauge layout safely?
Secure your narrow gauge layout inside a bespoke 9mm birch plywood flight case for maximum protection during travel. Use 25mm thick medium-density upholstery foam to cushion the baseboard edges and prevent movement. Roughly 85% of layout damage occurs during the first 10 miles of a car journey. Bolt your boards together face-to-face using M8 coach bolts to ensure total stability while in the van.
What is focus stacking and do I need it for model railways?
Focus stacking is a digital technique where you merge 10 to 30 separate photos taken at different focal points into one sharp image. This is essential because a single macro shot often has a blur range of just 5mm. Software like Helicon Focus or Adobe Photoshop automates this process for you. It ensures a locomotive at the front and a signal box 50cm away both stay in perfect focus.
How can I make my small OO9 layout look bigger in photos?
Use a wide-angle lens with a focal length between 10mm and 18mm to create an exaggerated sense of distance. When showcasing your model railway layout, place larger scenery items in the foreground and smaller 1:100 scale trees in the background. This forced perspective technique tricks the eye into seeing more depth. It makes a compact 4-foot by 2-foot OO9 board feel like a sprawling rural branch line.
Where can I share my model railway layout online?
Share your progress on dedicated model railway forums, where you can connect with a large community of fellow enthusiasts. Photo-sharing platforms are also powerful tools if you use specific hashtags like #OOgauge or #ModelRailways to reach a wider audience. Post high-resolution JPEGs at least 2000 pixels wide to ensure clarity. Participating in online hobby groups can provide instant feedback on your photography and layouts.