

Does your model railway still feel more like a toy set than the miniature world you envisioned? You've laid the track and wired the points, but the landscape remains stubbornly flat and uninspired. It's easy to feel overwhelmed by the sheer variety of static grass, flock, and scatter materials, all while worrying that an impressive layout will cost a fortune. The goal of creating truly realistic model railway scenery can seem daunting, a complex art reserved only for seasoned experts with deep pockets.
But it doesn't have to be that way. This ultimate guide is here to demystify the process and put that dream layout firmly within your grasp. We'll break down everything you need to know, from building convincing landforms on a bare baseboard to applying authentic textures and adding the fine details that bring a scene to life. You'll gain the confidence to use different materials effectively and learn clever, budget-friendly tips to transform your railway into a believable world that tells a story-without breaking the bank.
Key Takeaways
- Start by observing and photographing real-world locations to create a solid plan before you even buy materials.
- Learn to build convincing terrain from basic materials and then bring it to life by layering different ground cover textures for depth.
- Discover the pros and cons of ready-made trees versus the rewarding and cost-effective process of crafting your own unique vegetation.
- The final, yet most crucial, step to achieving truly realistic model railway scenery is mastering the art of weathering and adding small, story-telling details.
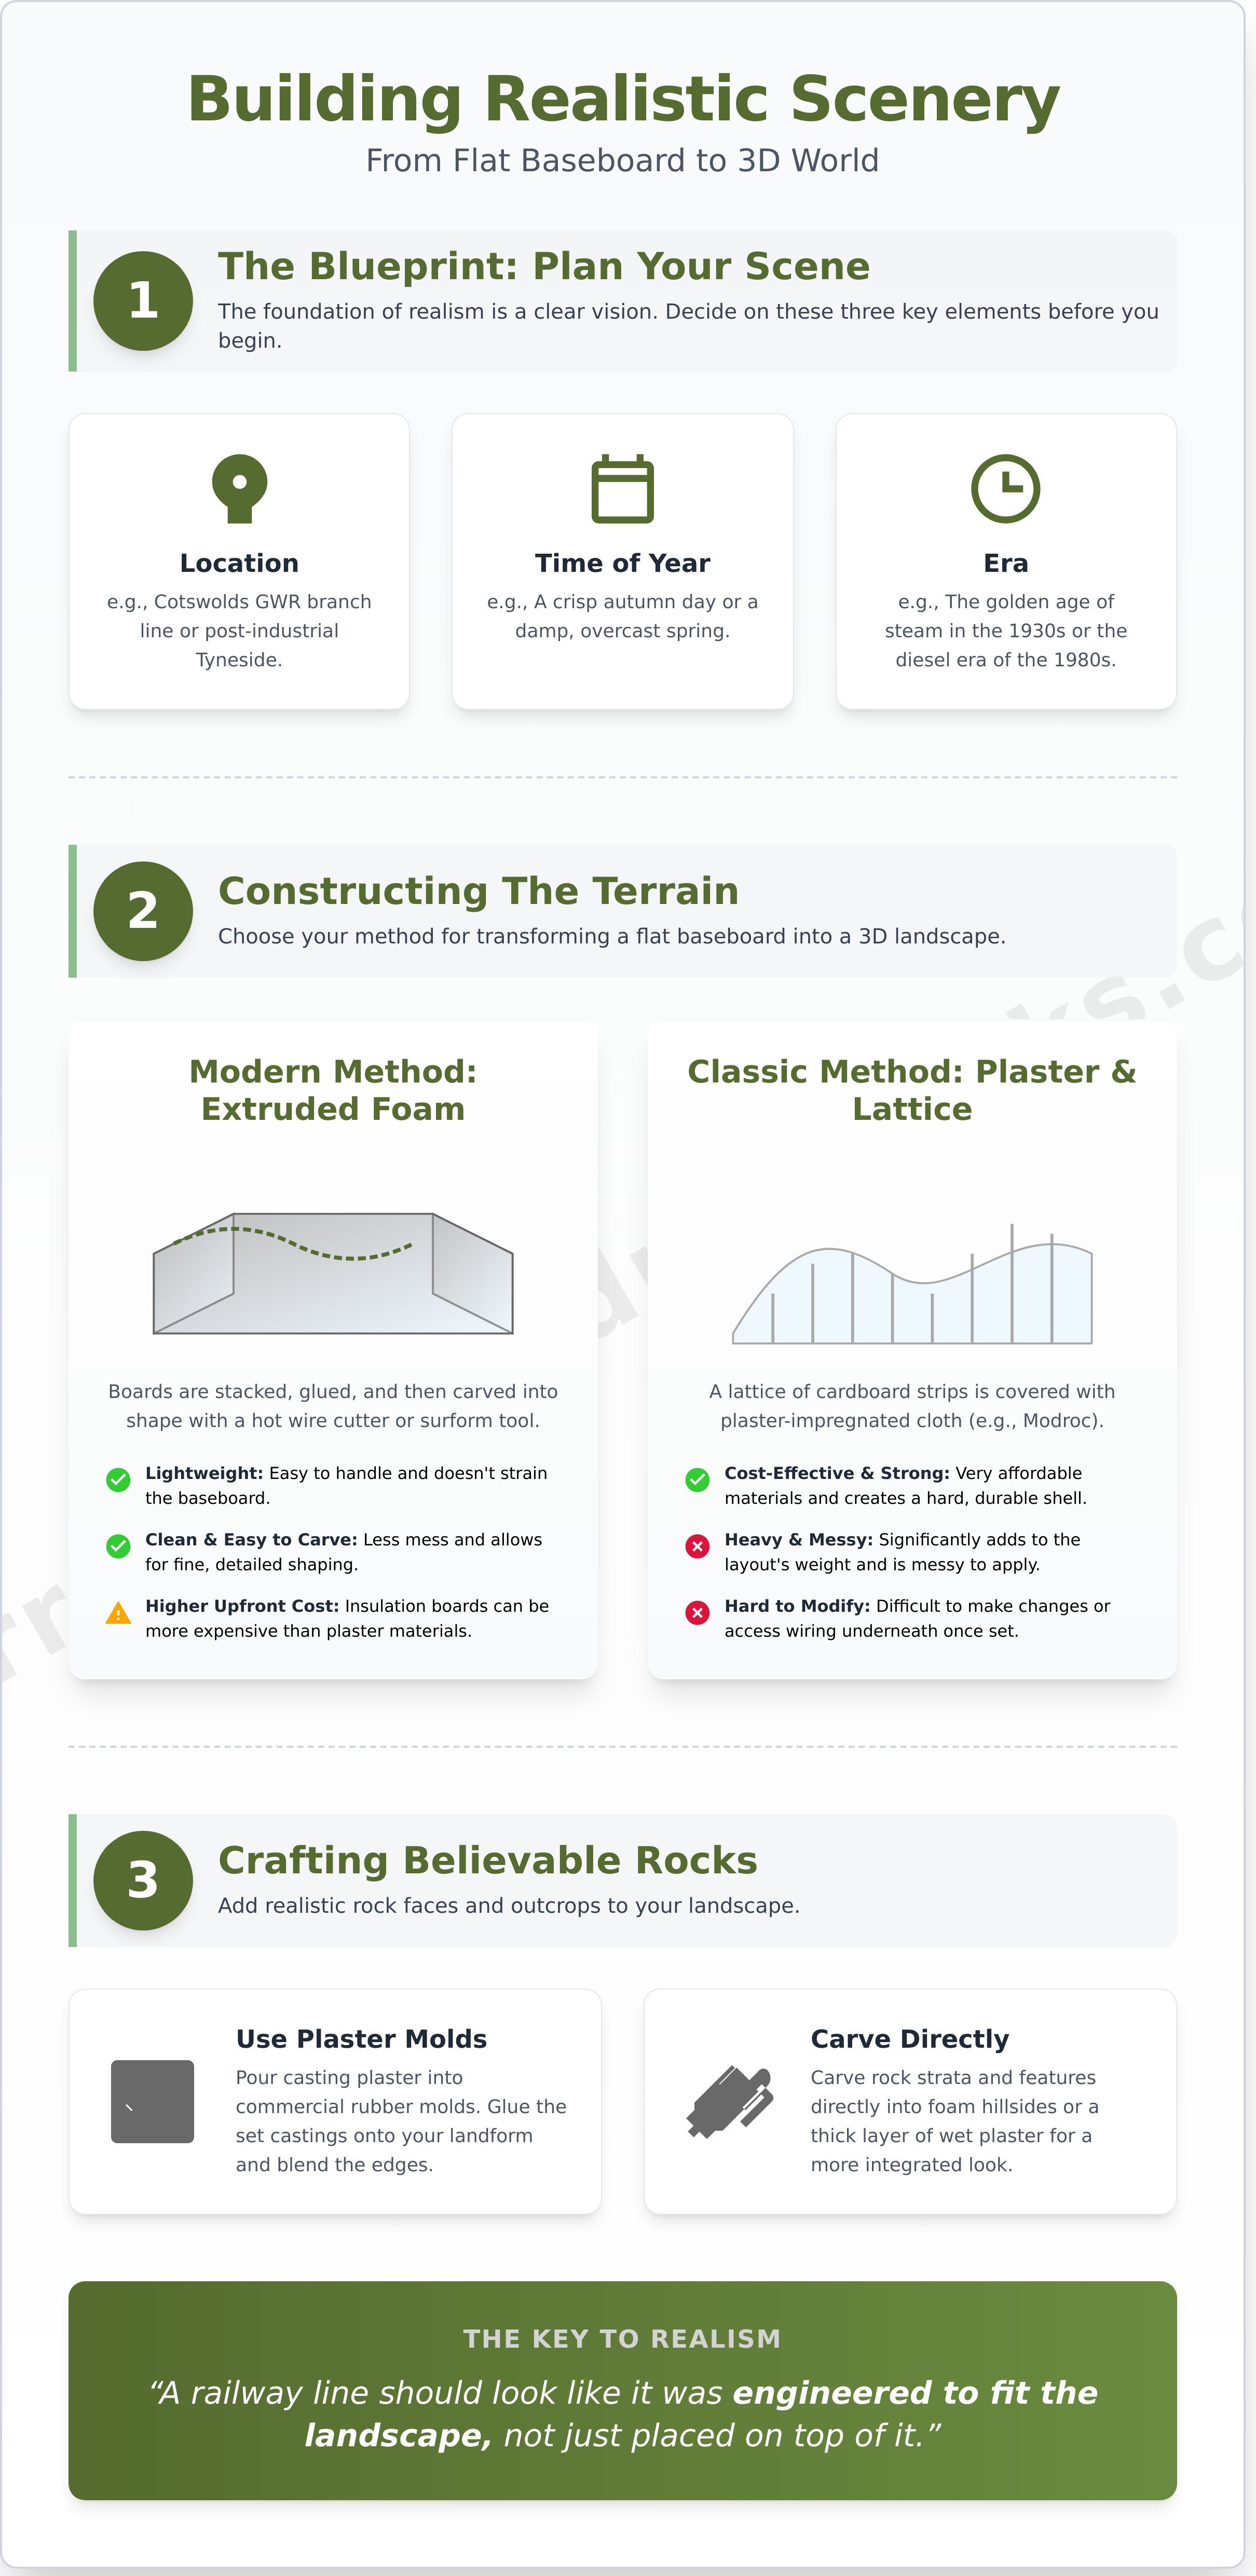
Planning Your Scene: The Foundation of Realism
Many newcomers to the hobby believe that achieving realistic model railway scenery requires a hefty budget and expensive kits. The truth is, the most crucial ingredient is free: a well-thought-out plan. Before you buy a single pot of paint or bag of flock, the foundation for a believable world is laid with observation, research, and a clear vision. Realism begins not in the wallet, but in the mind's eye.
To see how simple materials can be used to create stunningly realistic effects, this video offers some excellent techniques:
To create a consistent and immersive scene, decide on three key elements: a specific location, a time of year, and an era. Are you modelling a GWR branch line in the Cotswolds during a crisp autumn in the 1930s? Or a gritty, post-industrial Tyneside scene in a damp spring of the 1980s? This decision informs every choice you make, from the types of trees to the style of buildings and the weathering on your rolling stock. This detailed approach is what elevates the most captivating model railway layouts. Think of it as creating a 'scenic story'-a snapshot of a real place at a specific moment in time.
Capturing the essence of a specific time and place, particularly a classic British setting, often comes down to the small details. Drawing inspiration from the traditional materials and craftsmanship of the era can add a deep layer of authenticity to your world. For a look into timeless British style that can spark ideas for your layout's story, you can learn more about Created By The Ridleys.
Gathering Reference and Inspiration
Your best tool is the real world. Use online resources and your own explorations to build a library of ideas. A mood board, either physical or digital, can be invaluable for keeping your vision consistent.
- Google Maps Street View: "Walk" the streets and railway lines of your chosen location to see buildings, trackside details, and vegetation.
- Historical Photos: Archives provide an accurate look at the infrastructure and atmosphere of your chosen era.
- Nature Walks: Take photos of local landscapes. Notice how different shades of green blend together, how rocks are weathered, and how water flows.
Sketching Your Layout's Topography
A simple pencil sketch is the best way to translate your ideas into a physical plan. This isn't about artistic skill; it's about mapping out the 'bones' of your landscape. Draw the rough locations of hills, valleys, rivers, and roads. Crucially, plan how your track will interact with this terrain. Does it cut through a hill? Cross a river on a viaduct? A railway line should look like it was engineered to fit the landscape, not just placed on top of it. This is also the stage to decide where major structures like stations, bridges, and factories will sit, ensuring they have a logical purpose within your scene.
Building the Bones: Creating Realistic Landforms and Terrain
Transforming a flat baseboard into a convincing three-dimensional world is the foundation of all great layouts. The key to achieving truly realistic model railway scenery is to build up your landscape with natural, flowing contours rather than simple, uniform lumps. Avoid perfectly symmetrical hills and unnaturally straight ridges. Instead, think about how wind and water would have shaped the land over millennia, creating gentle slopes, valleys, and varied inclines.
Using Foam and Plaster for Hills
Two popular methods dominate landform construction. The modern approach uses extruded foam insulation boards (like Celotex or Kingspan), which are cut, stacked, and glued together before being carved into shape with a hot wire cutter or surform tool. Alternatively, the classic method involves creating a lattice of cardboard strips stapled to the baseboard, which is then covered with plaster-impregnated cloth (such as Modroc).
- Foam Method: Lightweight, relatively clean, and easy to carve fine details into. Can be more expensive upfront, with large boards costing £30-£50, but creates a very strong, stable base.
- Plaster Method: Very cost-effective and strong once set. However, it is significantly heavier, much messier to work with, and makes future changes or wiring access more difficult.
Crafting Believable Rock Formations
Convincing rock faces can be made using commercial rubber moulds and casting plaster. Pour the plaster into the mould, let it set, and then glue the casting onto your landform, blending the edges with more plaster. For a more integrated look, you can carve rock strata directly into foam hillsides or a thick layer of wet plaster. For a detailed walkthrough of these foundational techniques, the National Model Railroad Association offers an excellent guide on Creating Realistic Landforms. To paint, apply a dark grey or brown base coat, followed by a black wash to fill the crevices, and finally, dry-brush a lighter tone over the raised surfaces to highlight the details.
Roads, Paths, and Track Ballast
Finalising the ground level is crucial. Create roads and paths using fine sifted sand or dedicated scenic products, fixed with diluted PVA glue. The most important step for track realism is ballasting. Carefully apply your chosen ballast between the sleepers, shaping it with a small brush. Once satisfied, use a pipette to soak the ballast with a 50/50 mix of PVA glue and water, adding a drop of washing-up liquid to help it flow. Crucially, ensure no ballast or glue gets into the moving parts of your points and switches.
Ground Cover Essentials: From Bare Earth to Lush Grass
The ground cover is the 'skin' of your landscape, arguably the most important visual element for creating believable scenes. A flat, uniform green mat screams 'toy train set'. The secret to truly realistic model railway scenery lies in building up layers of varied colours and textures, a fundamental technique detailed in many expert guides, including Kalmbach Media's book on Ground Cover Essentials. This process transforms a bare baseboard into a living, breathing landscape.
The Base Layer: Dirt, Soil, and Mud
Every great landscape starts from the ground up. Before any grass appears, you need a convincing earth base. Begin by painting your plaster or wood base with matt acrylics in a patchwork of earthy tones-dark browns, muddy tans, and dusty greys. Once dry, brush on a coat of diluted PVA glue (about 50% water with a drop of washing-up liquid) and sprinkle on your earth material. You can use fine-sifted, sterilised real dirt from the garden or commercial 'earth' powders for a consistent, reliable finish.
An Introduction to Static Grass
Static grass is the key to achieving a field of individual, upright blades of grass. It consists of tiny synthetic fibres that, when dropped through a static grass applicator, become electrostatically charged and land standing upright in your glue. The process is simple but transformative:
- Apply a layer of basing glue or PVA to the area.
- Attach the applicator's grounding clip to a wet pin in the glue.
- Fill the applicator with fibres, hold it over the area, and switch it on.
- Shake gently as the fibres jump from the applicator and embed themselves vertically in the glue.
- Once dry, vacuum up the excess fibres for reuse.
For the best results, always use multiple lengths and colours. Start with a 2mm base layer, then add patches of 4mm and 6mm fibres in different shades (e.g., summer green, late summer, and scorched brown) to create depth and variation.
Using Scatters and Flocks for Texture
While static grass creates fields, scatters and flocks add the crucial ground-level texture. Scatter is a coarse ground foam, perfect for representing low weeds, rough undergrowth, and the clumpy texture of a forest floor. Flock is much finer, ideal for simulating moss or leafy detritus. Apply these by sprinkling them over patches of wet glue, building them up around rocks, trees, and track ballast to blend the scene together. Always mix a few different colours to avoid a uniform look. Find the perfect foundation for your scene with our diorama tools and scenery.
Adding Vegetation: Trees, Bushes, and Undergrowth
Vegetation is the element that breathes life into a static model, transforming a bare baseboard into a living landscape. While high-quality ready-made trees are available, the cost can quickly mount, with premium examples costing over £5 each. The alternative - making your own - is not only cost-effective but offers unparalleled creative freedom. Mastering a few simple techniques is a crucial step towards achieving truly realistic model railway scenery that reflects the specific season and location you're modelling.
Scratch-Building Your Own Trees
Creating your own convincing trees is easier than you might think. The most common methods provide excellent results and give you complete control over the size, shape, and species.
- Wire Armatures: Twist strands of florists' or craft wire (around 26-gauge) to form a trunk, progressively separating them into branches and twigs. Coat the trunk with a filler or texture paint for bark, then spray the whole armature with dark brown or grey paint.
- Natural Armatures: For finer, more delicate trees like silver birch, dried seafoam or certain plant roots provide a perfect, ready-made structure. Simply trim to size and you're ready for foliage.
Once your armature is prepared, apply a spray adhesive (a cheap hairspray works well) and sprinkle on your chosen scatter material. Use a mix of fine turf and coarser clump foliage for a more varied, natural texture.
Placing Trees and Shrubs Effectively
The key to realism is avoiding uniformity. Nature is random and chaotic. When planting your trees, think in terms of natural groves and clusters rather than neat rows. Mix different heights, shapes, and shades of green and brown to mimic a real British woodland. For a dense forest canopy, plant trees close together, allowing their branches to overlap. Use darker, coarser scatter on the ground to represent the shady undergrowth. For a more open parkland scene, space them out and use smaller clumps of scatter to represent individual bushes and shrubs along fence lines or streams.
This thoughtful placement of trees, combined with varied undergrowth, transforms a simple scene into a dynamic environment. It's this dedication that elevates a good layout into exceptional and realistic model railway scenery. For a wide selection of foliage and scatter materials to begin your project, browse the collection at Narrow Minded Railworks.
Finishing Touches: Details and Weathering for Maximum Realism
You've laid the track, built the hills, and planted the grass. Now for the most transformative stage. It's often said that the final 10% of the work provides 90% of the impact, and this is where a good layout becomes a truly believable miniature world. By focusing on small details and subtle weathering, you can elevate your entire project from a model to a masterpiece.
Adding 'Scene-Stealing' Details
Empty landscapes feel sterile; the key to a lived-in world is adding small details that tell a story. Think beyond just placing a building and instead create a mini-scene, or 'vignette', around it. A group of figures chatting by a classic red phone box, a car being filled at a petrol pump, or a farmer mending a dry-stone wall all add narrative and depth. These focal points guide the viewer's eye across your layout, rewarding them with new discoveries. To truly make your world feel authentic, bring it to life with our unique 3D printed scenery and figures, from period-correct post boxes to detailed station furniture.
Basic Weathering Techniques for Scenery
In the real world, nothing stays perfectly clean. Weathering is the art of replicating the effects of time, weather, and use on your models, tying your scenery and rolling stock together into one cohesive environment. Don't be intimidated; even simple techniques make a huge difference. Here are a few beginner-friendly methods:
- Weathering Powders: These fine pigments are perfect for adding subtle effects. Use a soft brush to apply black powder around chimney pots for soot stains, earthy browns for dust on country lanes, and rust colours on corrugated iron sheds or old track.
- A Dark Wash: Create a wash by heavily thinning black or dark brown acrylic paint with water until it's the consistency of milk. Brush this over brickwork or stone walls; the wash will settle into the crevices, highlighting detail and instantly adding years of grime.
- Environmental Touches: Think about how the environment would interact with surfaces. Add muddy tyre tracks leading into a farmyard, a few subtle oil stains on the ground in a depot, or tufts of overgrown weeds pushing through cracks in a platform.
These simple weathering methods, combined with carefully placed details, are the final steps in creating a believable world. It’s this dedication to the small imperfections and stories that elevates a layout from a collection of models into a piece of art. Taking the time to add that final layer of grime, rust, and life is what truly achieves breathtakingly realistic model railway scenery.
Your Journey to Realism Starts Now
From laying the foundational plans and shaping the terrain to layering ground cover and applying those crucial weathering effects, you now have the blueprint to create a truly immersive world. Remember, the key is in the details and the patient layering of textures and colours. Creating breathtakingly realistic model railway scenery isn't about a single step, but the culmination of many small, deliberate actions that bring your vision to life.
Ready to turn theory into practice? At Narrow Minded Railworks, we live and breathe this passion. That's why we create unique 3D printed details you simply won't find elsewhere, all designed by modellers for modellers. With worldwide shipping, the perfect components for your layout are just a click away.
Explore our range of scenery and diorama supplies to start building your realistic world.
Don't just build a track-build a story. Your masterpiece awaits.
Frequently Asked Questions
What is the best glue for model railway scenery?
For most scenery tasks, a good quality PVA glue is your best friend. Brands like Deluxe Materials' Scenic Cement or even general craft PVA from shops like The Range are perfect. It's versatile, dries clear, and can be diluted with water (often with a drop of washing-up liquid) to secure ballast and scatter. For securing trees or structures more quickly, a hot glue gun or a strong super glue can be more effective, but for general groundwork, PVA is the go-to adhesive.
How can I make realistic scenery on a very tight budget?
You don't need to spend a fortune! Forage for materials in your own garden. Small twigs make excellent fallen trees, and sieved, baked soil can create authentic dirt textures. Household items are also invaluable; scrunched-up newspaper forms a cheap and lightweight base for hills. A small tub of PVA glue and some basic craft paints for colouring can be purchased for under £10, providing the foundation for a layout that looks fantastic without a hefty price tag.
Your own garden is not just a source of free materials but also inspiration for creating realistic greenery. If you're interested in how to achieve that perfect lush look in the real world, which can inform your modelling, you can check out Garden Watering for tips on automated systems.
How do I stop static grass and flock from making a huge mess?
The key to controlling static grass and flock is to work in small, manageable sections. Apply your glue to one area at a time. Use a static grass applicator for precision, as it directs the fibres where you want them. To reclaim the excess, hold a small handheld vacuum cleaner nearby, or place a sock over the nozzle of your main vacuum. This collects the unused material cleanly, allowing you to pour it straight back into its container for future use.
What's the difference between flock, scatter, and static grass?
These materials serve different purposes. Flock is a very fine, powder-like foam used for short grass effects, moss, or foliage on trees. Scatter is a coarser, more irregularly shaped foam crumb, ideal for creating textured ground cover like undergrowth or rubble. Static grass consists of tiny synthetic fibres that, when used with an applicator, stand on end to convincingly replicate individual blades of grass. Combining all three is essential for achieving truly realistic model railway scenery.
How long does it take for scenery glue to dry completely?
Drying time depends on the type of glue, how thickly it's applied, and the ambient humidity. A thin layer of PVA glue will be touch-dry within an hour. However, for applications like ballasting, where the glue is heavily diluted with water and soaks deep into the material, you should allow at least 24 hours for it to cure completely. It's always best to be patient and ensure everything is fully hardened before running trains or adding more scenic layers.
Can I use real dirt and twigs on my layout?
Yes, you absolutely can, and it's a brilliant way to add authenticity. However, it is crucial that you sterilise any natural materials before use. This prevents mould, fungus, and tiny insects from being introduced to your layout. An easy method is to bake twigs and sifted dirt on a baking tray in your oven on a low heat (around 100°C) for about 20 minutes. This ensures your natural additions are safe and will last for years to come.