

So, you've just unboxed your stunning new OO9 Quarry Hunslet locomotive, eager to see it hauling a rake of slate wagons, only to discover it won't connect to anything. That distinctive, chunky coupling on the front is both the source of its prototypical charm and, for many, a bit of a headache. This is the unique quarry hunslet coupler, a feature that adds fantastic realism but can be a real source of confusion if you're trying to integrate the loco with your existing rolling stock.
If you're baffled by terms like 'NEM pocket' and 'offset shanks', or nervous about breaking your prized model while attempting a modification, you've come to the right place. This guide will demystify everything. We'll delve into the fascinating history of this special coupling before providing clear, practical steps for fitting different compatible types. By the end, you’ll feel confident enough to get your Hunslet coupled up and running smoothly on your layout, ready for a hard day's work in the quarry.
What is a Quarry Hunslet Coupler? A Look at the Real Thing
To truly understand the model quarry hunslet coupler, we must first look at the remarkable full-size locomotives that inspired it. The narrow-gauge slate quarries of North Wales, such as the vast Penrhyn and Dinorwic operations, were harsh industrial environments. Here, small, powerful tank engines built by the renowned Hunslet Engine Company worked tirelessly, navigating incredibly tight curves and steep gradients.
Operating machinery in these settings required immense skill, a tradition that continues in modern industrial sites. For those interested in the qualifications needed to handle today's heavy quarry equipment like dumpers, you can visit Vally Plant Training.
These demanding conditions required a coupling system that was fundamentally different from those on mainline railways. It needed to be simple, incredibly robust, and quick to operate by a single quarryman, often in poor weather. The solution was the distinctive ‘chopper’ coupling.
The History Behind the Design
In the bustling slate quarries, efficiency was paramount. Trains of slate wagons were constantly being assembled, moved, and shunted. The standard screw-link couplings of the main line were far too slow and complex for this fast-paced environment. They required a shunter to stand between the wagons, carefully tightening a turnbuckle. The chopper coupler, by contrast, was a masterpiece of industrial simplicity, designed for rapid connection and disconnection with minimal effort, maximising the productivity of both locomotives and men.
How the 'Chopper' Coupler Works
The design is beautifully straightforward, focusing on strength and function over finesse. Its core components are few:
- A large, solid central buffer head that absorbed impacts.
- A vertically hinged cast-iron hook, or ‘chopper’.
- A simple slot or pocket on the opposing wagon for the hook to drop into.
To couple a train, the locomotive would buffer up to a wagon, and the shunter would simply lift the chopper hook and let it drop into place. Uncoupling was just as fast-lift the hook, and the vehicle was free. While perfect for the quarries, this system had its limitations. It offered almost no ‘gather’ range, meaning the vehicles had to be perfectly aligned for it to work, a trade-off willingly made for its sheer speed and durability.
Modelling the Quarry Hunslet Coupler in OO9
Bringing the robust engineering of the Welsh slate quarries to a 4mm scale layout is a rewarding challenge. Manufacturers have done a fantastic job replicating the distinctive look of these locomotives, but the unique quarry hunslet coupler presents a significant operational hurdle. While visually accurate, the model versions are rarely compatible with standard OO9 rolling stock straight out of the box. This incompatibility stems from a combination of non-functional parts and non-standard mounting heights, which we will explore here.
Dummy vs. Functional Model Couplers
Many OO9 Hunslet kits and some ready-to-run models are supplied with 'dummy' couplers. These are typically simple plastic mouldings that capture the look of the prototype's hook and buffer but are purely cosmetic. They are non-functional and cannot be used to couple to wagons for an operational layout. If you want to run your Hunslet as part of a train, replacing this dummy fitting is the first essential step.
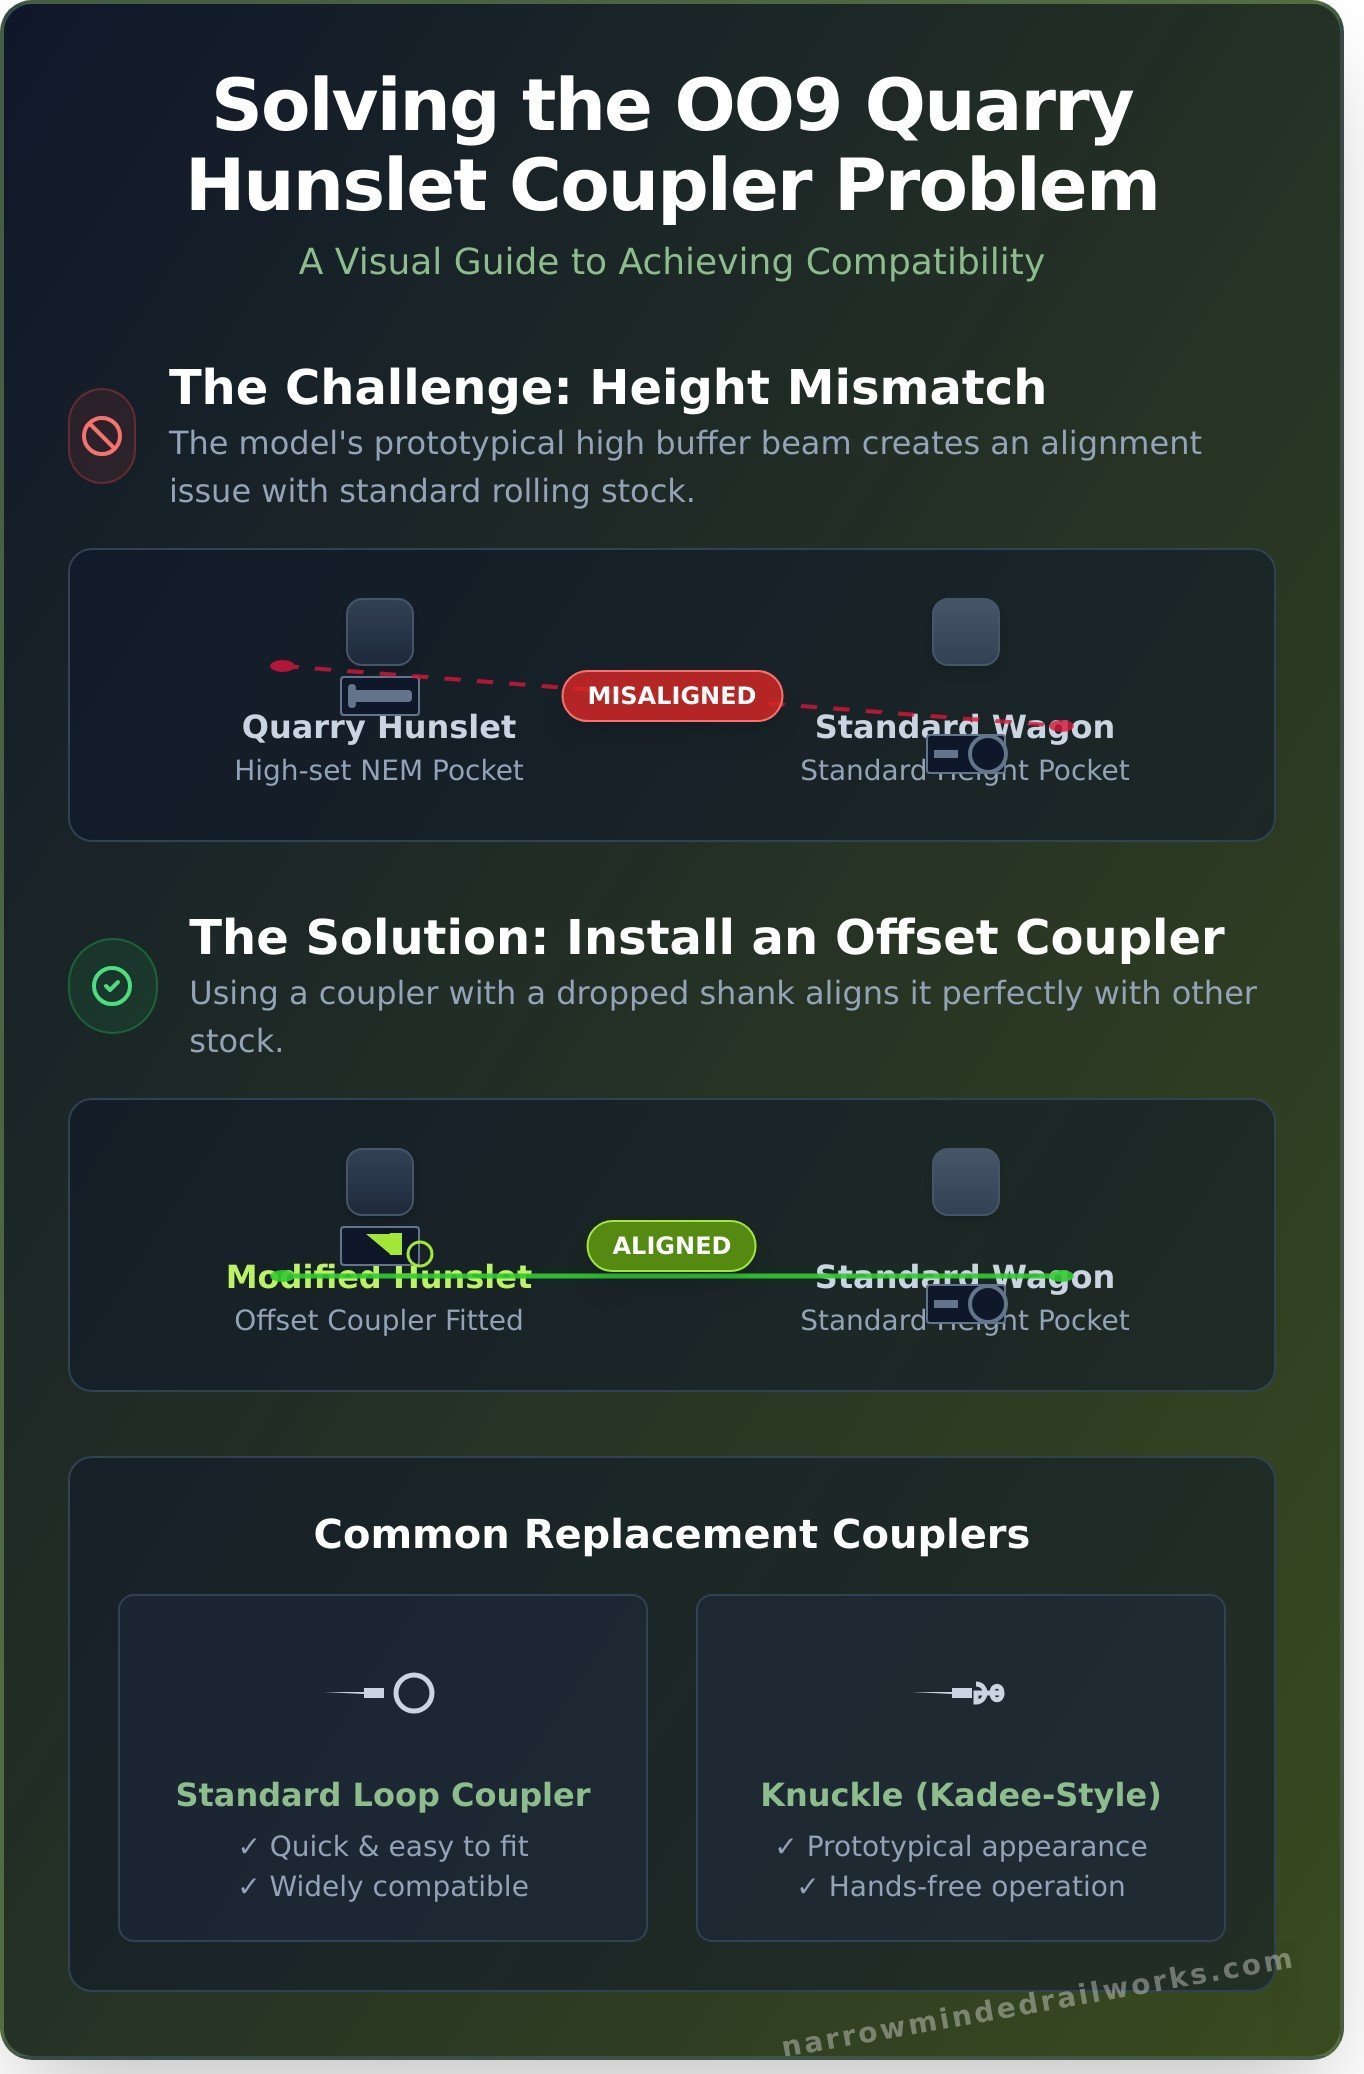
The NEM Pocket Problem
Modern OO9 models aim for standardisation using the NEM 355 pocket. This is a small, standardised slot on the buffer beam that allows you to easily swap different types of push-fit couplers. However, the Quarry Hunslet's prototype design, with its high-set buffer beam, creates a problem. To be accurate, any NEM pocket fitted to the model is often positioned much higher than the standard height on wagons. This height mismatch makes reliable coupling impossible without modification. The real-world industrial context for this design can be explored at places like the National Slate Museum, which is based at the historic Dinorwig Quarry.
Ensuring Compatibility with Your Wagons
For smooth and reliable operation on your layout, it is crucial that every piece of rolling stock-locomotives and wagons alike-has its couplers set at a consistent height. The goal is to modify your Hunslet so its new, functional coupler aligns perfectly with the rest of your fleet. The most common solutions involve either fitting a standard OO9 loop-style coupler or a more prototypical Kadee-style knuckle coupler. The following sections will guide you through the practical steps for both of these popular options.
Step-by-Step Guide: Fitting a Standard NEM Loop Coupler
For most modellers, especially those new to the hobby, replacing the factory-fitted coupling with a standard NEM loop coupler is the quickest and most effective upgrade. This method requires no complex modifications and provides reliable operation with the vast majority of UK-outline rolling stock. Replacing the basic quarry hunslet coupler is a simple 10-minute job that dramatically improves your locomotive's usability.
Follow these steps carefully, and always handle your model with care to avoid damaging any delicate parts.
Tools & Materials You'll Need
Before you begin, gather these simple tools and materials. Working on a cutting mat or a soft cloth will protect both your model and your work surface.
- A sharp hobby knife (for stubborn fittings)
- A pair of fine-point tweezers
- A small, flat-head screwdriver or similar prying tool
- Your replacement NEM 355 standard loop couplers
Removing the Factory-Fitted Coupler
[Image: A close-up photo showing the factory-fitted dummy coupler on the Quarry Hunslet model, with an arrow pointing to the clip.]
First, identify the existing coupler. On most ready-to-run models, this will be a simple, non-functional "dummy" bar or a basic hook held in a rectangular slot known as an NEM pocket. To remove it, gently use your tweezers or the tip of a small screwdriver to depress the small retaining clip at the back of the pocket and slide the old coupler out. Be patient; wiggling it gently is better than applying force. If the coupler is part of a kit and has been glued, you may need to very carefully slice the glue bond with a sharp hobby knife.
Installing the New Loop Coupler
[Image: A photo demonstrating the correct orientation of the new NEM loop coupler before insertion into the pocket.]
Take your new NEM loop coupler and note its orientation. The 'dovetail' T-bar goes into the pocket, and the loop itself should droop slightly downwards. Align the T-bar with the NEM pocket and slide it in firmly until you hear or feel a distinct 'click'. This confirms it has locked securely in place.
[Image: A final photo showing the newly fitted coupler being tested against a wagon on a piece of track.]
Finally, test the fit. Place the locomotive on a piece of track and couple it to a wagon. Check that the coupler heights match and that there is free movement around curves. Ensuring your couplers work correctly is a small but vital part of realistic operation, a principle championed by organisations like the Heritage Railway Association who work to preserve authentic railway practices. With this simple upgrade, your quarry hunslet coupler is now ready for shunting duties.
For a selection of compatible couplers and detailing parts, explore the full range at narrowmindedrailworks.com.
Advanced Option: Fitting Kadee-Style Couplers
For modellers seeking the ultimate in operational realism and prototypical appearance, upgrading to Kadee-style knuckle couplers is a rewarding challenge. While the standard loop-and-hook system is functional, Kadee couplers offer a significant step up in both looks and performance, though they demand more precision during installation.
Why Choose Kadee Couplers?
The advantages of moving to a knuckle-style system are clear, especially for those who enjoy shunting and complex operations on their layouts. The key benefits include:
- Realistic Appearance: They closely replicate the automatic couplers seen on full-size railways across the world, adding a crucial layer of detail.
- 'Hands-Free' Uncoupling: Using strategically placed magnets under the track, you can uncouple wagons and locomotives without touching them, allowing for incredibly smooth and prototypical shunting.
- Reliable Connection: Once coupled, the knuckle mechanism provides a very secure and slop-free connection between rolling stock.
Solving the Height Problem with Offset Shanks
A common issue discussed on modelling forums is the height incompatibility when fitting Kadees to OO9 models. The buffer beam on many Quarry Hunslet locomotives places a standard NEM-mounted coupler too high to align with wagon stock. Fortunately, Kadee provides an elegant solution: offset shank couplers.
Couplers like the Kadee #17, #18, and #19 feature a built-in vertical drop in the shank. This design lowers the coupler head to the correct height without any need to modify the locomotive's chassis. To choose the right one, use a coupler height gauge to measure the difference required and select the offset that best matches it.
Modifying the Buffer Beam for a Custom Fit
For older kits or scratch-built models that lack a modern NEM pocket, a more direct approach is necessary. This involves fitting a Kadee draft gear box (like the #5 or #148) directly to the buffer beam. This is a permanent modification best suited for experienced modellers.
The process typically involves carefully filing a precise rectangular slot into the buffer beam for the gearbox to sit in snugly. The box is then glued securely in place. This method provides the most robust and reliable fitting when replacing the original quarry hunslet coupler assembly. Always measure carefully before making any cuts.
Mastering these advanced techniques will elevate the detail and functionality of your narrow gauge models. You can perfect these skills on one of our highly detailed OO9 loco kits, designed for the discerning modeller.
Mastering the Hunslet Coupler: Your Next Step in OO9
From understanding the rugged charm of the real-world prototype to the practical steps of fitting both standard NEM loops and more advanced Kadee-style systems, you're now equipped to add another layer of realism to your OO9 locomotives. Mastering the unique quarry hunslet coupler is a rewarding step that elevates a good model into a great one, ensuring your rolling stock looks and performs authentically on your layout.
Now that your couplers are sorted, why not turn your attention to the locomotive itself? A beautifully detailed engine is the true heart of any narrow gauge scene. At Narrow Minded Railworks, our high-resolution 3D printed body kits are designed by modellers, for modellers, offering the perfect foundation for customisation and super-detailing.
Explore our range of detailed OO9 locomotive kits and discover your next project. Happy modelling, and enjoy the satisfaction of bringing your miniature world to life!
Frequently Asked Questions
Can I just use the coupler that comes with my Quarry Hunslet kit?
Yes, you can. The standard quarry hunslet coupler supplied with the model is a functional loop-and-hook type designed to work out of the box. It provides basic compatibility with most OO9 rolling stock. However, many modellers choose to upgrade for improved operational reliability, better shunting, or for a more prototypical appearance. Upgrading is a personal choice based on your modelling goals and what you want from your layout's performance.
What is a NEM pocket and how do I know if my model has one?
A NEM pocket is a standardised mounting box on a model that allows for the easy exchange of different couplers. NEM stands for "Normen Europäischer Modellbahnen" (European Standards for Model Railways). To check if your model has one, look at the buffer beam. You will see a small, rectangular plastic box where the coupler shank is inserted. If the coupler can be gently pulled straight out without unscrewing anything, it is almost certainly fitted in a NEM pocket.
Do I need to glue the new coupler into the NEM pocket?
No, you should not glue a coupler into a NEM pocket. The purpose of the NEM system is to allow for easy, tool-free swapping of couplings. The pocket is designed with a dovetail or clip mechanism that holds the coupler shank securely in place by friction alone. Applying glue would permanently fix the coupler, defeating the purpose of the pocket and making future changes or repairs extremely difficult and potentially damaging to the model.
Will fitting a new coupler void the manufacturer's warranty on my model?
Generally, no. Swapping a coupler using a standard NEM pocket is a non-permanent, reversible modification that manufacturers expect users to perform. However, if the process requires you to cut, drill, or make other permanent alterations to the locomotive's chassis to fit a non-standard coupling, this would almost certainly void your warranty. Always stick to NEM-compatible replacements if your model is under warranty and you are concerned about maintaining it.
What is the standard coupler height for OO9 models?
While there isn't a universally enforced standard, the OO9 Society recommends a coupler centre line height of 7.5mm above the railhead. Most commercial OO9 models and kits aim for this height to ensure compatibility across different manufacturers' rolling stock. Using a coupler height gauge, which can be purchased from specialist suppliers for just a few pounds, is the best way to ensure all your stock is consistent and runs smoothly without buffer lock or derailments.
Are there other types of couplers besides loops and Kadees for OO9?
Yes, there are several alternatives. While the standard loop-and-hook is common and Kadee-style knuckle couplers are a popular upgrade for their automatic uncoupling features, other options exist. Greenwich couplings are a popular choice in the UK for their discreet appearance and reliable hands-off operation. BEMO-style continental hook and loops are another option, often found on European narrow-gauge models. The best choice depends on what you use across the rest of your layout for compatibility.