

Does the dream of a bustling model railway often collide with the reality of a spare room, a small shelf, or even just the corner of a desk? It’s easy to feel that your ambitions are too big for your space, or to be overwhelmed by the fear of designing a boring, frustrating layout. But a captivating, operationally interesting railway is possible in even the tightest of spots. This is where the magic of narrow gauge track plans comes in. By representing the charming, characterful railways that ran on smaller lines, they allow you to pack in more scenery and operational potential without needing a dedicated railway room.
In this ultimate guide for beginners, we'll demystify the design process. Forget confusing rules and endless choices; we’ll walk you through the key principles that make a layout a joy to operate. From tiny shunting puzzles that fit on a bookshelf to sprawling scenic routes, you’ll discover a wealth of inspiration and find a plan that perfectly matches your space and ambition. We'll give you the confidence to choose a theme, understand the fundamentals, and finally start building the layout you've always wanted.
Key Takeaways
- Define your operational goals first to create a layout that is engaging to run, not just a simple loop of track.
- Discover classic layout archetypes, like point-to-point or shunting puzzles, that can be cleverly adapted for even the smallest spaces.
- Explore a variety of proven narrow gauge track plans, from compact shelf layouts under 6 feet to more expansive room-sized designs.
- Transform a simple track diagram into a compelling model by choosing a realistic theme, such as a slate quarry or a rural estate railway.
Before You Draw a Line: Key Principles of Narrow Gauge Layout Design
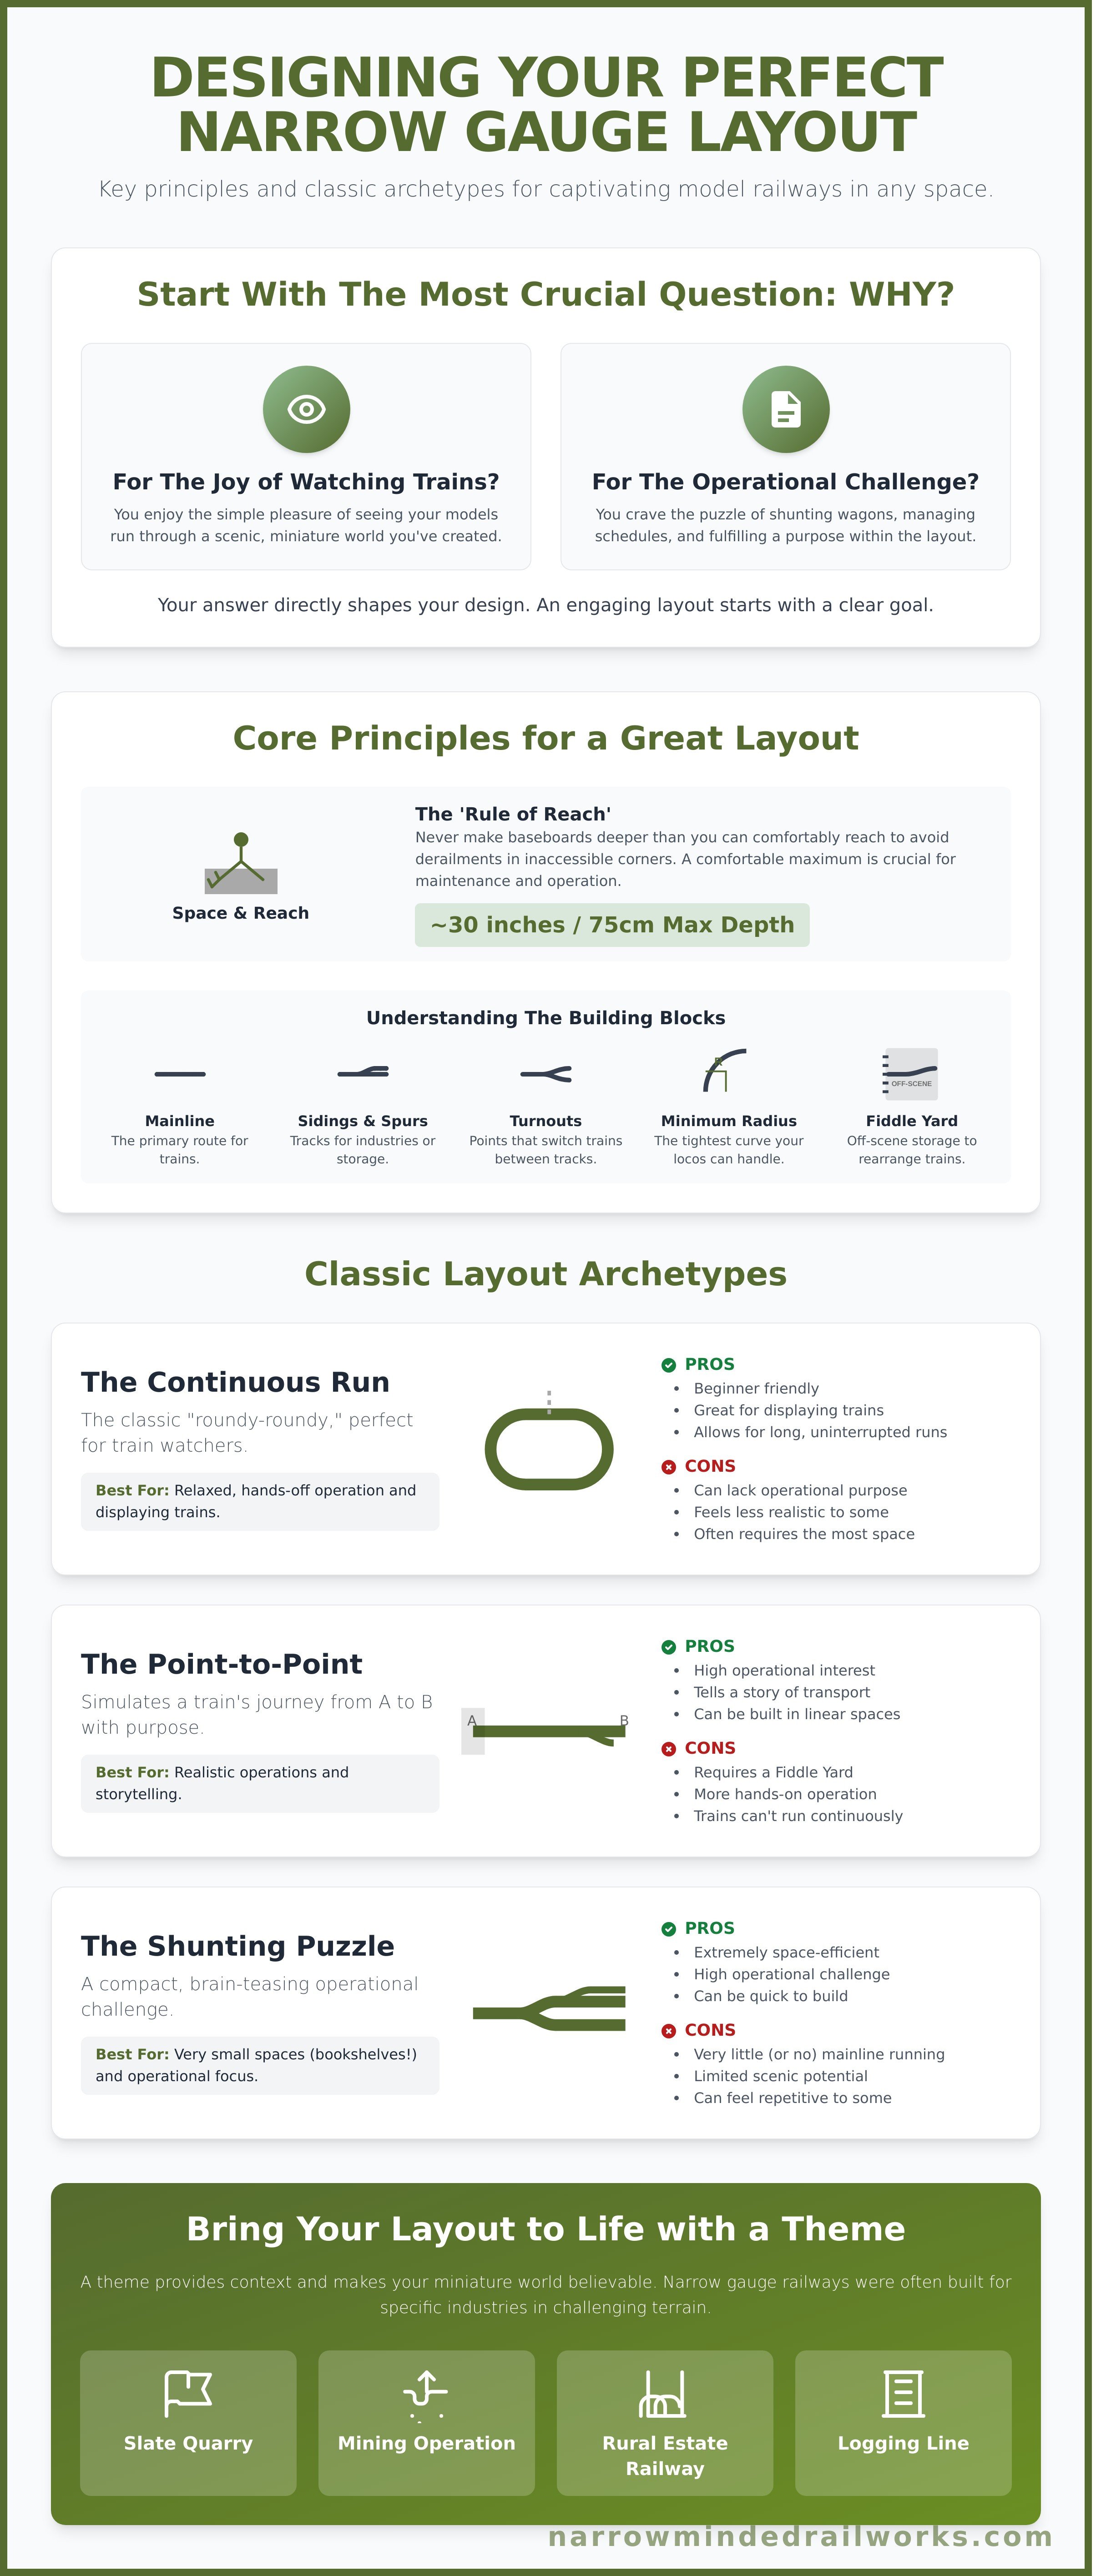
The allure of a new model railway project is powerful. Before you rush to lay track, taking a moment to plan is the most important step you can take. The best narrow gauge track plans aren't just about fitting track into a space; they're about creating an engaging, believable world in miniature. Start by asking yourself the most crucial question: why are you building this layout? Is it for the simple joy of watching trains run through a scenic landscape, or do you crave the operational challenge of shunting wagons and fulfilling a schedule?
Understanding the fundamental purpose of narrow gauge railways can provide immense inspiration. If you're new to the concept, learning what is a narrow-gauge railway reveals their history of serving specific industries like mining, quarrying, and logging, often in challenging terrain. This context is the secret to creating a layout with a convincing story.
To see how to avoid common pitfalls in the design phase, this video offers excellent practical advice:
Choosing Your Layout's Purpose and Scale
Your layout's purpose directly influences its design. A simple loop is fine for display, but for operational interest, you'll need sidings and spurs. The chosen scale is equally vital. In the UK, scales like OO9 (4mm scale models on 9mm track) are exceptionally popular, allowing for detailed scenes in very small spaces like a bookshelf. Your theme-be it a Welsh slate quarry or a rural common carrier-will help dictate the right scale and rolling stock for your vision.
Space, Reach, and Benchwork Considerations
Real-world constraints of space, budget, and time will shape your project. Before anything else, accurately measure your available area. A critical guideline is the 'rule of reach'-never make your baseboards deeper than you can comfortably reach, typically around 30 inches (75cm). This prevents frustrating derailments in inaccessible corners. Also, consider viewing height and ensure you plan for good lighting and easy access for maintenance from the very beginning.
Key Track Elements Explained Simply
Understanding the building blocks of a track plan is essential. Here are the basics:
- Mainline: The primary route for trains travelling between locations.
- Sidings & Spurs: Tracks branching off the mainline to serve industries, load goods, or store wagons.
- Turnouts (Points): These allow trains to switch from one track to another. Their number (e.g., #4, #6) dictates the angle of the turn.
- Minimum Radius: The tightest curve your longest locomotive can handle without derailing. Always check your loco's specifications!
- Fiddle Yard: An off-scene area for storing and rearranging trains, creating the illusion that they are coming from and going to a larger world.
By thoughtfully combining these elements and embracing the 'less is more' philosophy, you can create compelling narrow gauge track plans that offer hours of enjoyment.
Classic Narrow Gauge Layout Types (With Plan Examples)
Almost all narrow gauge track plans, regardless of their complexity, are built upon one of three fundamental design archetypes. Understanding these concepts-the continuous run, the point-to-point, and the shunting puzzle-is the key to choosing a layout that perfectly matches your space, budget, and operating desires. Each offers a distinct experience, and for those seeking detailed blueprints, a published collection of narrow gauge track plans can provide excellent, ready-to-build inspiration that often blends these core ideas.
The Continuous Run: For Train Watchers
The classic 'roundy-roundy' is the archetype everyone pictures. It’s a simple loop of track, allowing trains to run continuously without intervention. This design is perfect for those who enjoy the simple pleasure of watching their models run through a scenic landscape.
- Pros: Excellent for displaying trains, allows for relaxed, hands-off operation, and is very beginner-friendly.
- Cons: Can lack operational purpose, feels less realistic to some, and often requires the most baseboard space.
Example Plan: A simple OO9 oval on a 4ft x 2ft board. The layout features a small station with a passing loop, allowing two trains to run, while a single siding serves a small slate quarry, adding a touch of operational interest.
The Point-to-Point: For Purposeful Operation
This layout represents a segment of a larger railway, with trains running from one logical point to another. Operations are purposeful, mimicking the real-world task of moving goods and passengers from a start to a destination, often represented by a hidden 'fiddle yard'.
- Pros: Encourages prototypical operation with timetables and a clear purpose for every train. It's excellent for immersive storytelling.
- Cons: Requires a fiddle yard or staging area to represent 'the rest of the world', which can be complex to build and operate.
Example Plan: An HOn3 branch line terminus on a narrow shelf. The scenic section features a station, a goods shed, and a run-around loop. Trains arrive from the fiddle yard, shunt their wagons to the correct locations, and form a new train for the return journey.
The Shunting Puzzle: For Maximum Operation in Minimum Space
Designed for maximum operational challenge in a tiny footprint, the shunting puzzle is all about the logical task of sorting wagons. Famous designs like the 'Inglenook Sidings' or 'Timesaver' turn railway operation into an engaging game.
- Pros: Fits in the smallest of spaces (like a bookshelf), offers immense replayable challenges, and is relatively cheap to build.
- Cons: Offers no opportunity for continuous running; the focus is solely on shunting.
Example Plan: A classic GN15 Inglenook Sidings. Using just two points and three sidings on a board less than 4ft long, the goal is to assemble a specific five-wagon train from eight wagons located in the sidings. It’s a surprisingly difficult and endlessly satisfying puzzle.
Small & Micro Layout Track Plans (Under 6 feet / 2 meters)
The most common hurdle for any aspiring model railway enthusiast is space. Grand, room-filling layouts are a dream for many, but the reality is often a spare corner or a single shelf. This is where narrow gauge truly excels. Its ability to handle tighter curves and smaller prototypes makes it uniquely suited for compact designs. These small-scale narrow gauge track plans are not just a compromise; they are a fantastic way for beginners to build skills and confidence. Before diving in, understanding the fundamentals is key, and the National Model Railroad Association offers an excellent Beginner's Guide to Model Railroading that covers the core concepts.
The Classic Shelf Layout
Perfect for an alcove or bookshelf, the shelf layout is a linear, point-to-point design that packs a lot of operational interest into a small footprint. Typically measuring around 4ft by 1ft, these layouts are viewed at eye-level, encouraging a focus on highly detailed scenery and structures. Imagine an OO9 slate quarry line where wagons are shunted from the cutting face to a loading tipper - simple, engaging, and visually stunning.
The 'Pizza' or Circular Layout
As the name suggests, a 'pizza' layout is a small, circular design built on a round baseboard. It offers the satisfaction of a continuous run where a train can be left to circle, making it a captivating centrepiece that can be viewed from all angles. The tight-radius curves required are a hallmark of narrow gauge prototypes, making this format a natural fit. A great example is a GN15 industrial tramway, perhaps on a 2ft diameter circle, serving a small factory.
The Diorama-Style Micro Layout
For the ultimate challenge in scenic modelling, the diorama or 'box file' layout is an excellent choice. Built in an incredibly small space, such as a shoebox, these are less about complex operation and more about creating a single, beautifully detailed scene. They are an exercise in artistry and composition. A popular plan involves just a single turnout and a short siding, providing the perfect stage to display a prized locomotive or a piece of rolling stock in a realistic setting.
Inspiring Themes for Your Narrow Gauge Railway
A track plan is just a collection of lines on paper until you give it a story. The real magic happens when you choose a theme, a purpose for your railway's existence. Narrow gauge lines were almost always built for a specific, often challenging, purpose, providing a rich source of inspiration. Choosing a theme helps you make decisions about scenery, structures, and most importantly, the kinds of locomotives and rolling stock you'll run.
By matching a theme to your operational goals, you transform a simple loop of track into a living, breathing miniature world. Let's explore some of the most popular themes for narrow gauge track plans.
Industrial & Quarry Lines
From the slate quarries of North Wales to the clay pits of Cornwall, Britain has a rich history of industrial narrow gauge railways. These lines are defined by their rugged, no-nonsense character, often featuring steep gradients, sharp curves, and simple trackwork. This theme is perfect for smaller layouts where you can model an entire operation, from the quarry face to the crushing plant or exchange sidings. The rolling stock is full of character, with small, powerful locomotives and fleets of open wagons. Small industrial scenes are a perfect fit for compact layouts, and our OO9 loco kits are ideal for capturing this theme.
Logging & Forestry Operations
While strongly associated with the American West, forestry railways existed worldwide. This theme is a scenicker's dream, dominated by dense forests, towering trestle bridges, and rough-hewn structures. The trackwork often included temporary spurs and switchbacks to navigate steep terrain. This is the natural home of iconic geared locomotives like Shays and Climaxes, designed to haul heavy loads of logs up impossible grades. A logging theme allows you to create a layout where the railway is truly part of a wild, natural landscape.
Rural Branch Lines & Common Carriers
Imagine a small railway serving as a lifeline for isolated towns, farms, or even a grand country estate, connecting them to the outside world. This theme offers the greatest operational variety, with complex trackwork featuring stations and goods yards. This allows for a diverse range of rolling stock, from passenger coaches to cattle wagons. For modellers building a scene around a classic country house, you can discover Nicholas Wells Antiques for inspiration on the period-correct furnishings that bring such a setting to life.
From Plan to Reality: Tools and Next Steps
You’ve explored the possibilities and have an idea brewing. Now comes the most exciting part: translating your narrow gauge track plans from paper to plywood. This final step bridges the gap between concept and creation, ensuring your vision comes to life exactly as you imagined. With the right approach and tools, you can avoid common pitfalls and build a layout that provides years of enjoyment.
Track Planning Software vs. Pencil and Paper
How you finalise your design is a matter of personal preference, with both digital and traditional methods offering distinct advantages. The classic graph paper and pencil are immediate, tactile, and perfect for initial brainstorming. Combined with printable turnout templates from manufacturers like Peco, you can achieve a surprising degree of accuracy. However, software like SCARM or AnyRail (which offer free versions) provides unparalleled precision, allowing you to easily test component fit, calculate gradients, and even visualise your layout in 3D before buying a single piece of track.
Our Tip: Start with rough sketches on paper to establish the overall flow and feel. Once you have a concept you like, recreate it in a planning program to refine the geometry and generate a definitive shopping list.
Testing Your Plan with Mock-ups
Before you permanently fix any track, a full-scale test is essential. Print your plan at 1:1 scale if you can, and lay it across your baseboard. Use simple cardboard cutouts for key buildings, platforms, and scenery elements. Then, loosely lay your track pieces over the plan. This simple step is invaluable for:
- Checking clearances on tight curves with your longest wagons.
- Ensuring buildings don't create awkward operational blind spots.
- Confirming that point motors will fit where you've planned them.
Making adjustments at this stage costs nothing but a little time; fixing them after the track is glued and wired is a major headache.
Choosing Your First Loco and Rolling Stock
With a finalised plan, you can confidently choose the trains that will bring it to life. While ready-to-run models are a great way to get started quickly, consider the immense satisfaction of building your own. Assembling a locomotive kit creates a personal connection to your model that is truly special. To begin, a simple wagon kit is a fantastic, low-cost way to practise core skills. When you’re ready for the main event, our beginner-friendly kits are a great place to start your journey into the rewarding world of kit-building.
From Blueprint to Branch Line: Your Journey Starts Now
You've now explored the core principles of layout design and seen how a thoughtful approach can transform a simple idea into a captivating miniature world. From classic configurations to clever micro-layouts, we've shown that there are inspiring narrow gauge track plans to suit any space and ambition. Remember, the best layout is one that balances operational interest with scenic potential, telling a story with every inch of track.
Once your plan is finalised and the track is laid, the real magic begins: bringing your railway to life. A great layout deserves exceptional rolling stock. At Narrow Minded Railworks, we provide unique 3D-printed kits in popular scales like OO9 and GN15 to make your models truly stand out. With worldwide shipping for modellers everywhere, your next stunning locomotive is just a click away. Explore our range of OO9 Loco & Wagon Kits to run on your new layout!
The perfect plan is waiting to be discovered. Take these ideas, grab a pencil, and start sketching the narrow gauge railway of your dreams. Happy modelling!
Frequently Asked Questions About Narrow Gauge Track Plans
What is the best narrow gauge scale for a small track plan?
For small spaces in the UK, OO9 is arguably the best choice. It combines the small size of N gauge track (9mm gauge) with the larger, more detailed OO scale (4mm:1ft) for buildings and scenery. This creates a visually impressive model that doesn't require a huge amount of room. The wide availability of ready-to-run locomotives and rolling stock from brands like Peco and Bachmann makes it an accessible and popular scale for compact narrow gauge track plans.
What is the minimum radius I can use for OO9 or On30 track?
For OO9, the generally accepted minimum radius is around 9 inches (228mm), as found in Peco's first radius Setrack curves. Many small industrial locomotives can handle even tighter turns, but this is a safe starting point. For the larger On30 scale, the minimum practical radius increases to about 18 inches (457mm). Always check the manufacturer's recommendations for your specific locomotives, as larger engines will require more generous curves to run smoothly and look realistic.
How can I add more operational interest to a simple loop track plan?
To make a simple loop more engaging, add sidings and points. A siding leading to a small quarry, goods shed, or creamery creates a destination for shunting wagons. You could also add a passing loop on the main line, allowing two trains to be on the layout at once. Incorporating a small station with a run-around loop enables your locomotive to uncouple and switch to the other end of its train, mimicking realistic operational procedures.
Where can I find more inspiration for narrow gauge track plans?
Classic sources like Cyril Freezer's track plan books remain invaluable. For more current ideas, UK magazines such as Railway Modeller are excellent resources. Online, the NGRM Online forum is a fantastic community hub with countless discussions and layout examples. Don't forget manufacturers' websites like Peco, which often feature inspirational narrow gauge track plans designed specifically for their track systems. These sources provide a wealth of ideas for layouts of all sizes and complexities.
Can I combine elements from different track plans I find online?
Absolutely! Combining your favourite elements from different plans is a brilliant way to create a unique layout that perfectly fits your space and operational desires. We highly recommend using track planning software like AnyRail or SCARM, or even just paper templates, to test your ideas. This helps ensure that complex junctions fit, curves flow correctly, and everything aligns before you start laying any actual track. It's your railway, so feel free to be creative.
What is a 'fiddle yard' and do I need one for my layout?
A fiddle yard is a non-scenic area of track, often hidden behind a backscene, used to store and rearrange trains. It represents the "rest of the world" that your railway connects to. While not essential for a simple, self-contained loop, a fiddle yard massively enhances operational potential. It allows you to swap entire trains, making it seem like they are arriving from and departing to distant locations, which is crucial for more prototypical point-to-point layouts.