

A convincing model railway interior depends on visible details and well-placed lighting, not simply a roof over the scene. For model railway workshop interior details, think about wall finishes, doors and fittings that give the space a working purpose. Some interior wall textures are approximately 46 mm tall, and a detailing pack example includes two sheets, six doors and four open fires.
It’s easy to focus on a building’s exterior, but interior details can make coaches and stations feel more complete, especially when viewed up close or illuminated. Choose fittings that suit the scale and leave room for lighting and the surrounding scene.
This article explains how to plan interior features and lighting, adapt details to different spaces, and create handmade scenery around a workshop. You’ll also find practical advice on materials and model-making kits and scenery for a small-scale railway project.
Key Takeaways
- Plan coach and station interiors around the viewing angle, then fit details and lighting without crowding the space.
- Use accessible materials such as kitchen sponges, tea leaves and craft paint to build varied workshop scenery.
- Make scenes feel more convincing by varying surface texture, colour and placement rather than repeating identical details.
- Choose workshop tools and machinery that support the story of the building, and arrange them to suggest a clear working area.
- Use restrained colours, legible signage and considered lighting to create a British railway workshop atmosphere.
Adding interior details and lighting to coaches and stations
Interior fittings make a coach or station feel occupied, even when viewed through a small window. Start with the layout’s main viewing angle. A platform-side coach may need visible seats, partitions and passengers, while a station office might show a desk, a door and an illuminated room. Plan model railway workshop interior details alongside coach and station interiors to give the layout a consistent look, rather than treating each building as a separate scene.
For OO gauge, the AX117-OO detailing pack provides a practical example of ready-made interior textures. It includes two sheets, six interior doors and four open fires. Its wall textures are approximately 46 mm tall, and can be trimmed to suit buildings with lower ceilings. The pack is compatible with OO gauge model railways and 1:76 scale diecast models.
For a closer look at miniature interiors built up in detail, watch this video from Marklinofsweden:
Fit the AX117-OO details by cutting out the components and gluing them inside buildings with suitable card or paper glue. Test each wall texture against the interior before fixing it. Trim the lower edge where a ceiling restricts its height, then check that doors align with openings. A dry fit helps prevent a texture from covering windows or clashing with a partition.
Lighting should reveal the scene, not overpower it. Position a light to show seats or a station office without creating harsh glare through the windows. Where the model allows, conceal wires behind interior walls or beneath the floor. Before closing the roof, switch on the light and view the room from the layout’s usual angle. Adjust any fitting that casts a distracting shadow across a door or wall.
- Use warm-looking illumination for a lived-in waiting room, or a brighter work light above a station office desk.
- Keep coach lighting consistent with visible interior details, so empty seats do not appear unnaturally prominent.
- Leave access to the light fitting where possible, making later adjustments easier after the roof is attached.
Scratch-building gives you more control when a standard interior does not suit the model. The Leek & Manifold coaches were scratch-built from Plastikard and include interior details and lighting. Hulme End Station was also made from Plastikard with interior details and lighting. These examples show how model railway workshop interior details can support a consistent approach to walls, fittings and illumination, instead of becoming separate afterthoughts.
The AX117-OO detailing pack includes 6 interior doors and 4 open fires. Choose only the pieces that suit the visible room and the scene it is meant to suggest. A door can define a route between spaces, while an open fire can provide a focal point in a waiting room or office. Keep these details visible from the layout’s usual viewing angle, and avoid positioning them where a seat, partition or window obscures them.
Before fixing a piece in place, check its position against the other furnishings and the lighting. A small adjustment can keep a doorway clear or stop an illuminated fire competing with a nearby light. Choose fittings to suit what viewers can actually see, so the coach or station interior feels deliberate rather than overcrowded.
Handmade workshop scenery and materials
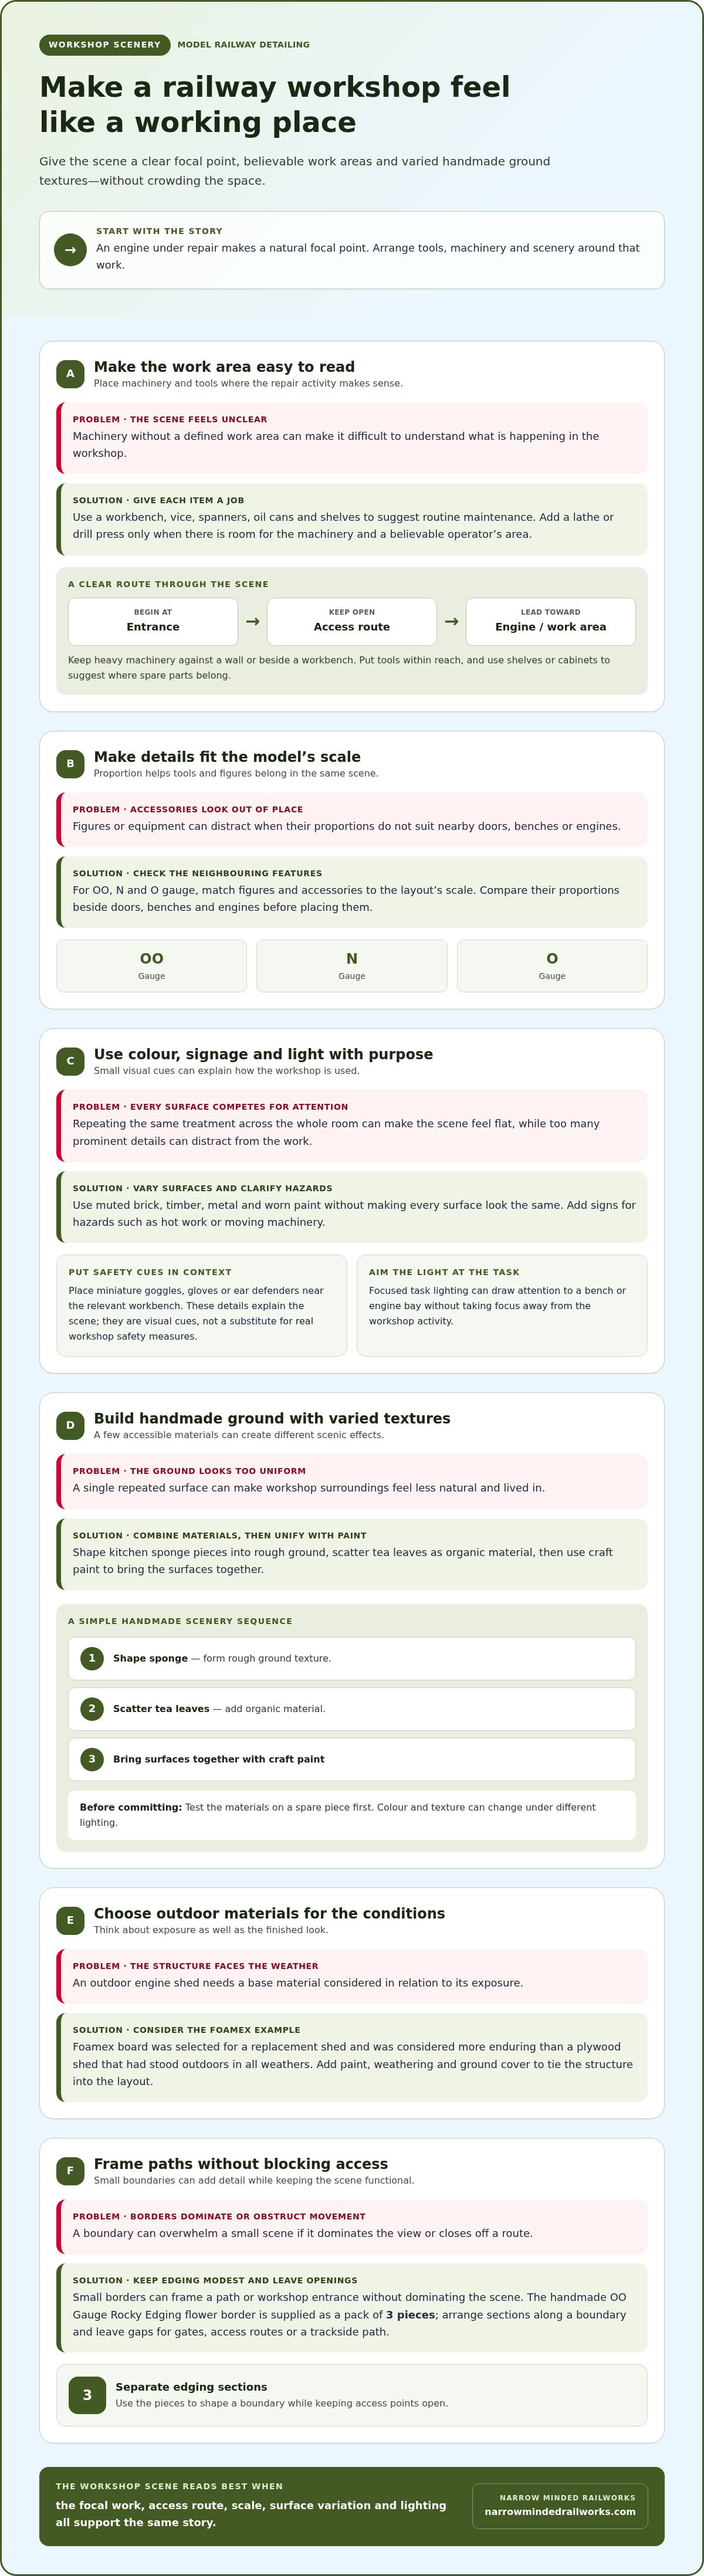
Build a railway workshop scene around its work, materials and movement. A clear focal point, such as an engine under repair, helps organise the scenery and accessories.
Tools and Machinery
Choose tools that make the workshop’s purpose clear: a workbench, vice, spanners, oil cans and shelves suggest routine maintenance. Add a lathe or drill press only if there is room for the machinery and a believable operator’s area. For OO, N and O gauge, match figures and accessories to the layout’s scale. Check their proportions beside doors, benches and engines.
Workshop Colours and Lighting
Muted brick, timber, metal and worn paint can create a practical British workshop without making every surface look the same. Add signs for hazards such as hot work or moving machinery, then place miniature goggles, gloves or ear defenders near the relevant workbench. These details help explain the scene; they are visual cues, not a substitute for real workshop safety measures. Focused task lighting can draw attention to a bench or engine bay.
Machinery and Work Area Placement
Position heavy machinery against a wall or beside a workbench, leaving a clear route from the entrance to the engine. Keep tools within reach of the work area, and use shelves or cabinets to show where spare parts belong. If the building and track arrangement allow, a small inspection pit can make the repair scene easier to read. Keep doorways and windows clear so viewers can see inside.
Handmade scenery can make the workshop grounds feel lived in. Kitchen sponges, tea leaves and craft paint offer varied textures: shape sponge pieces into rough ground, scatter tea leaves as organic material, then use paint to bring the surfaces together. Test the materials on a spare piece first, as colour and texture can change under different lighting.
For an outdoor engine shed, consider the base material. Foamex board was selected for a replacement shed because it was considered more enduring than a plywood shed that had stood outdoors in all weathers. Use this example to think about exposure and the finish you need, then add paint, weathering and ground cover to tie the structure into the layout.
Small borders can frame a path or workshop entrance without dominating the scene. A handmade OO Gauge Rocky Edging flower border is supplied as a pack of 3 pieces, offering separate sections to arrange along a boundary. Leave gaps for gates, access routes or a trackside path, and vary the surrounding ground texture to avoid a rigid, repeated edge.
For a project needing compatible scenery accessories, Diorama Tools & Scenery can help develop the surrounding workshop scene alongside its handmade details.
Realistic scenic detail and natural variation
A convincing workshop scene relies on variation, not repeated layers of grime. Give each surface a distinct purpose: keep frequently handled areas smoother, add darker marks around machinery, and use lighter dust on ledges. For example, scatter tools on a workbench but leave the floor beside it clearer. This contrast helps viewers understand how the space is used. Plan model railway workshop interior details around one main activity, then vary nearby surfaces to support that story.
Historic references help set the period and atmosphere. According to the National Railway Museum, its photographic collections date back to the 1800s. A photograph in the museum’s Bow Locomotive Works collection shows the locomotive erecting shop around 1900. Study the arrangement of large structures and open working space, then adapt those visual relationships to your model’s scale and footprint. Use the reference to guide composition, not to copy every mark.
Natural variation also comes from showing different stages of work. A photograph in the National Railway Museum’s Doncaster Works collection shows workers painting a locomotive in 1947. Translate that activity into a model by placing paint containers near a partly finished component, with a separate clear working area nearby. Keep the painted surface distinct from older equipment, so the scene tells a specific story rather than making every object look equally worn.
Wagon and carriage references suggest further ways to vary materials. A photograph in the National Railway Museum’s Shildon Works collection shows wagons being built around 1910, while a Wolverton collection photograph shows carriages under construction about 1928. Choose one construction activity as the scene’s focus. Arrange timber, metal parts or tools around that task, then leave adjacent areas less cluttered to preserve a readable composition.
Weathering works best when it follows a believable cause. Add darker staining beneath a roof edge, near a chimney, or around a frequently used doorway. Keep exposed surfaces lighter where rain or handling would leave a different finish. A photograph in the National Railway Museum’s York Carriage Works collection shows a first-class carriage built around 1935. Use its contrast between passenger fittings and workshop surroundings to inform how you treat different materials.
Before fixing scenic details, view the model from the layout’s usual position. Check whether a tool, figure or surface mark supports the scene or distracts from it. The National Railway Museum’s Derby Works collection includes a photograph showing line widening at Ambergate in July 1931. Its subject suggests a useful composition principle: make the main activity clear, then use supporting details to show its context. Apply that principle to a repair bay, storage corner or assembly area. With model railway workshop interior details, vary spacing and finish rather than lining every object evenly.
What tools and machinery are commonly found in a railway workshop?
Show equipment that suits the workshop’s task. A repair bay might centre on an engine, while a carriage shop could feature a workbench for fittings. Decide on the activity first, then select tools to support it. This gives each object a purpose instead of simply filling floor space.
Hand tools add useful small details. Place spanners, hammers, files, screwdrivers and oil cans on a bench or hang them on a wall. A vice suggests that parts are being held for repair, while a toolbox or labelled drawer gives smaller items a believable home. Leave a few tools in use and store the rest nearby.
Larger machinery can establish the workshop’s function. A drill press, lathe or grinding wheel suggests metalwork, while a lifting jack or inspection equipment points to locomotive maintenance. Choose machinery to suit the building and the activity shown. One prominent machine with a few smaller accessories often reads more clearly than a crowded collection.
- Repair bench: pair a vice with files, spanners and a small parts tray.
- Metalworking area: place a drill press or lathe beside a clear working surface.
- Stores corner: use cabinets, shelves and oil cans to suggest organised supplies.
- Engine bay: add maintenance tools close to the locomotive, leaving its outline visible.
Historical references can help distinguish workshop activities. The National Railway Museum collection contains over 1,000 model engines, carriages and other rail vehicles and equipment. Its Doncaster Works collection includes a photograph of workers painting a locomotive in 1947. Use that example to build a painting scene with paint containers, a prepared work area and tools associated with finishing.
Before fixing accessories in place, arrange them around one task. Put the most important machine or tool where viewers can recognise it, then use smaller items to explain its purpose. A bench with a vice, a partly assembled component and a nearby toolbox tells a different story from a lathe surrounded by metalworking tools. Leave clear floor space around the activity so figures and equipment remain easy to distinguish.
Scale affects how much detail a model can carry. In a compact workshop, choose distinctive shapes, such as a bench, cabinet and drill press, rather than tiny loose tools. In a larger building, add storage boxes, wall-mounted equipment and separate work surfaces. Check each item beside the engine and doorway; consistent proportions help the machinery feel at home in the same railway setting.
What colours, signage and lighting suit a British railway workshop interior?
A British railway workshop can look convincing without a fixed colour scheme. Start with the building’s materials: exposed brick, painted timber, dark metal and concrete each suggest a different surface. Choose a restrained base palette, then use brighter colour selectively on a tool cabinet, sign or engine component. This creates a focal point without making every wall compete for attention.
Historic references help set the period and atmosphere. The National Railway Museum’s Bow Locomotive Works collection includes a photograph of the locomotive erecting shop around 1900. Use the image’s broad arrangement as a visual cue: identify the main work area, then let the structure and equipment guide your colour choices. A model inspired by an older works might suit worn timber and soot-darkened surfaces, while a cleaner interior can suggest regular maintenance.
Make signage clear at miniature viewing distance. Place a workshop nameplate beside the entrance or a small notice near a tool store. Use bold, simple lettering so it remains legible through windows. A warning sign beside a grinding area or a notice above a paint store can define each zone. Treat signs as scenic details, not statements of current safety requirements.
Lighting changes how colours appear. Warm light can make timber and brick feel inviting, while more neutral light can reveal metal tools and painted parts. Test the effect with the workshop roof in place, because shadows and reflections shift once the interior is enclosed. Direct a small fitting towards a workbench or engine, and keep other areas softer to preserve contrast.
- Brick and masonry: combine muted red-brown tones with selective darker marks around openings.
- Timber benches: use varied brown shades, with a lighter worn patch where tools are handled.
- Metal equipment: distinguish the machine from its surroundings through a different finish.
- Signs and notices: use short labels for areas such as stores, paint and repairs.
For a practical sequence, paint large surfaces first, add signs and equipment, then test the lighting. Check each colour beside the model’s track, figures and engine. If a bright sign draws attention from the main scene, reduce its contrast. Avoid using one light source to flatten the whole room; directing illumination towards a specific task makes the workshop easier to read.
Develop the scene with railway scenery tools and details that complement its chosen palette and period.
Narrow Minded Railworks: OO9 Locomotive & Wagon Kits
Narrow Minded Railworks offers kits and scenery for railway modellers developing a workshop layout. Its OO9 Locomotive & Wagon Kits can help establish the railway activity around a miniature works, while GN15 Locomotive & Scenery Kits provide another narrow-gauge modelling option. For larger-scale projects, O-16.5 / 7mm Scale Kits offer a further route to building a distinctive scene.
Once you’ve planned the workshop’s setting and activity, Narrow Minded Railworks’ Diorama Tools & Scenery can help you develop the surrounding layout. Choose products that suit your scale and the scene you’re building, from railway vehicles to scenery and diorama details.
To explore the kits and scenery, visit Narrow Minded Railworks.
Turn Your Workshop Idea Into a Working Scene
A model railway workshop feels more convincing when its details support a clear story. First decide what the scene should show: an engine awaiting attention, a workshop in active use, or a quiet corner of a station. That choice gives each design decision a purpose and helps the finished layout feel personal rather than crowded.
If you’re developing the railway vehicles or setting around that scene, Narrow Minded Railworks offers OO9 Locomotive & Wagon Kits, GN15 Locomotive & Scenery Kits, and O-16.5 / 7mm Scale Kits. Choose the scale and direction that best suit your planned layout, then build the workshop around the activity you want viewers to notice first.
Take the next step at your own pace: contact Narrow Minded Railworks to discuss your model railway project. A clear idea of the scene you want to create is a practical place to begin, and your workshop can grow detail by detail.
Frequently Asked Questions
How can I model workshop benches, tool cabinets and work areas?
Build benches and cabinets from layered card or thin stripwood, then add details that show how each piece is used. Score drawer fronts into card and make small handles from short pieces of wire. Place a cutting mat or partly assembled component on the bench to suggest ongoing work. Keep the cabinet beside its work area so its contents and nearby tools make sense together.
How do I add realistic oil stains, clutter and weathering to a workshop scene?
Apply weathering gradually, concentrating dark marks beneath an engine or around a frequently used machine. Use a fine brush to apply diluted dark paint, then soften the edges before it dries. Group clutter by task, such as spare parts near a workbench, instead of scattering it evenly. Leave some floor and bench space clear so each stain and object remains visible.
How can I build workshop interior details from scratch using inexpensive materials?
Use packaging card for shelves, benches and cabinet bodies, then cover rough edges with thin paper. Short pieces of wire can represent handles, pipes or simple tool shapes. Make a template from scrap paper before cutting repeated parts, and dry-fit each piece inside the building. This helps prevent bulky fittings from blocking windows or doorways before you paint and attach them.