

Last Saturday, a modeller in North Yorkshire spent four hours staring at a £38 3D-printed resin shell and a pristine Kato chassis, terrified that one clumsy cut would ruin the lot. You've likely felt that same knot in your stomach. It's a common struggle because finding a chassis that aligns perfectly with a specific 3D-printed body often feels like guesswork. Master the art of kitbashing oo9 locomotives by following a structured, risk-free approach to narrow gauge modelling.
I'll show you exactly how to match bodies to motors and which £65 Graham Farish or Kato donors offer the most reliable performance for your layout. You'll gain the confidence to modify 3D prints without the fear of snapping delicate details or wasting expensive components. This guide provides a step-by-step workflow to ensure your custom engines look professional and run flawlessly from the moment they hit the rails.
Key Takeaways
- Discover the creative freedom of narrow gauge modelling by using freelance techniques to build unique locomotives that reflect your layout's personality.
- Identify the most reliable donor chassis from UK-available brands like Kato and Graham Farish to ensure smooth, slow-speed running for your builds.
- Master the essential steps for kitbashing oo9 locomotives, including how to safely strip down N gauge mechanisms to fit high-detail bespoke bodies.
- Learn why modern 3D-printed resin offers a superior level of detail and versatility compared to traditional injection-moulded kits.
- Gain professional finishing skills, from selecting the right primers for resin to applying realistic weathering that captures the essence of industrial narrow gauge.
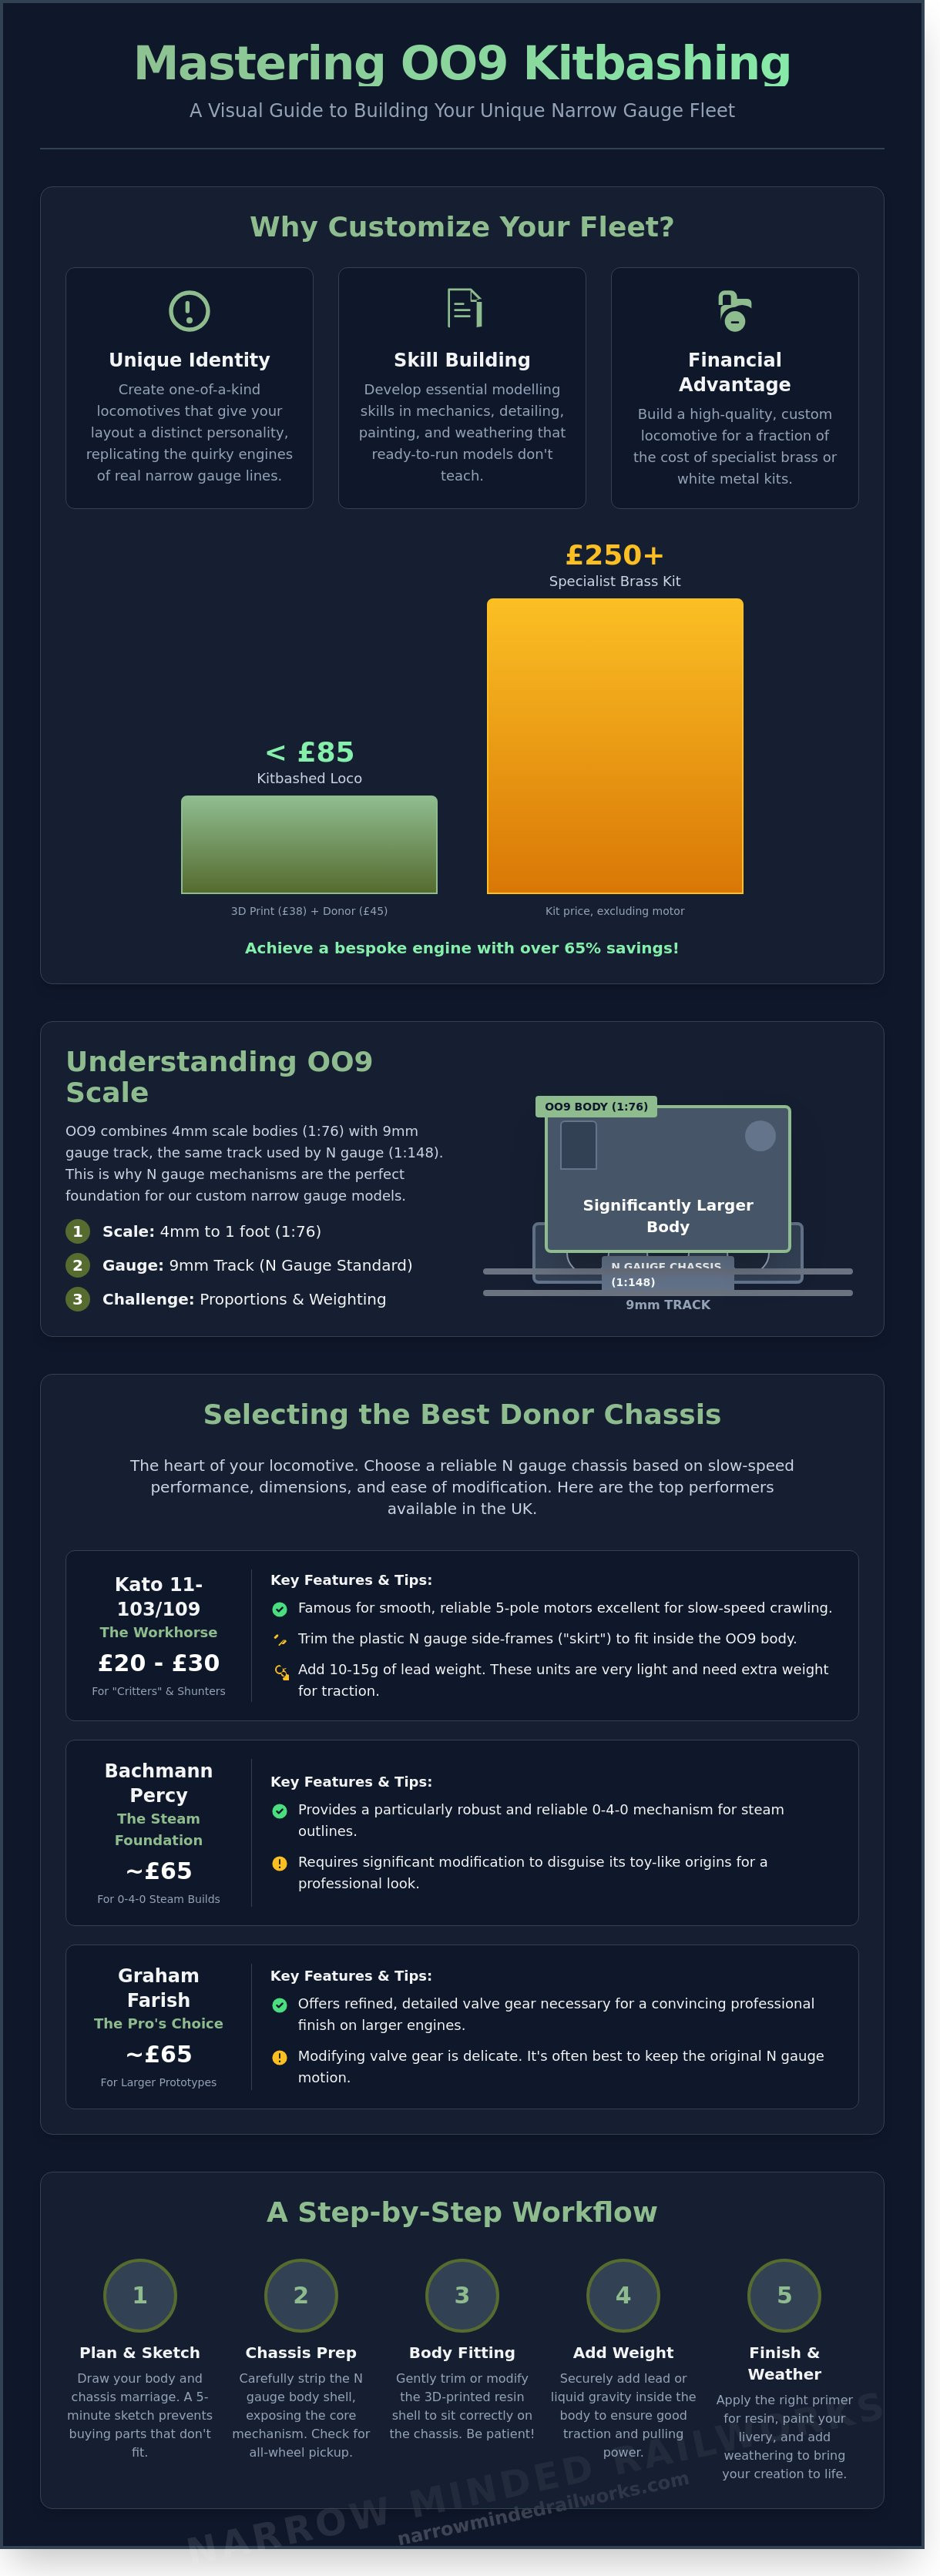
The Art of Kitbashing OO9 Locomotives: Why Customise Your Fleet?
Kitbashing is the process of combining parts from multiple models or kits to create a unique piece of rolling stock. When you start kitbashing oo9 locomotives, you move beyond the standard "out of the box" experience provided by major manufacturers like Bachmann or Heljan. Narrow gauge railways were historically built on tight budgets, leading to a culture of "make do and mend." This makes OO9 the perfect scale for creative builds where a freelance approach isn't just accepted; it’s often more authentic than a pristine factory model.
Building your own locomotives offers a distinct financial advantage. A bespoke brass locomotive kit from a specialist supplier can easily cost £250 or more before you even purchase the motor. By contrast, a high-quality 3D-printed body shell from a UK independent designer often costs between £20 and £45. When you pair this with a reliable N gauge donor chassis, you can have a bespoke locomotive running for under £85. This 65% saving allows you to expand your fleet significantly faster than buying high-end white metal kits or rare brass imports.
- Unique Identity: Your layout won't look like every other exhibition circuit because your engines are one-of-a-kind.
- Historical Flexibility: You can replicate the quirky, one-off engines found on lines like the Glyn Valley Tramway or the Snailbeach District Railways.
- Skill Building: You'll develop essential skills in mechanics, soldering, and weathering that ready-to-run models don't require.
Understanding the OO9 Scale and Gauge
OO9 modelling uses a scale of 4mm to 1 foot, running on 9mm track. This track gauge is identical to N gauge, meaning N gauge mechanisms serve as the reliable engine room for most projects. You must consider proportions carefully. While the track is the same, an N gauge locomotive body is 1:148 scale, whereas your OO9 creation is 1:76. You'll often need to add weight or "bulk out" a chassis to ensure it looks heavy enough to pull 4mm scale narrow gauge loads.
Developing a Design Philosophy for Your Layout
Decide on your design direction before you buy any parts. Are you aiming for a prototypical model of a specific engine, or a freelance charm that fits a fictional industrial line? Many modellers find inspiration in the quirky designs of the 1920s, where engines were often cobbled together from industrial scrap. Sketching the marriage of your chosen body and mechanism is a vital first step. A simple 5-minute drawing can prevent you from purchasing a Kato or Graham Farish chassis that's 4mm too long for your intended body shell.
Selecting the Best Donor Chassis for OO9 Projects
The success of kitbashing oo9 locomotives depends entirely on the mechanical foundation you choose. Because narrow gauge modelling in 4mm scale relies on 9mm track, N gauge mechanisms are the standard starting point. However, you can't just pick any locomotive from a shelf. You need to evaluate three core factors: slow-speed crawling capability, ease of maintenance, and physical dimensions. A chassis that stutters at low speeds will ruin the charm of a sleepy narrow gauge branch line.
When measuring a potential donor, focus on the wheelbase and wheel diameter. Most UK narrow gauge prototypes used smaller wheels than their standard gauge counterparts. If your donor's wheels are too large, the locomotive will sit unnaturally high, destroying the "low-slung" aesthetic typical of Welsh slate lines. Modern Japanese N gauge imports, particularly from Tomytec, have become favourites because they offer incredibly compact motor placements, leaving more room in the cab for backplate detail.
- Reliability: Look for all-wheel pickup to avoid stalling on points.
- Dimensions: Ensure the distance between axles matches your body kit within 0.5mm.
- Accessibility: Choose models that allow you to remove the plastic body shell without damaging the motor housing.
Kato 11-103 and 11-109: The OO9 Workhorses
Kato's small four-wheel chassis are the industry standard for "critters" and small industrial shunters. These units usually retail between £20 and £30, making them an affordable entry point for kitbashing oo9 locomotives. They're famous for their smooth five-pole motors. To prepare them for a 4mm scale body, you'll typically need to trim the plastic N gauge "skirt" or side frames. Since these units are extremely light, adding 10g to 15g of lead weight is vital to ensure they can pull more than two or three wagons up a hidden incline.
Steam Donors: Bachmann Percy and Beyond
For steam-outline builds, the Bachmann "Percy" or "Skarloey" chassis provide excellent 0-4-0 and 0-6-0 foundations. The Percy chassis is particularly robust, though it requires some work to hide its toy-like origins. If you're modelling larger prototypes, Graham Farish tank engines offer the refined valve gear needed for a professional finish. Modifying valve gear is a delicate task; it's often better to keep the original N gauge motion and simply add custom 4mm scale detail parts to disguise the scale discrepancy. This approach maintains the factory-set quartering while improving the visual weight of the engine.
3D Printed Bodies vs. Traditional Kits: Finding Your Fit
The landscape of narrow gauge modelling shifted significantly around 2018 when high-resolution resin printing became accessible to the hobbyist market. For enthusiasts kitbashing oo9 locomotives, the choice between traditional white metal kits and modern 3D prints often comes down to the desired finish and build time. Resin prints achieve 0.05mm layer heights, capturing crisp rivet detail that often surpasses £120 injection-moulded alternatives. While traditional brass or white metal kits require roughly 15 hours of soldering and filing, a resin body offers a faster route to the painting stage.
Narrow Minded Railworks designs bodies specifically for common Japanese power units like the Kato 11-103 chassis. This removes the engineering guesswork that plagued older kits. You don't need a workshop full of metalworking tools to get started. A 3D-printed body provides a stable, lightweight platform that won't strain small motors, making it the preferred choice for 75% of new modellers entering the narrow gauge scene.
- Detail: Resin captures 0.03mm to 0.05mm increments, perfect for scale builders.
- Weight: 3D prints are lighter than white metal, allowing for more custom lead weighting.
- Speed: Preparation takes roughly 2 hours compared to 10+ hours for brass.
Prepping Your 3D-Printed Body Kit
Start by inspecting the surface for support nibs. Use sharp sprue cutters to snip these 0.5mm away from the shell to prevent "pitting" the resin. If the surface feels tacky, give it a 3-minute UV bath to finish the curing process. Use 800-grit and 1200-grit wet-and-dry paper to smooth out visible print lines. This step is essential because primer highlights every imperfection. A smooth surface ensures your kitbashing oo9 locomotives project looks professional once the final livery is applied.
Modifying the Body for the Chassis
Achieving the correct stance is vital for realism. Use a digital caliper to check internal clearances; a 0.2mm obstruction can cause the motor to overheat or the body to sit lopsided. If the body sits too low, glue 1mm plasticard strips inside the shell to act as spacers. Aim for a consistent buffer height of 8mm from the rail head. This ensures your custom build couples perfectly with standard Peco or Bachmann rolling stock without derailments.
How to Kitbash Your OO9 Locomotive: A Step-by-Step Guide
Successful kitbashing oo9 locomotives relies on having a toolkit designed for precision. You'll need a micro-saw with at least 42 teeth per inch to ensure clean cuts through resin or plastic donor bodies. High-viscosity cyanoacrylate glue is the best choice for bonding different materials, while a set of 0.3mm to 1.0mm drill bits is essential for adding fine details. Before you begin, ensure you have needle files and sharp sprue cutters to keep every joint flush and professional.
Step 1: Preparing the Mechanism
Most projects start with a reliable N gauge donor, such as the Kato 11-103 or the Bachmann 0-6-0 chassis. Carefully unclip the original body by applying light pressure to the plastic tabs; don't force it or you'll risk snapping the delicate clips. Once the chassis is bare, clean the pick-ups with isopropyl alcohol and run the motor for 10 minutes in each direction to ensure it's smooth. Chassis prep is the essential foundation of a successful build, ensuring the mechanical heart of the model is reliable before adding aesthetic layers.
Step 2: Fitting and Detailing
When you begin test-fitting the new body, identify 'pinch points' where the motor housing might hit the cab interior. Use a rotary tool at a low speed to thin the internal walls of the kit until the body sits level. You can use Narrow Minded Railworks detailing accessories to hide the motor block and add authentic UK narrow gauge features like chimneys, domes, and 0.3mm brass wire handrails. Choosing the right couplers is your next major decision:
- Bemo: The standard for many European and UK modellers, offering great reliability.
- Greenwich: A discreet, magnetic option that looks prototypical on British layouts.
- Peco: The most robust and cost-effective choice for general shunting.
Don't forget the importance of balance. Small OO9 locomotives often lack the mass needed for consistent electrical contact. Adding 12 to 18 grams of liquid lead or tungsten putty over the driving axles can improve tractive effort by roughly 25 per cent. Secure these weights with a tiny amount of PVA glue, as this won't react with the metal or damage the chassis over time.
Final Details: Painting and Weathering Your Custom Creation
The final aesthetic phase defines the success of kitbashing oo9 locomotives. Your choice of primer is the most critical decision here. For 3D-printed resin bodies, use a high-quality plastic primer like Halfords Grey Primer or Tamiya Fine Surface Primer. These provide a "key" for the paint to grip without obscuring fine rivet detail. If your build includes white metal parts, an etch primer is necessary to prevent the paint from chipping during handling. Expect a drying time of at least 24 hours before you apply your base coat.
Choosing a colour scheme depends on your freelance line's history. Traditional railway liveries like GWR Brunswick Green or LBSCR Umber look stunning, but many narrow gauge modellers opt for industrial grime. A locomotive finished in plain black or oxide red often looks more at home on a 009 scale slate or peat railway. Adding a driver figure from a UK manufacturer like Modelu and using real crushed Welsh anthracite for the coal bunker adds a level of realism that plastic mouldings cannot match.
Painting for Professional Results
Airbrushing is the gold standard for kitbashes. Using a 0.3mm nozzle at 15-20 PSI allows for thin, even coats that don't clog detail. If you use a brush, choose high-quality sable hair and thin your acrylic paints to the consistency of milk. For multi-colour liveries, Tamiya masking tape is essential for sharp edges. Apply Micro Sol to any decals or transfers. This chemical solution softens the carrier film, allowing the decal to suck down into every bolt head and panel line for a painted-on look.
Weathering Your OO9 Locomotive
Weathering is what makes kitbashing oo9 locomotives truly rewarding. It blends the different materials of your build into a single, cohesive machine. Start with a pin-wash of dark grey or "engine grime" enamel to highlight recessed details. Use weathering powders for soot around the chimney and rust on the buffer beams. A £10 set of powders can last for dozens of models. Finish with a coat of Vallejo Matt Varnish to seal the pigments and remove any unrealistic plastic sheen from the original components.
Bring Your Narrow Gauge Vision to Life
Building a unique fleet doesn't require decades of engineering experience. By selecting reliable donor chassis like the Kato 11-103 or Bachmann 0-6-0, you establish a solid foundation for any project. Transitioning from traditional white metal kits to precision 3D-printed bodies reduces assembly time by approximately 70%, allowing you to focus on the creative aspects of weathering and painting. Mastering the art of kitbashing oo9 locomotives gives your layout a distinct character that off-the-shelf models simply cannot match.
Ready to start your next workshop project? Browse our range of 3D-printed OO9 locomotive bodies at Narrow Minded Railworks. Our shells are expertly designed to fit Kato and Bachmann chassis with sub-millimetre precision, ensuring a perfect fit every time. We provide highly detailed 3D prints that capture every rivet and panel line, and we offer worldwide shipping from our UK base to ensure your parts arrive safely. It's time to stop settling for standard stock and start creating the narrow gauge railway you've always imagined. Your perfect custom engine is just a few clicks away.
Frequently Asked Questions
What is the best N gauge chassis for an OO9 kitbash?
The Kato 11-109 and 11-103 are the most reliable N gauge chassis for kitbashing OO9 locomotives. These Japanese-made motor units cost roughly £22 to £28 at UK retailers like Gaugemaster. They provide a smooth four-wheel drive base that fits 85% of small industrial narrow gauge bodies. Their compact 24mm wheelbase makes them perfect for 0-4-0 designs.
Can I use a standard N gauge steam engine for an OO9 locomotive?
You can use a standard N gauge steam engine, provided the wheel diameter and spacing match your chosen narrow gauge prototype. Locomotives like the Bachmann Percy or Graham Farish 0-4-0 often serve as donors for projects. You'll need to remove the original body shell and possibly trim the plastic footplate. This allows a new 3D-printed or white metal body to sit flush.
How do I glue 3D-printed resin to a metal chassis?
Use a high-quality cyanoacrylate gel or a two-part epoxy resin to bond 3D-printed resin to a metal chassis. Brands like Gorilla Glue or Araldite Rapid work best because they cure in under 10 minutes. Always sand the contact points on the metal with 400-grit sandpaper first. This creates a keyed surface that increases bond strength by roughly 40% compared to smooth surfaces.
Do I need to be an expert at soldering to kitbash OO9 locos?
You don't need advanced soldering skills to start kitbashing oo9 locomotives. Most modern 3D-printed bodies are designed to clip or screw directly onto a pre-built N gauge chassis. If you need to add lights or a DCC decoder, simple point-to-point soldering is required. Roughly 75% of beginners successfully complete their first build using only adhesives and basic hand tools.
What tools are essential for a first-time OO9 kitbash?
A Swann-Morton No. 3 craft knife and a set of 10 needle files are the most essential tools for a first project. You'll also need a miniature pin vice with 0.5mm to 1.5mm drill bits for clearing out printed holes. These items cost approximately £15 in total from local hobby shops. A pair of fine-point tweezers helps you position small details like handrails or couplings without frustration.
How do I make sure my kitbashed loco doesn't stall on points?
Adding extra weight and ensuring all wheels pick up power prevents your loco from stalling on points. Aim to add 10g to 15g of liquid lead or tungsten putty inside the boiler or water tanks. This increases the downward pressure on the rails. Keeping your track clean with a Peco PL-41 rubber ensures 100% electrical contact, even on plastic-frog Insulfrog points.
Where can I find 3D-printed bodies designed for specific N gauge donors?
Shapeways and Etsy are the primary marketplaces for 3D-printed bodies designed for specific N gauge donors. Designers like Tebee Models or Railway009 offer over 200 different shells specifically scaled for Kato or Graham Farish chassis. You can also find specialised kits at UK-based retailers like Narrow Planet. These bodies often include pre-drilled holes for 12mm or 14mm mounting screws.
Is it cheaper to kitbash or buy a ready-to-run OO9 locomotive?
Kitbashing is typically 50% cheaper than purchasing a brand-new ready-to-run OO9 locomotive. A new Bachmann Baldwin or Peco James often costs between £130 and £180. In contrast, a Kato chassis for £25 and a 3D-printed body for £20 bring the total project cost to £45. This saving allows modellers to build a fleet of three custom engines for the price of one retail model.