

The most operationally realistic railways in the world can fit inside a standard footwear container. In the world of micro-modelling, building a gn15 layout in a shoebox proves that the "fiddle" isn't a cheat; it's the primary engine of engagement. You likely want to build a detailed narrow gauge railway but feel restricted by a lack of permanent space or high equipment costs. We recognize that complex wiring and bulky baseboards can feel overwhelming, so we provide a streamlined path to a finished project.
This guide ensures you can master the art of "Gnineering" by building a high-detail, functional micro-layout. You'll learn how to utilize specialized GN15 locomotive and scenery kits to create a professional, portable diorama without the need for expensive ready-to-run models. We will explore clever track planning, budget-friendly construction, and the specific standards required to make your miniature estate railway a success.
Key Takeaways
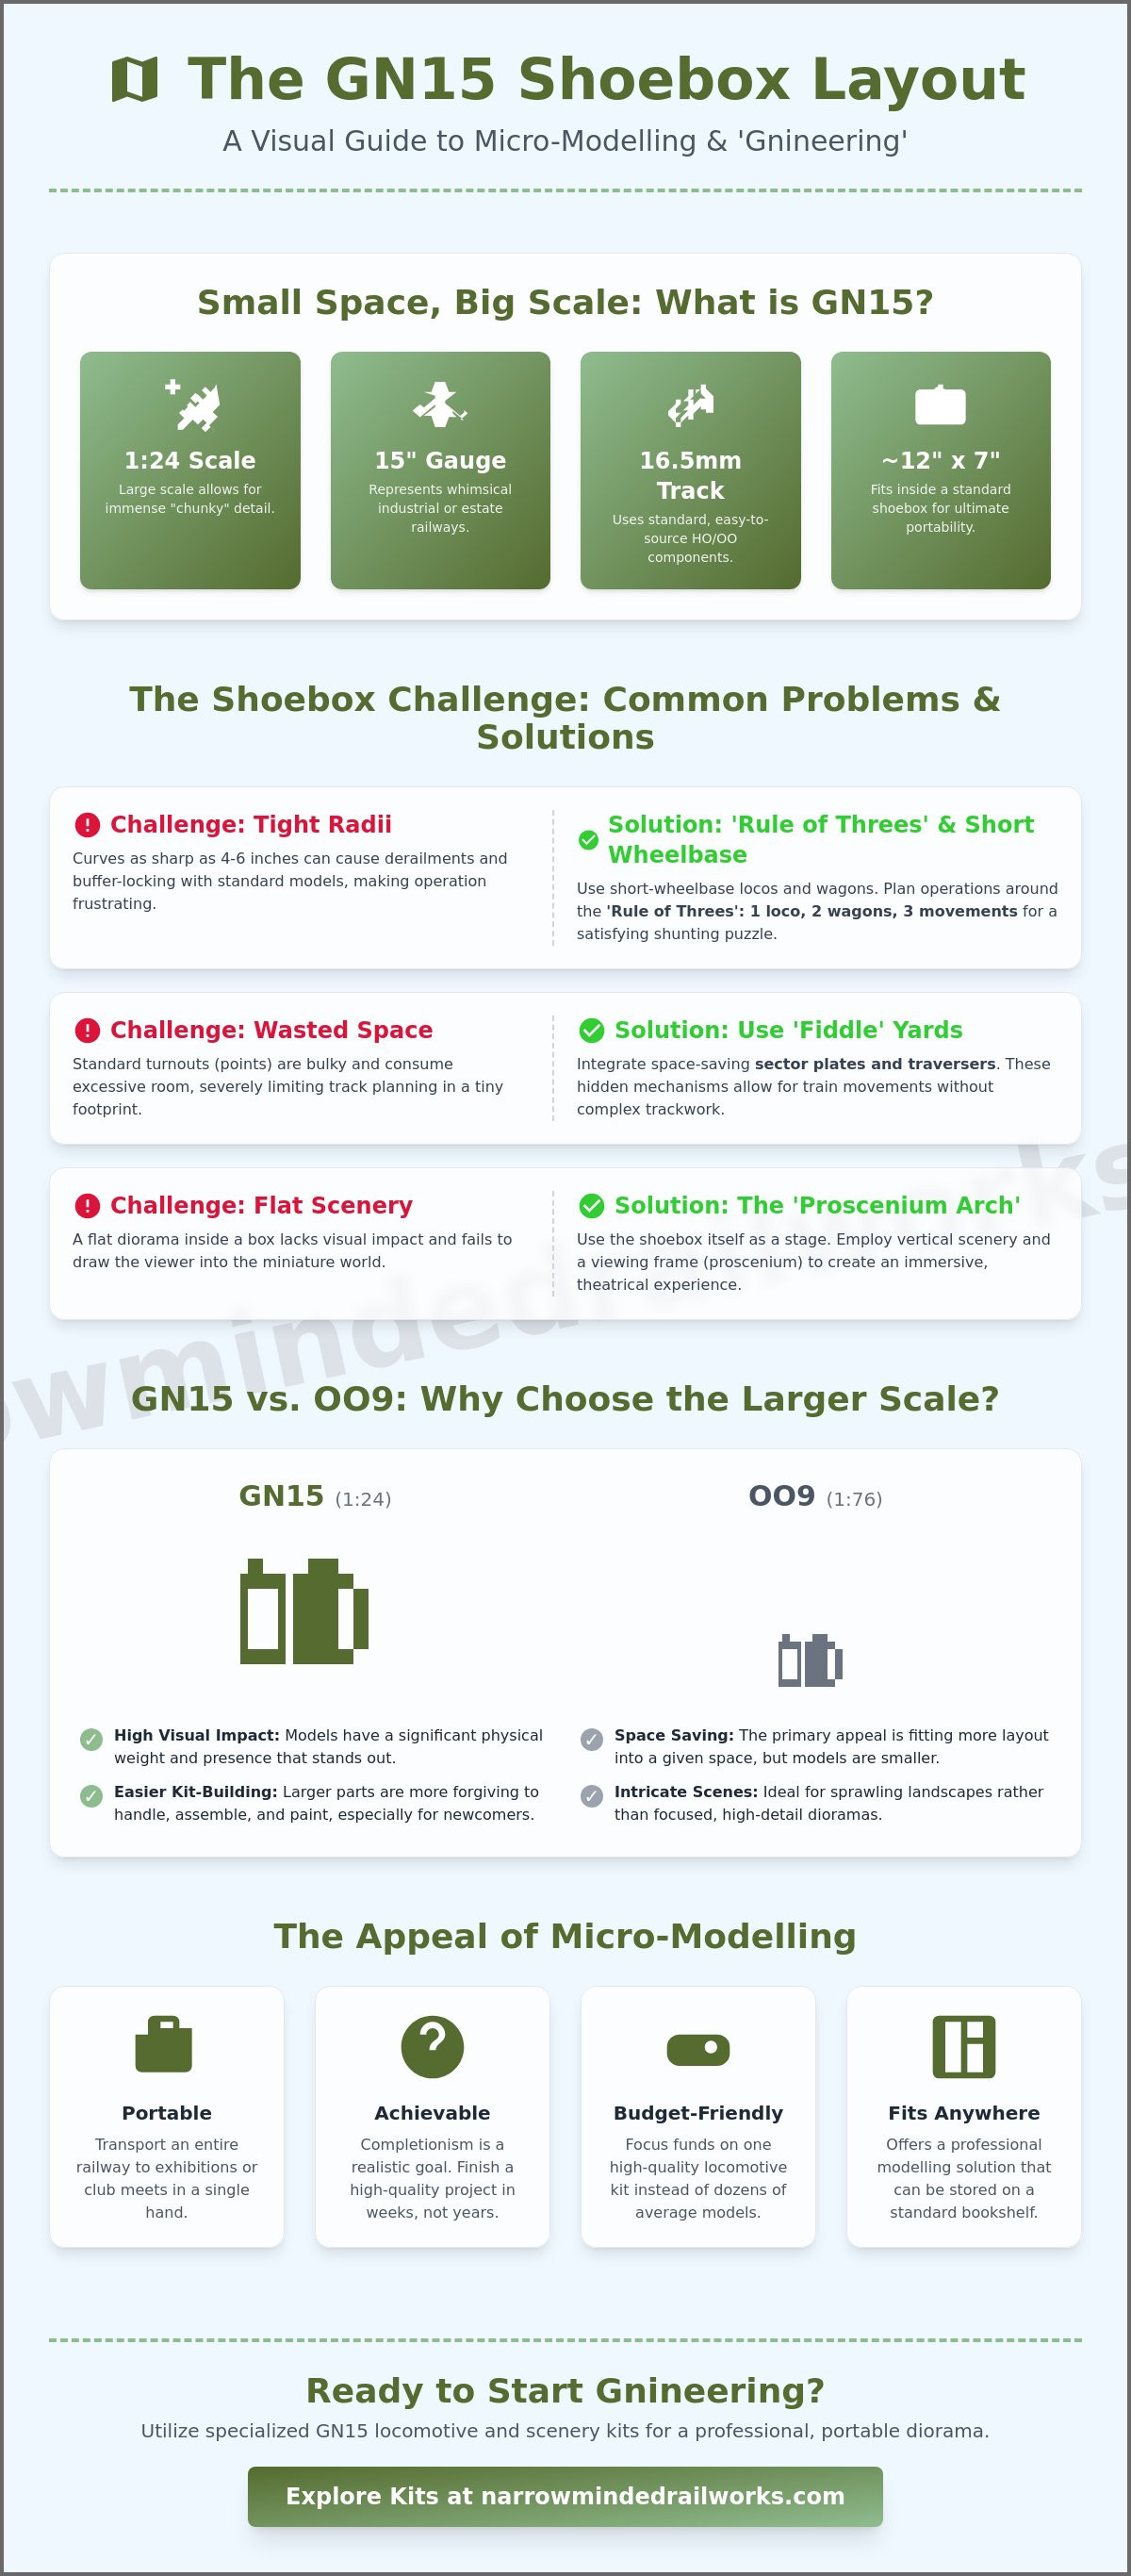
- Small footprints often limit traditional track plans, but we show you how to utilize the 12x7 inch space for a high-detail G-scale project.
- Tight radii can cause derailments; however, applying the 'Rule of Threes' ensures smooth operation for industrial shunting.
- Standard turnouts consume excessive room, so we explain how to integrate sector plates and traversers to maximize your layout's footprint.
- Flat dioramas lack visual impact, but using vertical scenery and the 'Proscenium Arch' effect creates an immersive, theatrical experience.
- Starting a gn15 layout in a shoebox can feel daunting, yet selecting specialized short-wheelbase kits provides a manageable and budget-friendly entry point.
What is a GN15 Shoebox Layout? Small Space, Big Scale
A gn15 layout in a shoebox represents the pinnacle of micro-modelling. By utilizing 16.5mm track to represent a 15-inch gauge line at 1:24 scale, you can build a functional railway within a footprint of approximately 12 by 7 inches. While the physical space is limited, the large scale allows for immense detail and "chunky" character that smaller scales often struggle to replicate. This approach is rooted in the "Gnineering" philosophy, which prioritizes creativity through extreme constraints and whimsical industrial or estate themes. It is a specific branch of the broader narrow gauge railway hobby where the focus shifts from sprawling scenery to intricate, localized storytelling.
Choosing the Gn15 scale allows you to work with models that have significant physical presence despite the tiny baseboard. The standard track width makes components easy to source, yet the 1:24 proportion ensures that every rivet, figure, and piece of weathered timber stands out. This combination of "Small Space, Big Scale" is what defines the shoebox challenge.
To better understand this concept, watch this helpful video of a functional exhibition layout:
The Appeal of Micro-Modelling in 2026
Modern modelers often face a lack of dedicated hobby space, but the micro-layout offers a professional solution that fits on a bookshelf. Portability is a primary advantage. You can transport a completed railway to exhibitions or club meets in a single hand without risking damage to delicate scenery. Because the project size is manageable, completionism becomes a realistic goal. You can finish a high-quality project in weeks rather than years. This format is also budget-friendly. Instead of spreading your funds across dozens of average models, you can focus on one high-quality GN15 locomotive kit and a handful of detailed wagons to create a masterpiece.
GN15 vs. OO9: Why Choose the Larger Scale?
While OO9 is popular for its space-saving qualities, GN15 offers a different level of visual impact. GN15 figures and locomotives possess a weight and presence that smaller scales lack, making them ideal for high-detail dioramas. Larger parts are also more forgiving for those who are new to kit-building. It's often easier to handle and paint a 1:24 scale industrial "critter" than a tiny 4mm scale equivalent. Additionally, because GN15 uses standard 16.5mm track, you don't need to hunt for niche track systems. You can use widely available components and focus your energy on the creative "Gnineering" aspects of the build.
The Shoebox Challenge: Track Planning and Radii
Designing a gn15 layout in a shoebox requires a fundamental shift in perspective. You aren't building a main line. You're building a focused industrial scene. The 'Rule of Threes' is the gold standard here. This means planning for one locomotive, two wagons, and three distinct movements. This constraint ensures shunting remains a satisfying puzzle rather than a cluttered traffic jam. While standard layouts often demand 9-inch curves, the 'Gnineer' thrives on 4-inch to 6-inch radii. These tight turns only work if you select the right rolling stock for the job.
Many builders encounter issues because they assume standard track plans scale down perfectly. They don't. GN15 models have a significant physical overhang compared to smaller scales like OO9. If your locomotive is too long, the front will strike your scenery or tunnel mouths as it rounds a sharp bend. To solve this, you must prioritize short-wheelbase designs. These prevent buffer-locking on the curves. Many modern 3D-printed gn15 locomotive kits are specifically engineered with these tight geometries in mind. They provide the necessary clearance for industrial corners while maintaining the 'chunky' character the scale is known for.
The 'Inglenook Sidings' Adaptation
The classic Inglenook shunting puzzle usually requires several feet of linear space. In a shoebox, you have to be more efficient. By using a 'hidden' siding that exits the rear of the box, you suggest a larger world beyond the cardboard walls. This creates an illusion of depth. It keeps the physical footprint under 12 inches. The minimum operational unit for a GN15 shoebox is a single shunting neck capable of holding one locomotive and one wagon. This simple setup allows for basic but engaging switching operations in a remarkably small area.
Pointwork vs. Sector Plates
Commercial turnouts often prove too long for a 12-inch box. A single standard point can consume nearly half of your available length. This leaves very little room for wagons. A 'Y' point is a proactive solution because it splits the track symmetrically. This saves several inches of straight track compared to a traditional left or right-hand point. If space is still too tight, you might consider mechanical alternatives like a sector plate. While we will cover the mechanical build of these later, it is important to plan your clearances now. If you study the specialist journal for micro layouts, you'll see that these space-saving designs are the secret to functional micro-modelling. They ensure your layout remains a working railway rather than a static display.
Engineering the 'Fiddle': Sector Plates and Traversers
Standard model railway points are often too long for a gn15 layout in a shoebox. A single turnout can consume five or six inches of your precious twelve-inch baseboard, leaving almost no room for rolling stock. To solve this, you must look toward "fiddle" engineering. These mechanisms allow you to move the track itself rather than moving the rail blades, providing the same operational variety in a fraction of the space. By utilizing the shoebox lid as a fold-down structural extension, you can house these moving parts outside the main scenic area, effectively doubling your operational length when the layout is in use.
Powering these moving sections doesn't require complex electronics. You can use flexible "dropper" wires with enough slack to allow for the movement, or install brass "wiper" contacts that complete the circuit only when the track is properly aligned. This transparent approach to wiring ensures your layout remains reliable without the need for expensive control systems. It keeps the focus on the shunting movements rather than troubleshooting electrical faults.
Building a Simple DIY Sector Plate
A sector plate is a length of track that pivots at one end, allowing the other end to swing between two or more exit tracks. You only need basic materials: a small piece of MDF, a single nut and bolt for the pivot, and some spare track. To ensure perfect rail alignment every time, you should use the "V" notch method. By cutting a small notch into the baseboard where the plate meets the fixed track, the swinging arm "clicks" into place. You can easily hide this mechanism inside a locomotive shed or behind a warehouse wall to maintain the industrial atmosphere.
Traverser Mechanics for Multi-Track Storage
While a sector plate swings, a traverser slides horizontally. This is the ideal solution for moving stock between parallel sidings in a tight space. For a shoebox, simple friction-based sliders made from plastic or wood are often better than heavy metal drawer slides. They save weight and height. You can hide the sliding bed behind a high retaining wall or a bridge. It is vital to install safety stops at the ends of the traverser. These physical barriers prevent your gn15 scale locomotives from driving off the edge of the world during a busy shunting session. This engineering ensures your gn15 layout in a shoebox is as robust as a full-sized railway.
Scenery Strategy: Verticality and Forced Perspective
A gn15 layout in a shoebox often feels restricted if you only consider the flat footprint of the baseboard. To overcome this, you should adopt the "Proscenium Arch" effect. This involves using the edges of the box to frame your railway like a theatre stage. While horizontal space is limited, the vertical clearance allows for multi-level storytelling. You can build upwards with mine headstocks, tall factory chimneys, or elevated walkways. These structures add significant depth and visual interest without consuming valuable track space. By focusing on height, you create the illusion of a much larger industrial environment.
Forced perspective is another proactive solution for small spaces. You can make the box appear deeper than seven inches by scaling down background elements. Placing smaller buildings or smaller-scale trees at the rear of the scene tricks the eye into perceiving distance. Integrating 3D-printed scenery is essential for this approach. These parts provide the sharp, crisp textures needed to sell the realism of the 1:24 scale. To begin your scenic journey, explore our range of GN15 locomotive and scenery kits designed specifically for high-detail micro-modelling.
Industrial Themes that Fit the Box
Selecting the right theme is vital for a coherent gn15 layout in a shoebox. A "Potato Railway" works well because you can use low-relief barns and crates of produce to fill space efficiently. If you prefer a more rugged look, a "Quarry Siding" uses steep rock faces to provide a natural end to the box, hiding the exit tracks. For those who enjoy a refined aesthetic, the "Estate Railway" theme utilizes brick walls and ornate gates. These themes allow you to pack immense character into a tiny area while maintaining a realistic narrow gauge atmosphere.
Lighting and Atmosphere
Ambient room light is often inconsistent and creates unwanted glares; however, installing LED strips in the shoebox lid provides a professional display. This constant light source allows you to use shadows strategically. You can cast shadows into the corners to hide the seams where the box walls meet the floor. Weathering your structures is the final step. Applying washes and powders to your buildings ensures they match the work-worn aesthetic of industrial narrow gauge. This attention to detail transforms a simple cardboard box into a living, breathing miniature world.
Step-by-Step: Your Shoebox Build with Narrow Minded Railworks
Starting a gn15 layout in a shoebox might feel like a series of compromises; however, it's actually an exercise in focused craftsmanship. You'll need a container that won't flex under pressure. While standard cardboard is a useful starting point, it often lacks the structural integrity for long-term track alignment. We recommend a sturdy boot box or heavy-duty footwear container. To prevent warping, you should reinforce the interior floor with a layer of 5mm foam board or a thin sheet of plywood. This provides a solid foundation for your 16.5mm track and ensures the rails stay level during operation.
Once the base is prepared, track laying can begin. You'll need to double-check the clearances for your rolling stock as discussed in our previous planning sections. Before gluing anything down, perform a dry run with your largest wagon to ensure no parts snag on the box edges. This proactive step prevents frustrating reconstruction later. It's a simple check that saves hours of work.
The Perfect Shoebox Starter Kit
For your first project, a 4-wheel locomotive body is the most reliable choice. Because these models have a very short wheelbase, they navigate the tight curves of a micro-layout without derailments. While we provide specialized gn15 locomotive kits, you'll need to source a compatible 4-wheel chassis from a third-party manufacturer like Hornby or Electrotren. We don't sell motors or chassis, so checking compatibility with your kit is essential. Matching your locomotive to themed wagon kits, such as industrial tippers or agricultural flatbeds, creates a cohesive narrative. Adding 3D-printed figures provides the final touch of human scale to the scene.
Finishing and Detailing
Raw 3D-printed parts require specific care to reach a professional standard. You should follow our guide on painting 3D printed models to achieve a convincing metallic or weathered wood finish. After painting, apply decals to add identity to your fictional estate or factory line. Final weathering with powders or thin washes will give the stock a lived-in feel. To complete the presentation, you can glue a label to the inside of the shoebox lid. This label can detail your railway's fictional history, turning a simple model into a documented piece of industrial heritage. This structured approach ensures your gn15 layout in a shoebox is a functional, high-detail success.
Start Your Micro-Modelling Journey Today
Space is often a primary constraint for railway enthusiasts, but it doesn't have to limit your creative output. We've explored how vertical scenery and mechanical solutions like sector plates transform a small container into a functional industrial scene. Building a gn15 layout in a shoebox allows you to achieve high-detail results in a fraction of the time required for a traditional layout. By focusing on the "Gnineering" philosophy, you can create a professional diorama that is both portable and operationally engaging.
You may feel overwhelmed by the technical requirements of narrow gauge, so we offer expertly designed 3D-printed bodies to simplify the process. Our kits are specifically scaled for 16.5mm chassis and we provide worldwide shipping for all narrow gauge enthusiasts. To begin your next project, explore our range of GN15 kits designed for micro-layouts. You don't need a dedicated hobby room to build a masterpiece. With the right tools and a bit of ingenuity, your shoebox can house a world-class railway.
Frequently Asked Questions
What is the best shoebox size for a GN15 layout?
A standard adult shoe box measuring roughly 12 by 7 inches provides the ideal starting point for a micro-layout. While larger boot boxes offer more room, they can be harder to store on standard bookshelves or transport to exhibitions. You should prioritize structural strength over pure dimensions; however, a box with a depth of at least 5 inches allows for taller industrial scenery like mine headstocks or factory chimneys.
Do I need special track for a GN15 shoebox railway?
No, GN15 runs on standard 16.5mm gauge track, which is the same width used for OO and HO scales. While standard track is functional, many builders choose Peco O-16.5 "crazy track" because the wider sleeper spacing better represents narrow gauge prototypes. This track choice ensures your gn15 layout in a shoebox looks authentic while remaining compatible with widely available 16.5mm wheelsets and chassis.
Can I use standard OO/HO locomotives in a shoebox?
Standard OO or HO locomotives are not suitable because they are built to 1:76 or 1:87 scale, which contradicts the 1:24 scale of GN15. You'll need to use GN15 locomotive kits mounted on short-wheelbase 16.5mm chassis. This ensures your figures, tools, and buildings look correctly proportioned alongside your rolling stock. Using the correct scale maintains the "chunky" character that defines this branch of the hobby.
How do I power a micro-layout without bulky controllers?
A simple 9V battery-powered handheld controller is the most proactive solution for a micro-layout. These units are small enough to be stored inside the box when not in use, making the entire railway self-contained. Since these layouts typically only run one locomotive at a time, you don't need complex wiring or high-amperage power packs to maintain reliable operation. It's a clean, portable way to manage your shunting.
Is GN15 more expensive than OO9 for small projects?
A gn15 layout in a shoebox is often more budget-friendly because you require significantly fewer items to complete a compelling scene. While individual locomotive kits may have a similar cost to OO9 equivalents, you usually only feature one or two wagons in a shoebox footprint. This focus on quality over quantity keeps your total investment manageable while allowing you to spend more on high-detail scenery and figures.
Can I fit a full loop of track in a shoebox?
You cannot fit a full loop of track in a standard shoebox because the 7-inch width is too narrow for a 180-degree turn. Even the tightest 4-inch radius would leave no room for scenery or locomotive overhang. Instead, you should focus on point-to-point shunting designs or "Inglenook" patterns. These layouts utilize the available linear space effectively and provide more operational interest than a simple circle of track.
What are the best themes for a 1:24 scale micro-layout?
Industrial and estate themes work best for this format because they justify the use of short locomotives and tight curves. Themes like potato railways, brewery sidings, or brickworks allow for detailed 1:24 scale textures in a small area. These settings naturally utilize the short shunting movements that define micro-modelling. They make the limited track length feel like a deliberate design choice rather than a spatial constraint.
How do I transport a shoebox layout safely?
You can transport your railway safely by securing the lid with a heavy-duty elastic band or Velcro straps. It's helpful to glue small foam blocks inside the lid to prevent rolling stock from shifting or hitting the scenery during transit. For extra protection, you should place the entire box inside a padded courier bag. This guards against moisture and accidental bumps while you carry your railway to a club or exhibition.