

Does the incredible detail of your new 3D printed railway kit feel overshadowed by stubborn layer lines and unsightly support marks? It's a common frustration that can make a promising model feel worlds away from a professional finish. You might be worried about breaking delicate parts or wondering why your paint just won't stick properly. The secret isn't a workshop full of expensive tools, but a clear, repeatable process. This is where mastering the art of finishing 3d printed kits transforms a raw print into a masterpiece that rivals traditional injection-moulded models.
In this step-by-step guide, we'll demystify the entire process. We'll show you exactly which essential tools you need and the safest techniques for cleaning, sanding, and preparing your model without fear of breakage. You will learn the secrets to perfect priming, creating an ultra-smooth surface that ensures your paint adheres flawlessly for a durable, stunning result. By the end, you’ll have the confidence to turn any 3D print into a show-stopping piece for your layout, completely free of those giveaway 'printed' textures.
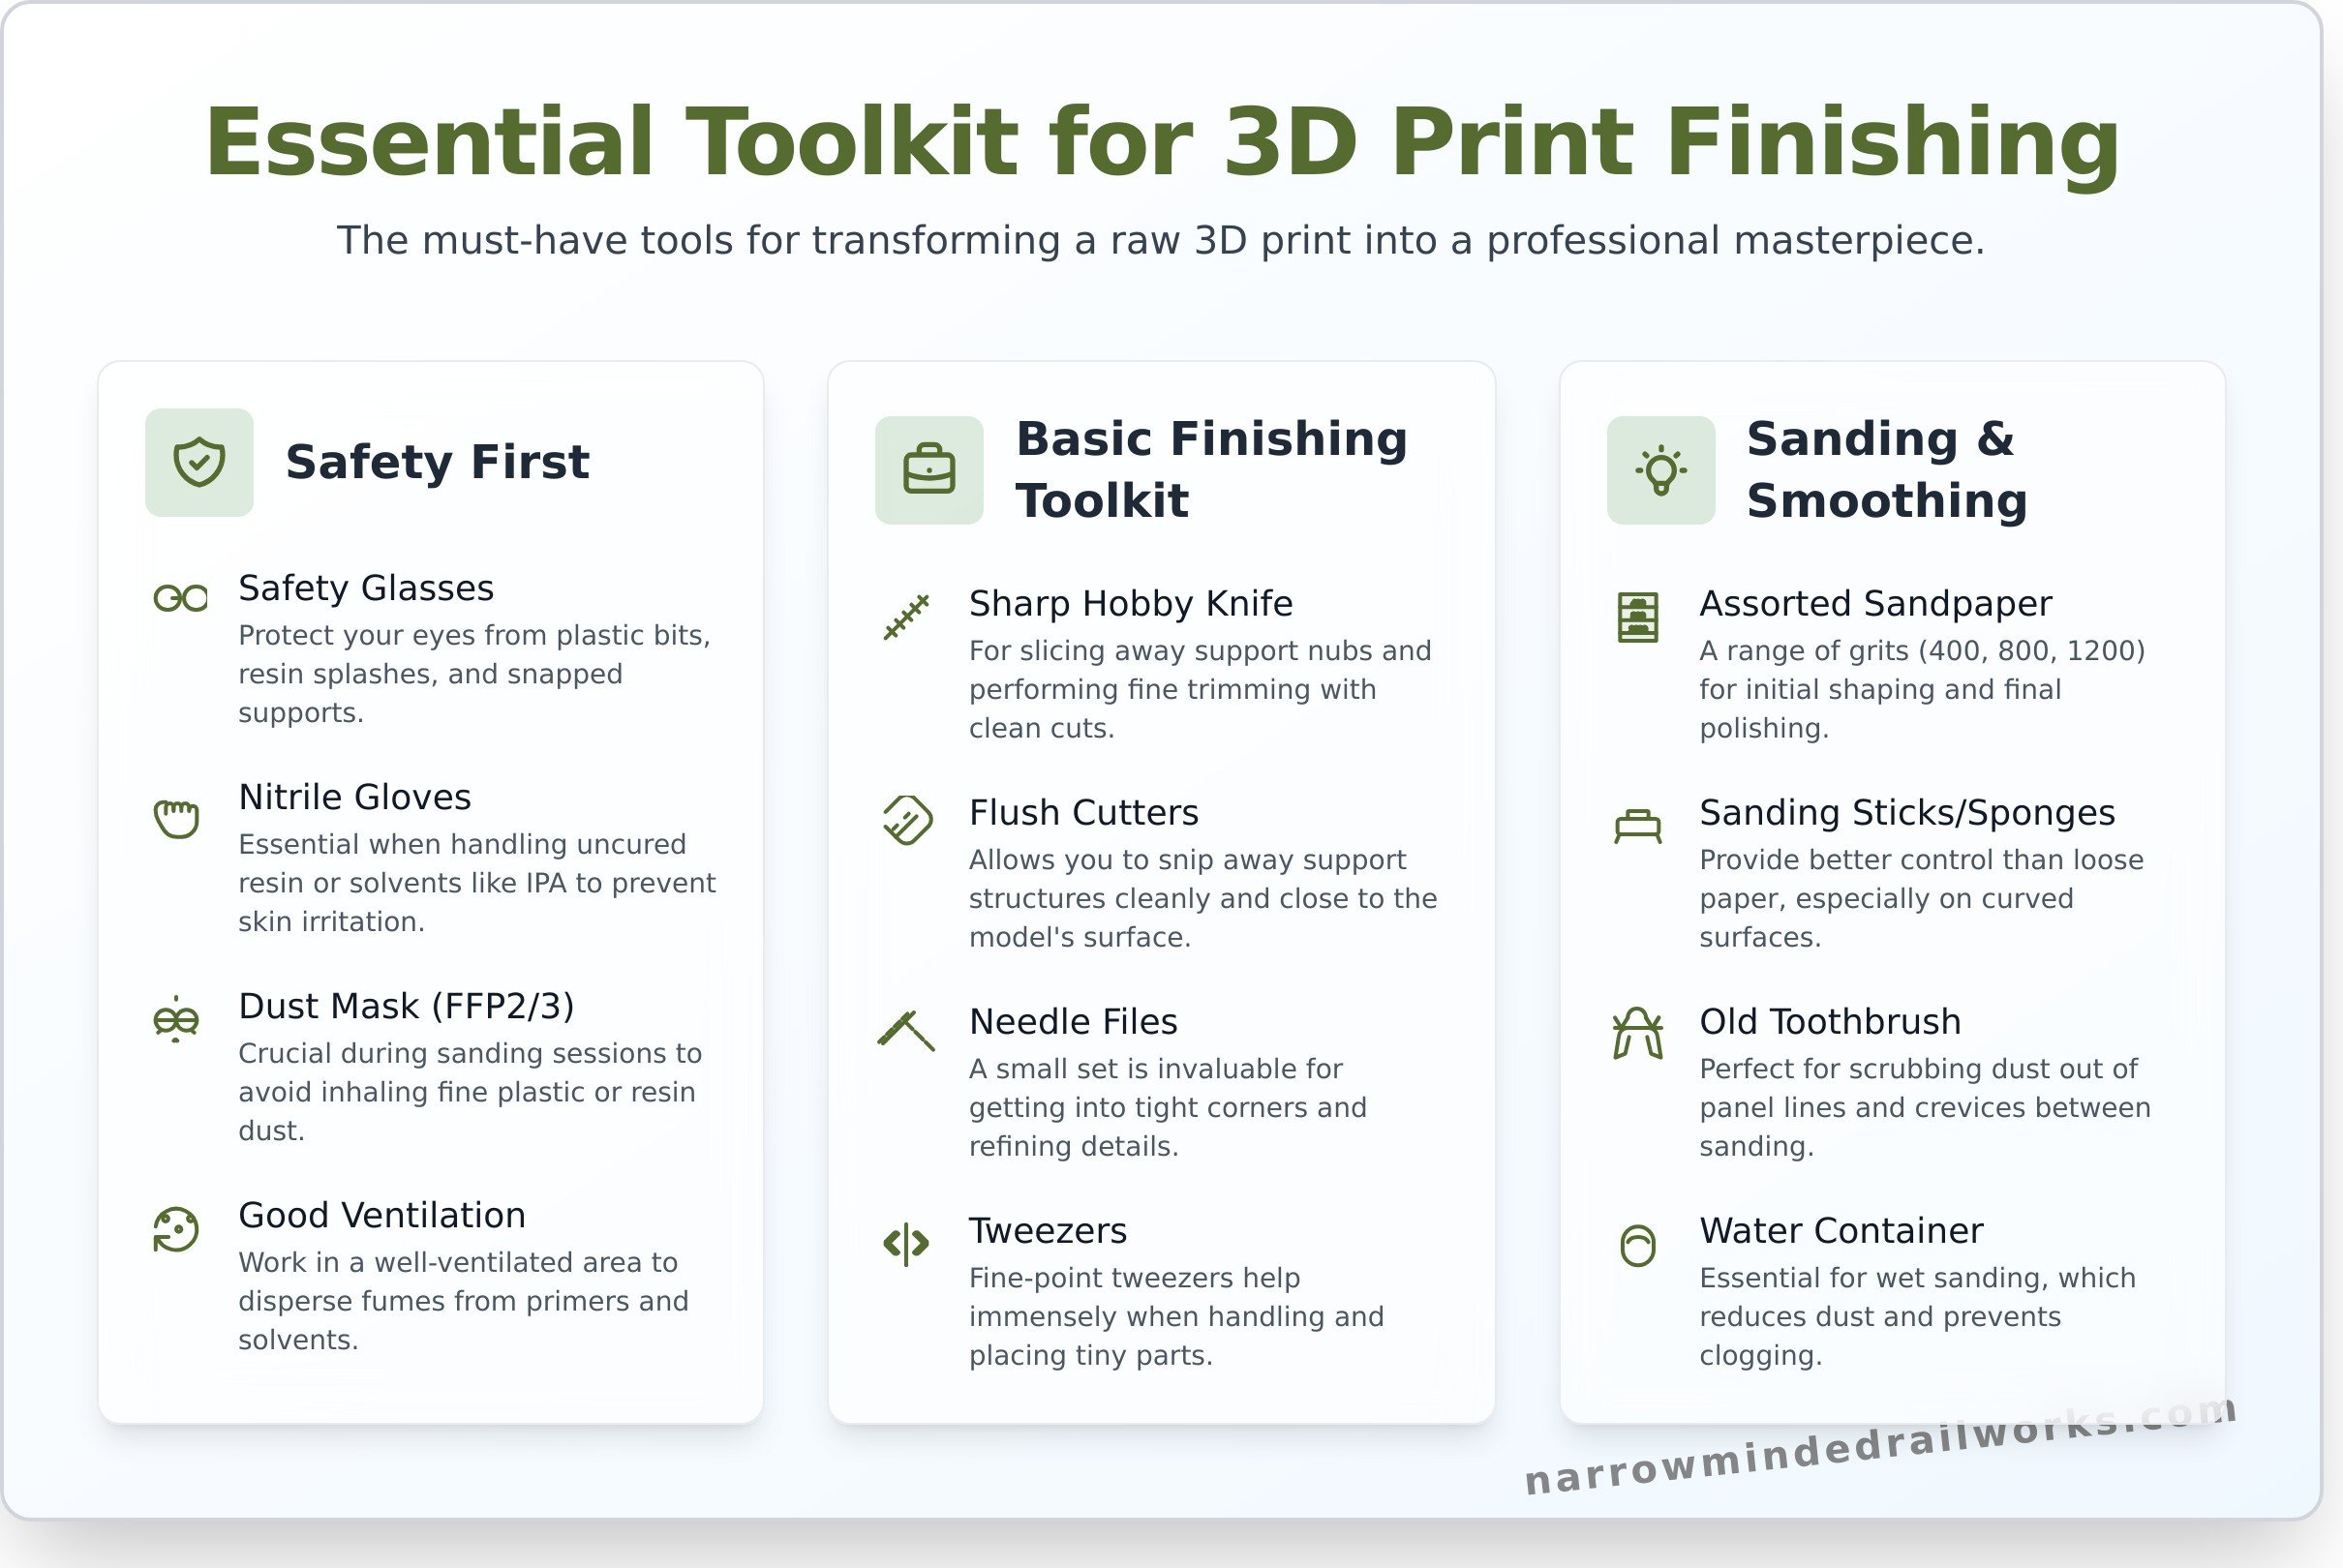
Essential Tools and Workspace for Finishing 3D Prints
Diving into the world of finishing 3d printed kits can seem daunting, but you don't need a professional workshop to achieve stunning results. A small, dedicated corner of a room, good lighting, and a handful of essential items are all it takes to transform a raw print into a masterpiece. The key is focusing on tools for safe and effective surface preparation. We'll cover the absolute must-haves for cleaning supports, sanding away layer lines, and preparing your model for a flawless coat of primer.
While a simple corner is a great start, having an organized and comfortable workspace makes a huge difference for detailed tasks. For inspiration on creating a more professional setup, looking at workstations designed for other creative fields can be helpful; for example, the ergonomic designs from StudioDesk are built for long hours of focused work.
To see some of these fundamental tools in action, this video provides an excellent overview of the post-processing workflow:
Safety First: Protecting Yourself
Before you pick up a tool, prioritising your safety is paramount. Working with resins, solvents, and fine dust particles requires basic but non-negotiable precautions to protect yourself.
- Safety Glasses: Always protect your eyes from stray bits of plastic, resin splashes, or snapped-off supports.
- Nitrile Gloves: Essential when handling uncured resin or cleaning solvents like isopropyl alcohol (IPA) to prevent skin irritation.
- Dust Mask: A simple FFP2 or FFP3 mask is crucial during heavy sanding sessions to avoid inhaling fine plastic or resin dust.
- Good Ventilation: Work in a well-ventilated area, especially when using primers or chemical smoothers, to disperse fumes.
Your Basic Finishing Toolkit
This core set of tools will handle the initial clean-up phase, where you remove supports and refine the basic shape of your print. Fresh, sharp blades are your best friend here for clean cuts and reducing the risk of slipping.
- Sharp Hobby Knife: An X-Acto knife or similar craft knife with plenty of fresh blades is perfect for slicing away support nubs and fine trimming.
- Flush Cutters: Also known as sprue nippers, these allow you to snip away support structures cleanly and close to the model's surface.
- Needle Files: A small set of assorted files (flat, round, triangular) is invaluable for getting into tight corners and refining details where sandpaper can't reach.
- Tweezers: A good pair of fine-point tweezers helps immensely when handling or placing tiny, delicate parts.
Sanding and Smoothing Supplies
This is where the magic happens. Proper sanding is the secret to an ultra-smooth surface, a critical step for a professional finish. It's one of the most foundational 3D printing finishing processes, and mastering it will elevate your models significantly. Having the right supplies makes this task much more effective.
- Assorted Sandpaper: Start with a range of grits. A good starting pack would include 400 (for initial shaping), 800 (for smoothing), and 1200 (for final polishing).
- Sanding Sticks or Sponges: These provide better control than a loose sheet of paper, especially on curved or complex surfaces.
- Old Toothbrush: A stiff-bristled toothbrush is perfect for scrubbing dust out of panel lines and crevices between sanding stages.
- Water Container: A small tub of water is essential for wet sanding, a technique that reduces dust and prevents sandpaper from clogging.
Step 1: The Initial Wash and Cure
The journey of finishing 3d printed kits begins not with a file or a sander, but with a thorough clean. This initial wash and cure cycle is arguably the most critical stage for resin prints. Straight off the build plate, your parts are coated in a thin, sticky layer of uncured liquid resin. Skipping this step will lead to a tacky finish where primer and paint refuse to adhere properly, sabotaging all your subsequent hard work. The science behind this is well-documented; for those interested in the technical details, this comprehensive guide to 3D printing post-processing offers an excellent deep dive. For now, let's focus on the practical application.
Washing Your Resin Kit Parts
Your primary goal is to dissolve and remove all residual liquid resin. The most common and effective cleaning agent is Isopropyl Alcohol (IPA) with a concentration of 90% or higher. For a more budget-friendly option available in most UK hardware shops, methylated spirits can also work well. Submerge the parts in your chosen cleaner and use a soft-bristled brush (an old toothbrush is perfect) to gently scrub the entire surface. Pay special attention to deep recesses and intricate details where resin loves to pool. Once clean, give the parts a quick rinse in clean water and set them aside to air dry completely before proceeding.
Why a Final UV Cure is Important
After washing and drying, your model parts will be clean but may still feel slightly soft to the touch. This is because the resin hasn't reached its final hardness. A post-cure exposes the model to ultraviolet (UV) light, completing the polymerisation process and locking the molecules into a hard, stable state. This step is essential for achieving a durable part that is easy to sand and safe to handle without gloves. A dedicated UV curing station provides the best results, but placing your parts in direct sunlight on a bright day for an hour or two can also be surprisingly effective.
Properly washing and curing your model is the foundation for success in finishing 3d printed kits. This non-negotiable first step ensures a clean, hard, and stable surface that is perfectly prepared for the next stages of support removal and sanding. Taking your time here will save you immense frustration later on.
Step 2: Support Removal and Surface Preparation
This is where the magic truly happens. You're about to transform a raw 3D print, complete with its manufacturing artefacts, into a clean canvas ready for painting. The primary goal here is to methodically remove every trace of the printing process, from support nubs to visible layer lines. This stage requires patience; rushing can easily lead to gouges or broken details, so take your time. A careful approach now is a crucial step in the process of finishing 3d printed kits and pays dividends in the final result.
Techniques for Removing Support Marks
Support structures are essential for printing complex shapes, but they leave behind small attachment points or 'nubs' that must be removed. Tearing them off by hand is a recipe for disaster, often leaving pits in the model's surface. Instead, follow a more controlled process:
- Snip First: Use a quality pair of flush cutters to snip the support structures as close to the model's surface as possible without touching it.
- Shave Carefully: With a fresh, sharp hobby knife blade, carefully shave down the remaining nub until it is flush with the surrounding surface. Always cut away from yourself for safety.
- Sand Smooth: A final light sanding with fine-grit sandpaper (800-grit or higher) will blend the area perfectly, making the support point disappear.
Sanding for a Flawless Finish
Sanding is arguably the most critical part of surface preparation. It eliminates the fine layer lines characteristic of 3D printing, creating a perfectly smooth surface for primer and paint. Start with a medium grit like 400 to tackle any major blemishes or stubborn support marks. Then, progress sequentially through finer grits-such as 800, then 1200, and even higher if you desire a glass-like finish. This methodical approach is a cornerstone of professional finishing. For a deeper dive into the technical aspects across various materials, the Stratasys Finishing Guide for 3D Printed Parts offers an excellent industrial perspective. For best results, try wet sanding: dipping your sandpaper in water prevents dust and stops the paper from clogging, resulting in a superior finish. Trust your sense of touch; run your fingertip over the surface to feel for any remaining imperfections.
Dealing with Minor Imperfections
Even with careful support removal and sanding, you might find small pits, gaps, or stubborn layer lines. This is where modelling fillers come in. Use a hobby-grade putty or filler (like Squadron Green or Vallejo Plastic Putty) applied sparingly with a small tool. Once it has fully cured according to the manufacturer's instructions, sand it smooth to blend seamlessly with the model. For hiding very fine surface texture across the entire model, a 'filler primer' is an excellent choice. This special type of primer has a higher solids content that helps to fill in microscopic imperfections, giving you a pristine base for your paintwork.
Ready to practice? Check out our detailed loco kits!
Step 3: Priming for a Perfect Paint Job
After all your hard work sanding and filling, it can be tempting to jump straight to painting. However, priming is a non-negotiable step in the process of finishing 3D printed kits, especially those made from resin. This crucial stage acts as the bridge between your prepared model and a flawless paint finish. A good primer coat creates a uniform surface for paint to adhere to, reveals any tiny surface flaws you may have missed, and neutralises the model's original colour, ensuring your top coats look exactly as intended.
Why You Must Prime Resin Models
Paint and bare resin are not natural partners. The smooth, non-porous surface of a cured resin print offers very little for paint to grip onto, leading to beading, chipping, and peeling down the line. A primer is specifically formulated to create a micro-texture, or ‘tooth’, that paint can securely bond with. It also unifies the surface, blending the texture of sanded areas, filled sections, and untouched resin into a single, consistent canvas ready for colour.
This principle is identical in the automotive world, where high-quality aftermarket body parts from specialists like Aggwings require perfect preparation to ensure a flawless, factory-quality paint job.
Choosing the Right Primer for Your Kit
You don’t need to spend a fortune to get excellent results. A high-quality aerosol primer from a hobby brand or even an automotive specialist like Halfords will work perfectly. The key is to choose the right colour for the job:
- Grey: The perfect all-rounder. It’s neutral enough for most colours and is exceptional at revealing surface details and any imperfections that need a final touch-up.
- White: Ideal if your model will have a bright final colour scheme (e.g., yellows, reds, or light blues), as it helps these colours pop.
- Black: A great choice for dark or metallic paint schemes, and can be used to create natural shadows (a technique known as pre-shading).
For prints with very faint but persistent layer lines, consider a ‘filler primer’. This is slightly thicker and can help to fill in minor surface imperfections, saving you additional sanding time.
How to Apply a Smooth Primer Coat
Technique is everything when it comes to priming. A rushed job can ruin your hard work, so take your time and follow these steps for a glass-smooth finish. This is where attention to detail really elevates the process of finishing 3D printed kits.
- Clean the Model: Before you spray, give your model a gentle wash with warm, soapy water and an old toothbrush to remove any sanding dust, skin oils, or residue. Let it dry completely.
- Shake the Can: Vigorously shake your primer can for at least two minutes to ensure the pigment is fully mixed.
- Apply Light Coats: Hold the can about 20-30cm from the model. Apply the primer in short, light, sweeping passes. The goal for the first coat is coverage, not a thick layer. It might even look a bit patchy.
- Dry and Repeat: Let the first coat dry to the touch (usually 15-20 minutes). Then, apply another light coat from a different angle to ensure you cover all the nooks and crannies. Repeat this process two or three times until you have a smooth, even, and opaque finish.
A great primer coat sets the stage for the final painting, turning a good model into a fantastic one. For kits designed with fine details that truly shine after priming, explore the collection at Narrow Minded Railworks.
Common Mistakes to Avoid When Finishing Kits
Learning from the mistakes of others is one of the fastest ways to improve your modelling skills. The journey of finishing 3d printed kits is incredibly rewarding, but a few common pitfalls can cause unnecessary frustration. By understanding and avoiding these simple errors, you can elevate your model from good to truly exceptional and ensure the entire process is more enjoyable.
Rushing the Process
Patience is a modeller's most valuable tool. Each step in the finishing process needs its own time to cure and settle. Rushing leads to fingerprints in soft paint, primer that won't adhere properly, and a weak overall finish. Sanding, in particular, is where patience pays off. Don't be tempted to jump from a coarse grit straight to a fine one; each grade is designed to remove the scratches left by the previous one.
- Allow proper drying time: Let parts dry completely after washing, and give primer and paint coats at least the manufacturer's recommended time to cure before handling or masking.
- Take your time sanding: This is the foundation of a smooth finish. Work slowly and methodically.
Using the Wrong Tools
Using the correct tool for the job is not just easier, it's essential for a clean result. A dull craft knife blade will tear and gouge the resin rather than slicing it cleanly, creating more repair work. Similarly, overly aggressive files or very coarse sandpaper can remove delicate surface details or leave deep scratches that are difficult to fill and sand smooth later on. Invest in quality tools; they are worth every penny.
Neglecting the Final Inspection
Think of your primer coat as a diagnostic tool. Its uniform, matte finish is your last and best chance to spot any flaws you missed, such as faint print lines, sanding scratches, or small gaps. Always inspect your primed model under a bright, direct light, turning it over to check every angle. Don't be afraid to go back a step. If you find an imperfection, simply sand the area smooth and apply another light coat of primer. This small step is what separates a decent finish from a flawless one.
Now that you know what to avoid, you are well-equipped to achieve a professional-quality finish on your next project. Apply your new skills to a rewarding project today!
From Print to Masterpiece: Your Finishing Journey Begins
The journey from a raw 3D print to a stunning, display-worthy model is a truly rewarding one. As we've covered, the secret isn't magic, but a methodical approach. Remember that meticulous surface preparation lays the essential groundwork, and applying a quality primer is the non-negotiable step that guarantees your paintwork adheres beautifully and looks professional. Mastering these fundamentals is the key to successfully finishing 3d printed kits and bringing your vision to life.
Now that you're equipped with the techniques for a flawless result, it's time to choose your next project. At Narrow Minded Railworks, our kits are designed by modellers, for modellers, focusing on the unique prototypes and narrow gauge subjects you're passionate about.
Feeling confident? Browse our range of 3D printed model railway kits! With worldwide shipping available, your next masterpiece is just a click away. Happy modelling!
Frequently Asked Questions
Do I need to wash all types of 3D printed kits, like FDM and resin?
Yes, but for different reasons. Resin prints must be thoroughly washed in isopropyl alcohol (IPA) or a suitable resin cleaner to remove all uncured liquid resin. This is crucial for both safety and a quality finish. FDM prints (like PLA or PETG) don't have liquid residue, but it's still best practice to give them a quick wash with warm, soapy water to remove any dust, finger oils, or mould release agents from the printing process.
What is the best sandpaper grit to start with for removing support marks?
A great starting point for most support marks or nubs is a medium-grit sandpaper, typically around 240 to 320-grit. This is aggressive enough to remove the unwanted material without creating deep, difficult-to-remove scratches in the surrounding surface. For particularly large or stubborn support areas, you could start with 180-grit, but proceed with caution and follow up quickly with finer grits to smooth out the scratches you've introduced.
Can I use a Dremel or other rotary tool to speed up the sanding process?
You can, but you must be extremely careful. Rotary tools generate significant friction and heat, which can easily melt and deform both FDM plastics and cured resin. If you choose to use one, always operate it on the lowest possible speed setting. Use a very light touch and work in short bursts, moving constantly to avoid heat building up in one spot. They are best reserved for bulk removal on non-detailed areas, not for fine finishing work.
How do I know when the model's surface is smooth enough for priming?
Trust your senses. The surface should feel perfectly smooth to the touch, with no bumps or ridges from layer lines or support remnants. A great visual check is the "light test": hold the model under a bright, angled light source. This will cast shadows and highlight any remaining imperfections, scratches, or uneven spots that your fingers might miss. Once it looks and feels uniform under close inspection, you're ready for primer.
Why is my primer cracking or creating a strange texture on the model?
This is a common issue in finishing 3d printed kits and usually points to a surface problem. The most likely cause is an unclean surface; residual oils from your hands or uncured resin can prevent the primer from adhering properly, causing it to crack or bead up. It can also be caused by spraying in cold or humid conditions, or using an overly aggressive primer (like some automotive ones) that chemically reacts with the plastic or resin.
Is it better to remove supports before or after the final UV cure?
For resin prints, it is almost always better to remove supports *before* the final, hard UV cure. While the print is "soft" cured after washing, the resin is less brittle, allowing supports to be clipped off more cleanly with less risk of creating divots or snapping delicate parts of the model. Removing supports from a fully cured, brittle print often results in a "snap" that can take a chunk of the model's surface with it.