

That brilliant idea for a miniature world is crystal clear in your mind, but translating it into reality can feel overwhelming. Staring at a seemingly endless selection of diorama tools and scenery online or in a hobby shop, it’s easy to feel lost. Are all those expensive gadgets truly necessary? Will this £10 bottle of scenic glue ruin your project? It’s a common frustration that stalls a build before it starts, leaving you worried about wasting money and ending up with a scene that looks more toy-like than true-to-life.
This guide is here to cut through that confusion. We’ve created the ultimate modeller's checklist to demystify the essentials, separating the absolute must-haves from the 'nice-to-haves'. You'll learn not just what to buy, but why you need it-from basic cutters and glues to detailed 3D printed accessories and static grass. By the end, you’ll have a clear, prioritized shopping list, empowering you to spend wisely and confidently build the stunningly realistic miniature worlds you've always imagined.
Key Takeaways
- Master the basics by selecting the correct precision cutting and shaping tools for a flawless foundation on any project.
- Learn which specific adhesives and painting techniques are essential for assembling different materials and achieving lifelike realism.
- Build believable environments from the ground up with our complete checklist of essential diorama tools and scenery, from basic flock to advanced terrain materials.
- Discover how to use small, detailed scenery items to tell a compelling story and bring your miniature world to life.
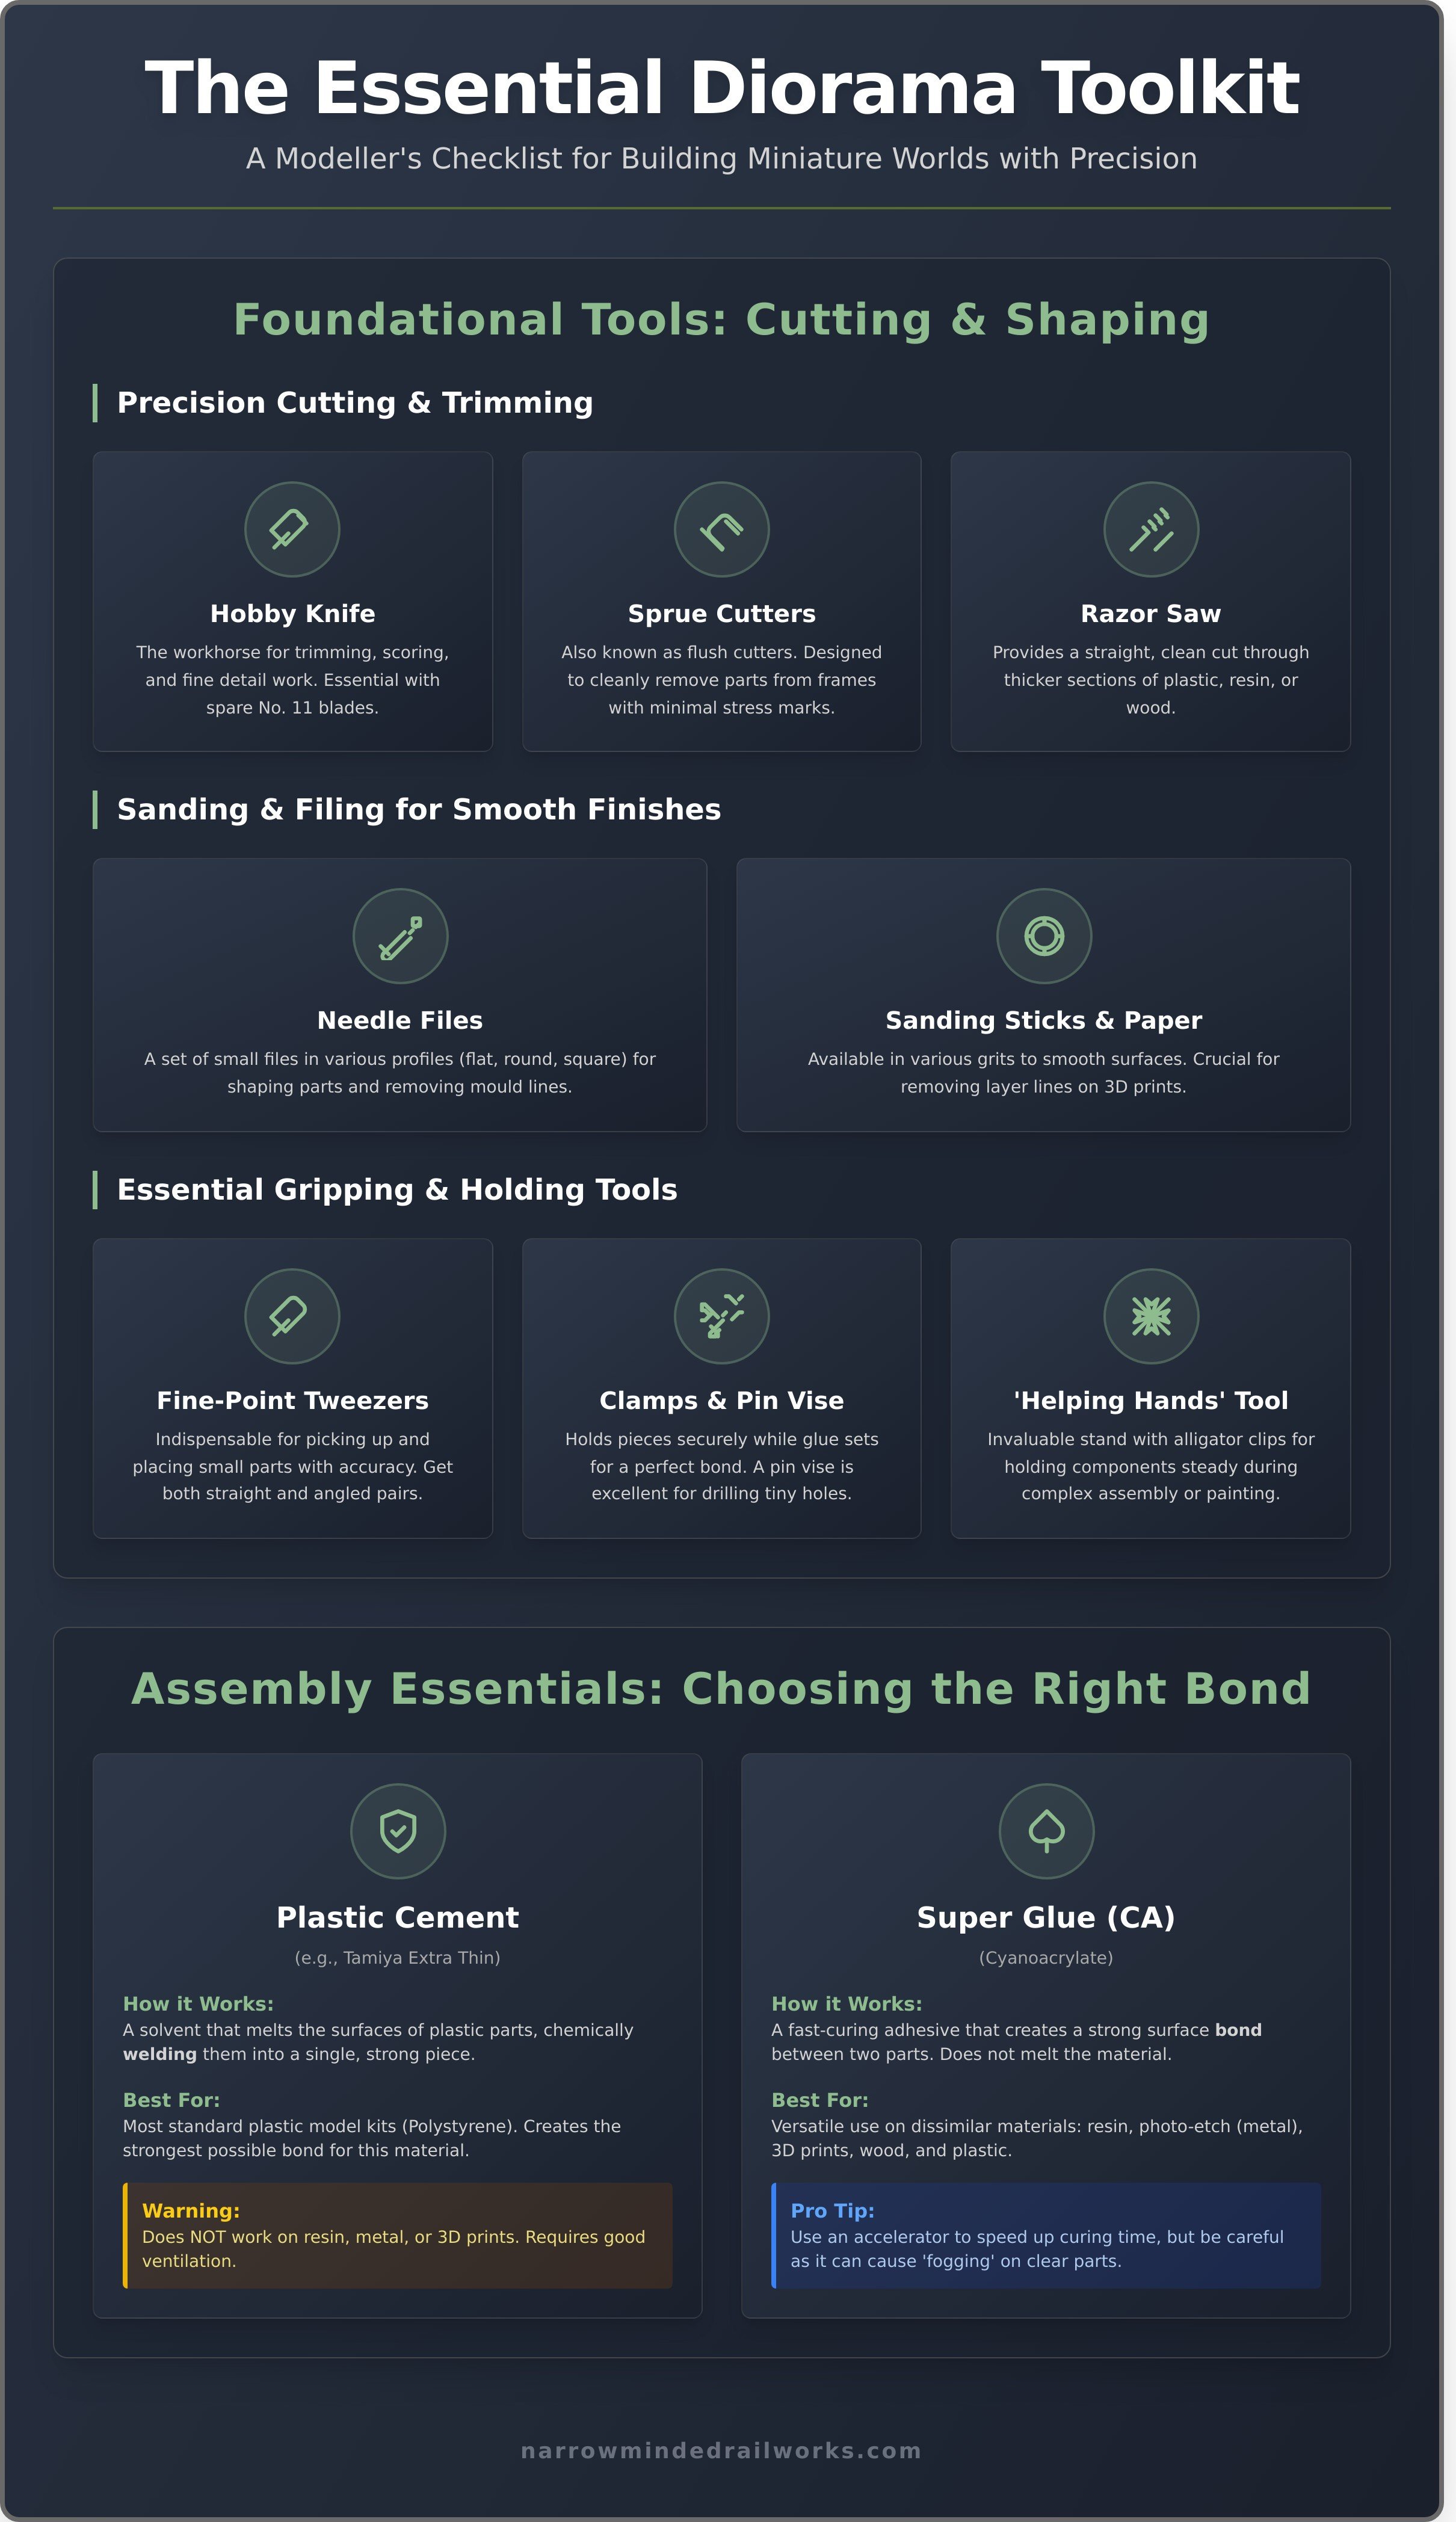
The Modeller's Toolkit: Essential Cutting and Shaping Tools
Every great diorama begins with a clean cut. The foundation of any modelling project lies not in the fancy paints or expensive airbrushes, but in the fundamental tools used for cutting, shaping, and refining your components. Achieving professional-looking results depends on precision from the very first step. If you're new to the hobby and wondering what is a diorama?, think of it as a miniature 3D scene that tells a story, and these foundational tools are what allow you to build that narrative piece by piece. Whether you're working with traditional plastic kits, resin figures, or modern 3D prints, these tools are non-negotiable.
Before you begin, remember that safety is paramount. Always use a self-healing cutting mat to protect your work surface and the blade's edge. Handle sharp blades with extreme care, always cut away from your body, and replace dull blades immediately-a dull blade is far more dangerous than a sharp one.
For a visual guide to some of these essential startup tools, this video offers some excellent advice:
Precision Cutting and Trimming
Your ability to accurately cut and trim parts will define the quality of your build. These three tools form the core of your cutting arsenal:
- Hobby Knife: The workhorse of your toolkit. A quality handle (like those from X-Acto or Swann-Morton) with a pack of spare No. 11 blades is essential for trimming, scoring, and fine detail work.
- Sprue Cutters: Also known as flush cutters or side cutters, these are designed to cleanly remove plastic parts from their frames (sprues) with minimal damage or stress marks.
- Fine-Toothed Razor Saw: For cutting through thicker sections of plastic, resin, or wood, a razor saw provides a straight, clean cut that a hobby knife can't manage.
Sanding and Filing for Smooth Finishes
Proper surface preparation is a vital step when assembling your diorama tools and scenery components. These tools help you remove imperfections for a flawless finish.
- Needle Files: A set of small files in various profiles (flat, round, square, triangular) is perfect for shaping parts and removing prominent mould lines left over from the manufacturing process.
- Sanding Sticks & Sandpaper: Available in a range of grits, these are used for smoothing surfaces. For 3D prints, working through progressively finer grits is the key to completely removing layer lines and support marks.
Essential Gripping and Holding Tools
Working with tiny components can be frustrating without the right tools to hold them steady. These items act as a crucial extra set of hands.
- Fine-Point Tweezers: A pair of both straight and angled tweezers is indispensable for picking up and placing small parts with accuracy.
- Small Clamps or a Pin Vise: These are used to hold pieces securely together while glue sets, ensuring a strong and perfectly aligned bond. A pin vise is also excellent for drilling tiny holes.
- 'Helping Hands' Tool: This adjustable stand with alligator clips is invaluable for holding components steady during complex assembly, painting, or even soldering wires for lighting.
Assembly Essentials: Glues and Adhesives for Every Material
Choosing the right adhesive is a critical step that can make or break your diorama. A clean, strong bond is the foundation of a professional-looking model, and using the wrong glue can lead to weak joints, messy seams, or even ruined parts. The best collections of diorama tools and scenery always include a versatile range of adhesives because different materials demand different bonding methods. Understanding whether to weld plastic together or bond a surface is key to success.
Proper application is just as important. Use only what you need; excess glue can squeeze out of joints, obscure details, and cause 'fogging' or 'crazing' on clear plastic parts like canopies or windows. Always test an adhesive on a spare piece of material first.
Plastic Cements vs. Super Glues (CA)
These two adhesives form the core of any assembly toolkit, but they work in fundamentally different ways. Plastic cement, such as Tamiya Extra Thin Cement, is a solvent that works by melting the surfaces of plastic parts, chemically welding them into a single, strong piece. In contrast, Super Glue (Cyanoacrylate or CA) is a surface adhesive that creates a bond between parts. It doesn't melt plastic, making it essential for joining dissimilar materials like resin, photo-etched metal, and wood to your plastic kits.
For advanced use, CA accelerator instantly hardens the glue, while a debonder can help you fix mistakes before the bond becomes permanent.
PVA and Wood Glues for Scenery
When it comes to building the landscape, white PVA glue is the modeller's workhorse. This non-toxic, water-based adhesive is perfect for all groundwork tasks, from securing ballast and sand to applying static grass and foliage. For large areas, it's common to dilute PVA with water. Adding a single drop of washing-up liquid to your water-glue mix creates 'wet water', which breaks the surface tension and helps the adhesive flow evenly into every crevice. This technique is a cornerstone of scenery building, as detailed in this excellent model railroad scenery guide from the National Model Railroad Association.
Specialty Adhesives and Fillers
Beyond the basics, a few specialist products will elevate your work and solve common modelling problems. Having these among your diorama tools and scenery supplies is a wise investment.
- Two-Part Epoxy: For an incredibly strong, structural bond required for heavy resin components or load-bearing parts, nothing beats epoxy. It offers a longer working time and fills gaps effectively.
- Canopy Glue: This is a special type of PVA designed for attaching clear parts. It dries crystal clear and, crucially, won't fog or craze transparent plastic like super glue or plastic cement can.
- Model Putty: Products like Tamiya Putty or two-part epoxies like Milliput are essential for filling gaps and seams after assembly, ensuring a smooth, flawless finish before painting.
Painting and Weathering: Bringing Your Diorama to Life
This is where the magic happens. A thoughtful paint job and realistic weathering are what transform a collection of plastic and resin parts into a believable, living scene. This stage creates mood, tells a story of use and exposure, and can elevate a simple kit into a masterpiece. Before you even touch a colour, always start with a quality primer. This crucial first step ensures your paint adheres smoothly and provides a uniform base for the layers to come.
Brushes, Paints, and Palettes
You don't need to spend a fortune to get started. A basic set of brushes will cover most tasks: a fine detail brush for precision work, a medium flat brush for base coats, and a wider, softer brush for applying washes. For paints, beginners in the UK often find acrylics easier to work with. They are water-based, dry quickly, and have low odour. Enamels offer a very durable finish but require specific thinners and longer drying times. For mixing your colours, a simple ceramic tile or an old saucer works perfectly as a reusable palette.
The Power of Weathering
Weathering is what gives your model a history. It’s one of the most rewarding aspects of building, turning your collection of diorama tools and scenery into an immersive miniature world. Three fundamental techniques will elevate your work:
- Washes: Heavily thinned paint (usually a dark brown or black) that flows into crevices and panel lines, creating instant depth and shadow.
- Dry Brushing: After dipping your brush in a light colour, you wipe almost all of it off on a paper towel. Gently brushing this over raised details highlights edges and creates a worn, faded look.
- Pigment Powders: These fine powders are perfect for creating realistic dust, rust, and mud effects. They can be applied dry or mixed with a binder to create textured grime on vehicles and terrain.
Applying Decals Like a Pro
To avoid the dreaded "silvering" effect where the decal's clear film is visible, follow this professional process. First, apply a gloss varnish over the area where the decal will go. This creates an ultra-smooth surface. Apply the decal using a setting solution, like Micro Set and Micro Sol, which helps it conform perfectly to curved or uneven surfaces. Once fully dry, seal the entire model with a final matte or satin varnish. This protects the decal and unifies the model's finish, making the decal look as if it were painted on.
Creating the Landscape: Essential Scenery Materials
Your landscape is the canvas upon which your model's story unfolds. A believable environment is built from the ground up, layering different colours and textures to create depth and realism. The goal isn't just to fill space, but to create a cohesive scene that complements your focal point. The right combination of diorama tools and scenery is crucial for transforming a flat base into a vibrant, living world.
Building Your Base and Terrain
The foundation of any great scene is a solid, yet workable, base. Start with a lightweight material like extruded foam insulation board, which is easy to cut and carve into basic landforms. For more organic hills and contours, drape plaster cloths over a support structure or apply a versatile material like Sculptamold. Before adding any ground cover, always apply a base coat of earthy brown or green paint to ensure a natural-looking foundation.
Ground Cover Basics
This is where your landscape truly comes to life. A static grass applicator is an invaluable tool for creating realistic fields and verges, making the fibres stand on end just like real grass. You can then build up layers of texture using:
- Scatter & Flock: Fine foam materials in various colours, perfect for representing soil, low-lying foliage, and moss.
- Clump Foliage: Irregular foam clumps used to create convincing bushes, shrubs, and the undergrowth at the base of trees.
Ballast and Scatter for Realistic Textures
The small details make the biggest difference in achieving realism. For model railways, using ballast in the correct scale for your track bed is essential. Don't overlook natural materials; finely sifted dirt, sand, and small stones make excellent and cost-effective additions for paths, roads, and rocky outcrops. To fix these loose materials permanently, apply a generous coat of diluted PVA glue (a 50/50 mix with water) using a pipette.
By carefully selecting and layering these core materials, you can build a rich and immersive environment. For a curated selection of high-quality diorama tools and scenery, explore the full range available at Narrow Minded Railworks.
The Final Details: Scenery Items That Tell a Story
You've built the landscape and laid the track, but the final 10% of the work is what truly brings a diorama to life. This is where you move from building a model to telling a story. Small, carefully chosen details provide context, establish a sense of scale, and create a believable, lived-in world. By grouping items into logical mini-scenes-a mechanic's clutter around a half-repaired car or goods stacked on a loading bay-you invite the viewer to look closer and discover the narrative within your creation. These finishing touches are just as crucial as your primary diorama tools and scenery supplies.
Structures and Buildings
Buildings are the anchors of your scene, providing immediate visual weight and context. While traditional kits for engine sheds, signal boxes, or small industrial units are excellent starting points, don't overlook other options. Unique, 3D printed structures can offer less common designs, perfect for a specific prototype or a freelance layout. Even something as simple as a well-weathered retaining wall or a small section of platform can add incredible depth and visual interest to a compact space.
Figures, Vehicles, and Animals
An empty scene is a lifeless one. Adding figures is the most effective way to convey scale and activity. Choosing figures in the correct scale is absolutely essential for realism; a slightly-too-large figure can instantly break the illusion. For unmatched detail, consider modern 3D scanned figures that capture natural poses and clothing folds. To further ground your diorama in a specific era and location, add period-correct vehicles, farm animals, or even a stray cat to complete the picture.
Lineside and Urban Details
The authentic clutter of everyday life is what makes a scene truly convincing. These are the small details that are often overlooked but subconsciously registered by the viewer, adding a deep layer of authenticity. Think about the environment you're creating and add appropriate scatter. Good examples include:
- Barrels, oil drums, and crates
- Pallets and packing cases
- Old tyres and petrol pumps
- Signage, telephone boxes, and fence posts
These small items are the final pieces of the puzzle, transforming a good model into a great one. Find unique details in our 3D printed scenery range.
From Checklist to Creation: Your Diorama Awaits
Building a captivating diorama is a journey, not just a destination. As we've explored, success begins with a solid foundation of essential cutting and assembly tools and comes alive through the artful application of paints and weathering. Ultimately, it’s the thoughtful selection of landscape materials and unique details that breathes life into your miniature world. Armed with this checklist, you now have the knowledge to select the perfect diorama tools and scenery for any project you can imagine.
When you're ready to stock your workbench, look no further. At Narrow Minded Railworks, we provide everything you need, designed by passionate modellers, for modellers. Discover our collection of unique 3D printed scenery you simply won't find elsewhere, and let us help you build something extraordinary. With worldwide shipping available for your next project, getting started has never been easier. Shop our range of essential tools and unique scenery.
Now, it's over to you. Clear your workspace, choose your subject, and begin the rewarding process of bringing your vision to life, piece by tiny piece.
Frequently Asked Questions About Diorama Tools
What are the absolute must-have tools for a complete beginner?
For someone just starting, you don't need a huge investment. The essentials are a sharp craft knife (like a scalpel), a self-healing cutting mat to protect your surfaces, and a steel ruler for precise cuts. You will also need a good quality PVA glue for assembly and a basic set of acrylic paints and brushes. This core kit allows you to start building and painting scenery without being overwhelmed by specialist equipment.
How do I choose the right scale for my scenery and figures?
Scale refers to the ratio of the model to its real-life counterpart. For beginners, it's wise to choose a popular scale where kits, figures, and accessories are widely available. In the UK, common scales include 1:35 for military models and OO gauge (1:76) for railway modelling. Sticking to a common scale ensures you can easily find compatible elements to create a cohesive and believable scene without difficulty.
What's the difference between static grass and simple scatter or flock?
The main difference is realism and application. Scatter or flock is a finely ground foam material that is simply sprinkled onto glue to create a flat, mossy, or basic ground cover effect. Static grass consists of individual synthetic fibres that, when used with a static applicator, stand on end. This creates a much more realistic 3D effect, perfectly mimicking a field of grass, whereas flock is better for low-lying textures.
Do I really need an airbrush, or can I get good results with brushes?
You absolutely do not need an airbrush to achieve fantastic results. High-quality brushes and techniques like dry brushing, stippling, and applying washes can produce incredibly detailed and realistic effects. While an airbrush excels at creating smooth base coats and subtle colour transitions, it has a steep learning curve and a higher initial cost, often starting around £70 for a decent starter kit. Master the brush first!
How can I best prepare and paint 3D printed scenery items?
The key to painting 3D prints is preparation. First, lightly sand the model with fine-grit sandpaper to smooth out any visible layer lines. The most crucial step is to then apply a coat of primer from a spray can. A good primer, available from hobby shops or even Halfords, creates a uniform surface that your acrylic paints can properly adhere to, ensuring a smooth and durable finish for your scenery piece.
What is the best way to store and organize all these small tools and materials?
Effective organisation is vital. Consider using multi-drawer craft storage cabinets for paints, glues, and scatter materials. Fishing tackle boxes with adjustable dividers are perfect for organising tiny parts and figures. To keep your workspace clear, a wall-mounted magnetic strip is an excellent way to store your most-used metal diorama tools and scenery implements like scalpels, files, and tweezers, keeping them safe and within easy reach.