

The most detailed narrow gauge locomotive loses its impact when it sits next to a generic phone box that is clearly out of scale. Many modellers find that standard scenery often feels bulky or lacks the unique character required for rural and industrial layouts. Achieving a professional finish requires the right diorama tools and scenery that respect the specific proportions of OO9, GN15, or O-16.5 scales. We understand that finding these niche details is a common hurdle. However, modern 3D printing technology now provides a reliable way to source authentic accessories that were once nearly impossible to find.
You deserve a miniature world that feels immersive and realistic rather than a collection of mismatched parts. This guide will help you master the art of miniature storytelling by showing you exactly how to select and use specialized tools for your layout. We'll address common frustrations, such as removing support marks from 3D printed resin, and provide a curated list of must-have equipment. By the end of this article, you'll have the confidence to use high-detail accessories like vintage petrol pumps and scanned figures to bring your narrow gauge scene to life.
Key Takeaways
- Learn how to provide authentic context for industrial and rural locomotives by mastering the fundamentals of miniature storytelling.
- Identify the essential precision cutting and abrasive tools required to finish 3D printed resin parts with a professional, mark-free surface.
- Discover layering techniques for groundwork that transform basic foam and plaster into realistic terrain using varying textures and scales.
- Understand how to select the right diorama tools and scenery, including vintage petrol pumps and realistic figures, to define your layout's unique character.
- Explore how specialized 3D printed accessories solve the problem of finding scale-accurate details for OO9, GN15, and O-16.5 layouts.
The Fundamentals of Miniature Storytelling: Why Diorama Scenery Matters
Narrow gauge modelling is unique because it often focuses on the charm of the "imperfect." A diorama serves as more than a mere display platform for track. It provides the essential context that explains why a specific locomotive exists in that space. Without the right diorama tools and scenery, a narrow gauge engine looks like a toy. With them, it becomes a piece of history. You might find it difficult to transition from a sterile "train set" look to a realistic, weathered environment, but focusing on the narrative is the first step toward a professional result.
To better understand how these elements come together to create a convincing scene, watch this helpful video:
Setting the Scene: Industrial vs Rural
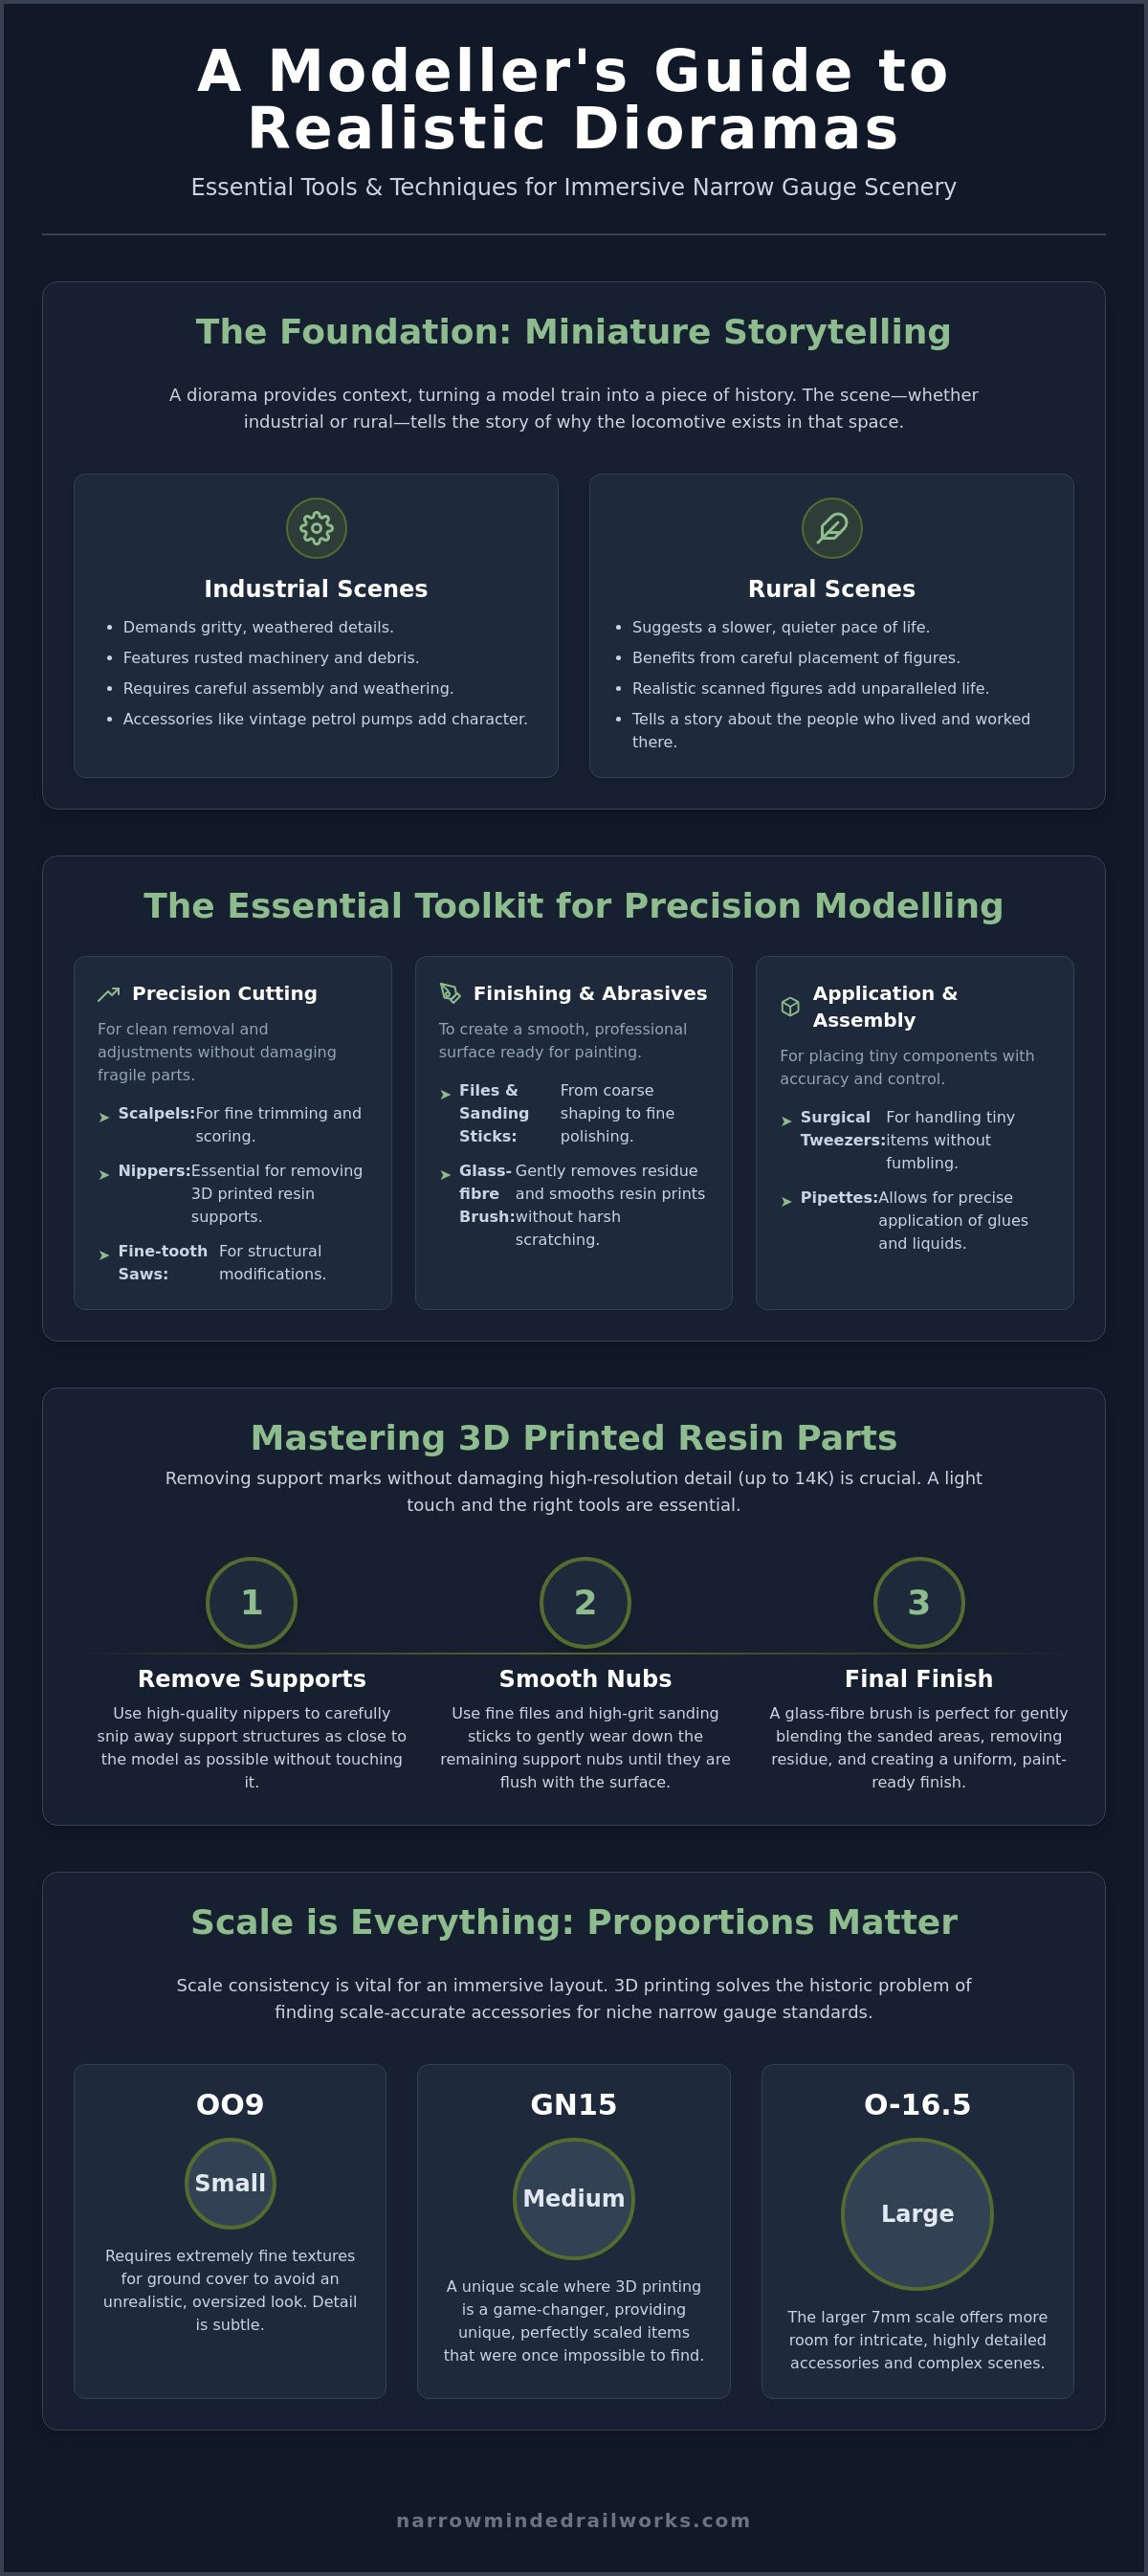
Narrow gauge lines often served specific purposes, such as hauling slate from a quarry or milk from a farm. These environments require different visual cues. Industrial scenes demand gritty details like rusted machinery and piles of debris, which often require specialized diorama tools and scenery to assemble and weather correctly. Rural scenes, on the other hand, benefit from the careful placement of figures and accessories that suggest a slower pace of life. A well-placed figure scanned from a real person adds a level of realism that generic plastic parts simply cannot match. By positioning a figure leaning against a wall or a vintage petrol pump near a shed, you tell a story about the people who worked the line.
The Role of Scale in Scenery Selection
Consistency in scale is vital for immersion. While OO9 modellers need fine textures for ground cover to avoid looking like oversized gravel, O-16.5 (7mm) modellers have more room for intricate, larger details. Finding unique items for GN15 scale used to be a significant constraint because standard gauge accessories often looked out of place. Resin 3D printing has solved this problem. It allows for the production of highly detailed items like vintage petrol pumps or phone boxes that are scaled perfectly for narrow gauge layouts. These parts are easy to finish and provide the unique industrial or rural character that defines a successful diorama. Using the right abrasives ensures that even 3D printed parts look like they belong in a 1930s landscape rather than a modern workshop.
Essential Diorama Tools for Precision Modelling
Precision is non-negotiable when you're working with the unique proportions of narrow gauge scales. Many modellers find that generic hobby knives lack the finesse required for the delicate components found in OO9 or GN15 kits. However, assembling a professional toolkit of diorama tools and scenery accessories ensures your work retains its intended detail. A standard setup should include scalpels for fine trimming, nippers for removing resin supports, and fine-tooth saws for structural adjustments. These tools allow you to handle intricate parts without the risk of snapping fragile details.
A cluttered workspace with poor lighting often leads to assembly errors and unnecessary eye strain. Establishing a dedicated area with bright LED lamps and proper ventilation creates a safer, more productive environment for precision modelling. Finishing is where a diorama either succeeds or fails. You should stock a range of abrasives, from coarse files for initial shaping to high-grit sanding sticks for a smooth finish. Modern 3D prints can reach resolutions of up to 14K with layers as thin as 17 microns, so a light touch is essential to avoid erasing surface textures. Using application tools like surgical tweezers and pipette systems allows you to place tiny items exactly where they belong without the mess of manual handling.
Specialist Tools for 3D Printed Accessories
Removing support marks is a common pain point for modellers who are new to resin. If you don't use the right technique, you risk pitting the surface of your model or leaving unsightly bumps. Glass-fibre brushes are essential here because they gently clean away residue and smooth out minor imperfections without the aggression of a metal file. Mastering finishing 3d printed kits ensures that your phone boxes and petrol pumps look like authentic cast iron or timber rather than layered plastic. This preparation stage is vital for achieving a professional, realistic appearance before you ever pick up a paintbrush.
Adhesives and Fixatives
Choosing the wrong adhesive can lead to failed joints or messy surfaces on your layout. Utilizing a specific bonding strategy based on material properties provides a permanent, clean result. Cyanoacrylate (CA) is the standard for resin-to-resin bonds, but it can be brittle. For resin-to-wood or larger structural bonds, a two-part epoxy provides the necessary strength, especially since modern engineering-grade resins have a 15% higher impact resistance than older materials. Groundwork requires a different approach. While standard PVA works for basic scenery, dedicated scenic cements are thinner and penetrate textures more effectively. If you're adding tiny details like signage to your scenery, using Micro Sol helps decals settle into the grain of the 3D print for a painted-on look. If you're starting a new project, you can find a curated range of diorama tools and scenery designed specifically for the needs of narrow gauge enthusiasts.
Mastering Groundwork and Natural Scenery Textures
A narrow gauge diorama often feels disconnected if the track sits on top of the scenery rather than being an integrated part of it. Building a professional landscape requires more than just pouring ballast; it involves a deliberate layering process. While creating realistic terrain can be time-consuming, using the right diorama tools and scenery materials allows you to transition from a flat wooden board to a living, breathing environment. Mastering these textures is what separates a basic loop of track from a professional exhibit.
You should start with a foundation of high-density foam. This material is lightweight and easy to carve into the steep embankments or deep cuttings typical of narrow gauge lines. Once you've shaped the terrain with hot wire cutters or scalpels, a thin layer of plaster or sculptamold provides a hard shell for your textures. Layering is the secret to realism. Don't simply use one grade of dirt. Instead, start with a base of fine dust or sifted earth and gradually add larger rocks and coarse ballast. This mimics the natural accumulation of debris found around industrial sites or rural branch lines. Blending your trackwork into this environment involves painting the rail sides and using fine-grain ballast that won't look like oversized boulders in OO9 or GN15 scales.
Creating Realistic Soil and Vegetation
Achieving realistic vegetation requires a structured approach to prevent the "golf course" look that ruins many layouts. You can follow these three steps for a professional finish:
- Step 1: Apply a matte earth-toned acrylic base and sprinkle finely sifted soil over wet glue to create a natural foundation.
- Step 2: Use a static grass applicator to layer fibers of different lengths. While applicators range in price from $45.95 to $157.90, even entry-level tools allow you to create the upright, wild verges essential for narrow gauge realism.
- Step 3: Add variety by gluing clump foliage or sea foam to represent brambles and bushes that have overgrown the line.
For modellers seeking to replicate the look of established landscapes, you can check out Buds Nursery Cavan to explore a wide variety of trees and shrubs that provide excellent visual references for realistic scenery.
Weathering Your Environment
Weathering bridges the gap between clean resin accessories and the grimy reality of a working railway. Buildings and structures often look too "new" out of the box, but you can age them quickly using washes and weathering powders. For industrial sites, a drop of gloss varnish in low-lying areas creates the appearance of oily puddles or fresh mud. Integrating your detailed accessories is the final touch. Utilizing weathering model trains techniques helps blend 3D printed phone boxes, figures, and petrol pumps into the surrounding dirt. By selecting the correct diorama tools and scenery essentials, you ensure every element of your landscape serves the narrative of your miniature world.
Scale-Specific Accessories: Finding the Right Details
Generic scenery often looks out of scale for narrow gauge layouts. While standard gauge layouts might get away with mass-produced plastic buildings, narrow gauge thrives on the unique and the weathered. Accessories like vintage petrol pumps and phone boxes act as focal points that ground your model in a specific era. High-quality 3D printed accessories provide the detail level required for this, often reaching 14K resolution with layers as thin as 17 microns. This level of precision eliminates the "3D printed look" that once deterred modellers. Using specialized diorama tools and scenery allows you to customize these items, ensuring they fit the specific narrative of your industrial or rural line.
Details for OO9 and Small Scales
In 4mm (OO9) scale, even the smallest accessory must be sharp and well-defined. Because these models are compact, industrial clutter such as barrels, crates, and hand tools becomes highly visible. You shouldn't overwhelm a small layout, so pick items that suggest a story without crowding the track. If you're new to this scale, reviewing a beginner guide to OO9 can help you understand the scale context before you commit to specific accessories.
Large Scale Details: GN15 and O-16.5
Larger scales like GN15 and O-16.5 (7mm) demand even more attention to texture. In these scales, the grain of a wooden crate or the rust on a petrol pump is clearly visible to the naked eye. Generic 1/24 scale items often fail to capture the specific "chunky" yet detailed aesthetic of narrow gauge. Utilizing unique 3D printed items is the most effective way to fill these larger spaces without resorting to repetitive, mass-produced scenery. For those exploring these bigger proportions, a guide on getting started in GN15 scale offers excellent accessory ideas to populate your layout.
Ready to enhance your layout with authentic details? You can browse our full range of 3D printed scenery and figures to find the perfect match for your scale.
The Narrow Minded Advantage: 3D Printed Scenery Solutions
Finding the right diorama tools and scenery items for a narrow gauge layout shouldn't feel like a compromise. Traditional manufacturers often overlook the specific needs of OO9, GN15, and O-16.5 scales, leaving modellers to adapt parts that aren't quite right. Narrow Minded Railworks addresses this gap by designing every accessory with the narrow gauge enthusiast in mind. By utilizing high-resolution resin 3D printing, we produce intricate details that were previously impossible to manufacture in small batches. This technology ensures that items like phone boxes and vintage petrol pumps maintain their crisp edges and authentic proportions.
We're a UK-based specialist, but we serve a global community of modellers who value realism and precision. Choosing 3D printed resin over traditional materials like white metal offers several benefits. Modern engineering-grade resins have a 15% higher impact resistance compared to materials from just a few years ago. This durability is vital when you're assembling anything from a tiny wagon kit to a larger locomotive body. Our goal is to provide the missing pieces of your miniature world, ensuring you have access to the specific industrial and rural details that make a layout feel complete.
Unique Offerings: Beyond the Standard Kit
We believe that a scene only truly comes to life when it's inhabited by realistic characters. Our figures are scanned from real people, which provides an unparalleled level of realism that generic plastic moulds can't match. You'll notice the difference in the natural drape of a jacket or the authentic posture of a station worker. Beyond figures, we specialize in those hard-to-find rural accessories. Whether you need specific industrial clutter for a quarry scene or a perfectly scaled phone box for a village halt, our custom-designed items fill the gaps that standard kits leave behind.
Finishing Your Narrow Minded Kits
Don't let the thought of working with resin intimidate you. Finishing our 3D printed scenery and locomotive bodies is a straightforward process that follows a proactive solution. Start by ensuring the model is clean; a quick brush with a glass-fibre tool removes any remaining support residue. Once clean, apply a high-quality primer to provide a key for your paint. Because our resin captures such fine detail, you don't need heavy coats of paint to achieve a professional finish. A light touch with a brush or airbrush will preserve the surface textures we've worked hard to include. If you're ready to start your next project, you can browse our full range of diorama tools and scenery to find the perfect addition to your layout.
Elevate Your Layout with Professional Scenery Techniques
Building a realistic narrow gauge diorama often presents the challenge of finding details that don't look like oversized toys. We've explored how selecting the right diorama tools and scenery accessories can transform a basic track loop into a detailed narrative. By mastering precision finishing for resin parts and implementing a layered approach to groundwork, you ensure your OO9, GN15, or O-16.5 layout stands out. While sourcing these niche items was once difficult, modern 3D printing provides a direct solution for authentic industrial and rural details.
Our UK-designed 3D printed kits are crafted specifically to meet these needs, featuring figures scanned from real people for ultimate realism. Whether you're modelling a quiet rural halt or a busy industrial quarry, we provide the specialized components required to finish your world. With worldwide shipping available, you can access these unique details regardless of your location. Explore our unique 3D printed scenery and diorama tools today to begin your next project. Your journey from a simple train set to a professional-grade railway environment is just a few details away.
Frequently Asked Questions
What are the most essential diorama tools for a beginner?
Beginners should prioritize a precision hobby knife, fine-point tweezers, and a set of high-grit sanding sticks. While it's tempting to buy complex machinery, these basic diorama tools and scenery essentials allow you to handle almost any assembly task. You'll also need a reliable static grass applicator and various grades of ballast to create the layered, realistic textures that define professional narrow gauge layouts.
Can I use 3D printed scenery items with traditional plastic kits?
You can seamlessly integrate 3D printed resin accessories with traditional plastic or laser-cut wood kits. Standard plastic kits often lack the specific industrial or rural details required for narrow gauge layouts. High-resolution 3D printed items fill this gap by providing the unique character that generic kits cannot offer. This hybrid approach allows you to build large structures while maintaining high-fidelity details in focal areas.
How do I remove support marks from 3D printed resin scenery?
Use a fine-grit sanding stick or a glass-fibre brush to gently level the surface where supports were attached. It's common to find small "nibs" on resin parts, but these are easily removed with a sharp scalpel before sanding. While these marks are a constraint of the printing process, taking the time to smooth them ensures a professional look after you apply paint and weathering.
What is the best glue for attaching 3D printed accessories to a diorama?
Cyanoacrylate (CA) glue, commonly known as super glue, is the most effective choice for bonding resin to other materials. While standard wood glue works for scenery bases, it won't adhere to non-porous resin surfaces. For larger structural items that require more working time, a two-part epoxy provides a stronger bond that withstands the handling required during the construction of your diorama tools and scenery project.
Do I need to prime 3D printed scenery before painting?
You must always prime 3D printed resin before applying your final colors. Resin surfaces are non-porous, which can prevent acrylic paints from adhering properly or cause them to bead. Using a dedicated hobby primer creates a uniform surface that grips the paint. This step is essential to preserve the fine details, such as the grain on a 3D printed phone box or petrol pump.
How do I choose the right scale figures for my OO9 or GN15 layout?
Match your figures to the specific scale of your rolling stock, such as 4mm for OO9 or 1/24 for GN15. Many generic figures look stiff or out of proportion, which ruins the immersion of a scene. Using figures scanned from real people provides a level of realism that standard plastic moulds lack. These authentic poses and clothing folds help ground your locomotives in a believable, lived-in environment.