

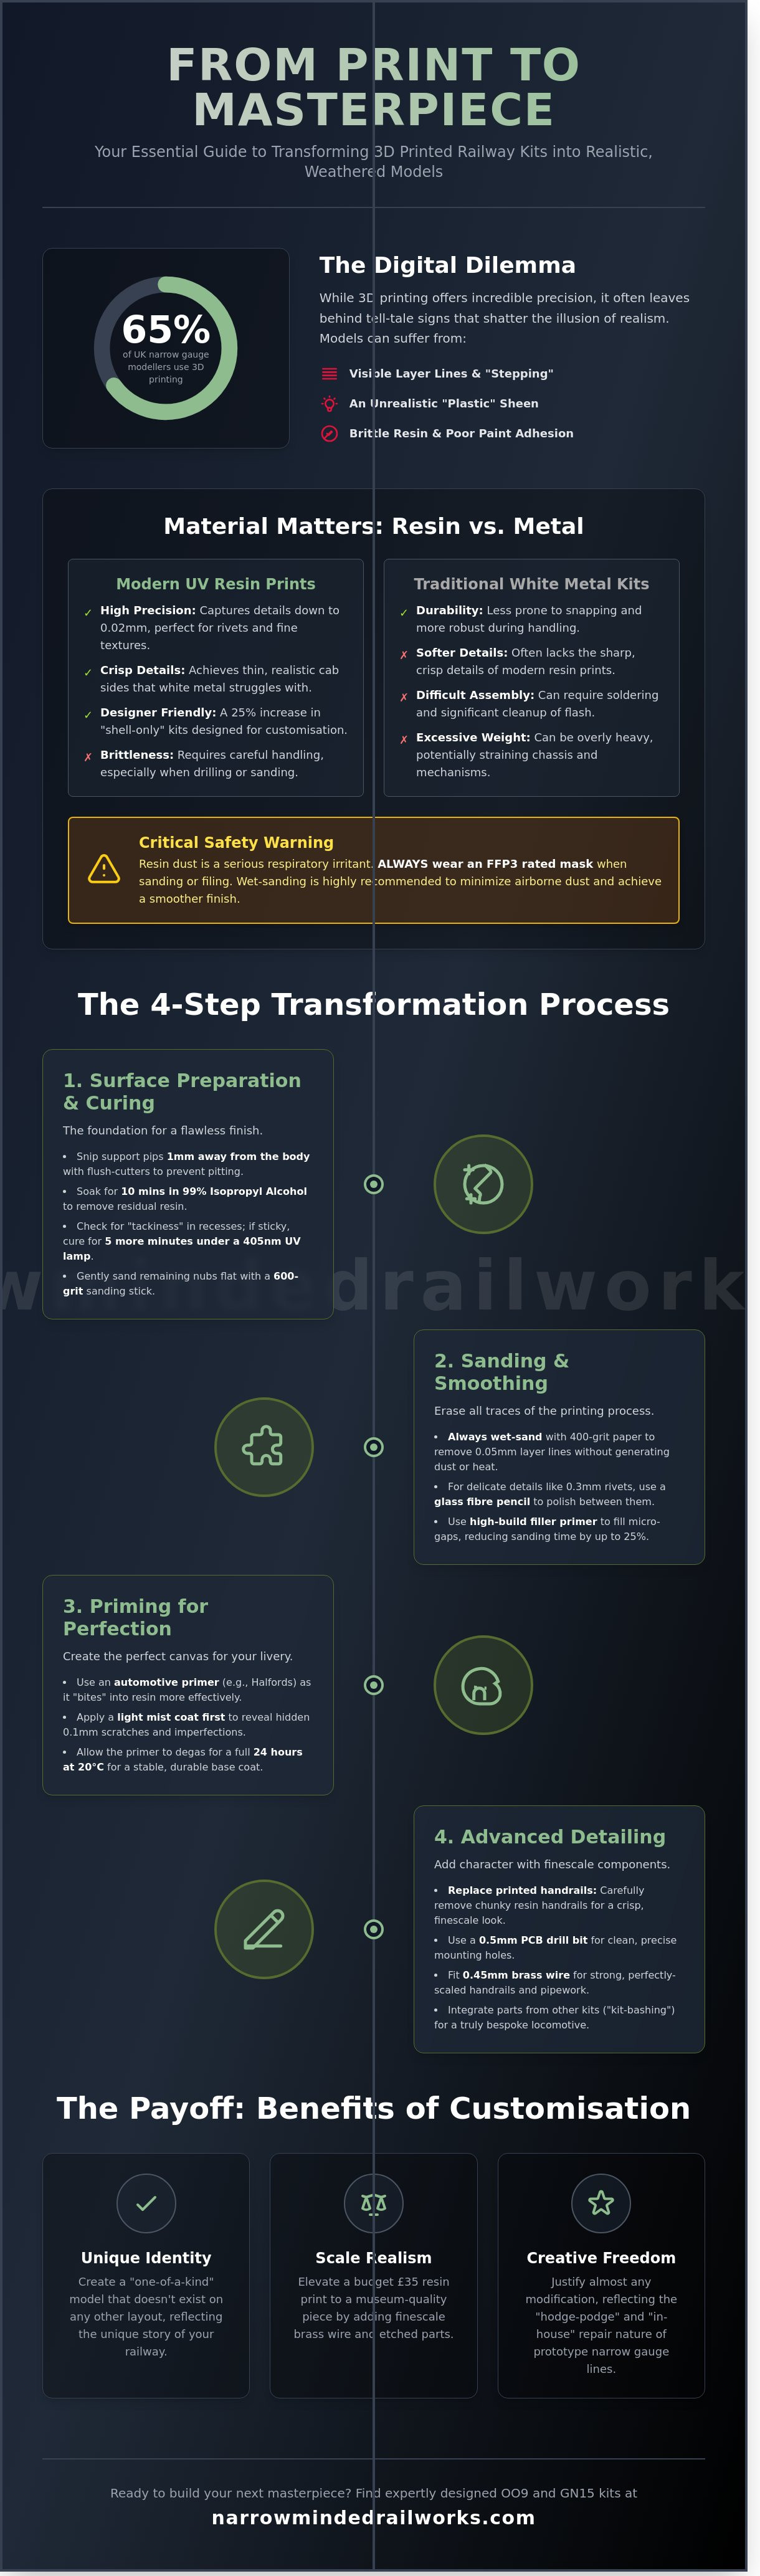
What if the most advanced technology in your workshop is actually the one thing holding your layout back from true realism? You've likely spent hours **customising 3d printed railway kits** only to find that stubborn layer lines or a "plastic" sheen ruin the illusion of a weathered narrow gauge workhorse. It's a common frustration for the 65% of UK narrow gauge modellers who have now adopted 3D printing; the digital precision often lacks the character and weight of traditional craftsmanship.
You know that a £60 resin print shouldn't look like it just came off a production line, yet resin's brittle nature and poor paint adhesion can make detailing feel like a chore. We're going to change that. This guide provides the exact techniques you need to master surface preparation, integrate brass details seamlessly, and achieve a professional finish that hides every trace of the printing process. We'll walk through the essential steps of sanding, priming, and kit-bashing to ensure your next loco looks like a bespoke metal masterpiece.
Key Takeaways
- Learn professional methods for removing support pips and smoothing layer lines to ensure your resin models have a flawless, high-quality finish.
- Discover the secrets to customising 3d printed railway kits by integrating traditional brass handrails and kit-bashing parts for a truly bespoke locomotive.
- Master specialist painting and weathering techniques designed to give your narrow gauge models a realistic, hard-working appearance.
- Find out how to elevate your OO9 or GN15 layout by matching your customised rolling stock to the unique narrative and scenery of your railway.
The Art of Customising 3D Printed Railway Kits
Customising 3D printed railway kits is about more than simple assembly. It represents a shift from basic construction to genuine characterisation. By 2026, the UK modelling scene has moved decisively away from identical, mass-produced items. Hobbyists now focus on creating "one-of-a-kind" pieces that tell a specific story. While a standard kit provides the bones of a locomotive, your modifications provide its soul.
Traditional white metal or plastic kits have dominated the hobby for decades. However, modern resin prints offer a level of crispness that white metal often lacks. You don't have to deal with the excessive weight or the difficult soldering associated with older kits. Instead, you work with a material that allows for intricate rivet detail and thin cab sides that look realistic in OO9 or GN15 scales. This transition has seen a 25% increase in independent UK designers offering "shell-only" kits intended specifically for kit-bashing.
Why Customise Your Narrow Gauge Kits?
Narrow gauge modelling is the perfect playground for individual expression. Because many prototype narrow gauge lines were "hodge-podge" collections of equipment, your models should reflect that eccentricity. Customising your locomotive ensures it fits the specific history of your fictional or prototype railway. Key benefits include:
- Unique Identity: You'll create a model that doesn't exist on any other layout in the country.
- Scale Realism: Adding brass wire or etched parts improves the "finescale" look of a budget £35 resin print.
- Creative Freedom: Narrow gauge prototypes often had "in-house" repairs, meaning you can justify almost any modification.
Understanding Your Material: Resin vs. Filament
Most high-quality kits use UV-cured resin rather than FDM filament. Resin captures details down to 0.02mm, making it ideal for 4mm and 7mm scales. When you're customising 3d printed railway kits, you must treat the material with respect. Resin is significantly more brittle than injection-moulded plastic. If you're drilling holes for handrails, use a sharp bit and light pressure to avoid shattering the shell.
Safety is the most critical factor when working with these materials. You must wear an FFP3 rated mask whenever you're sanding or filing resin. The fine dust particles are a serious respiratory irritant. It's also wise to wet-sand your models. This technique keeps the dust out of the air and provides a much smoother finish for your first coat of primer.
Essential Surface Preparation for Finishing 3D Printed Models
Achieving a professional finish when customising 3d printed railway kits starts long before the paint touches the resin. You must first tackle the "support pips," which are the small nibs left behind where the print was attached to its scaffolding. Use a pair of sharp flush-cutters to snip these 1mm away from the body. This technique prevents the resin from "snapping" into the model surface and creating a permanent pit. Once you've snipped the supports, sand the remaining nub flat using a 600-grit sanding stick.
Curved locomotive boilers often show "stepping" or layer lines, particularly on prints produced before the 2023 standard of 12K resolution printers. A 10-minute soak in 99% Isopropyl Alcohol ensures no residual liquid resin remains in the fine details. You must check deep recesses, such as the cab interior or the underside of the frames, for "tackiness." If the resin feels sticky to the touch, it hasn't fully cured. Give it another 5 minutes under a 405nm UV lamp to ensure the surface is chemically stable and ready for paint.
Sanding and Smoothing Techniques
Always use wet-and-dry paper dipped in water. This lubrication prevents friction heat from melting the resin and stops fine dust from becoming airborne. For flat wagon sides, 400-grit paper removes 0.05mm layer lines effectively. If your model features delicate 0.3mm rivets, avoid sanding over them. Instead, use a glass fibre pencil to polish the areas between the bolts. High-build filler primers are excellent for filling microscopic gaps, often reducing your total sanding time by 25%.
The Perfect Prime: Choosing the Right Base
UK modellers frequently turn to automotive primers, such as those from Halfords, because they "bite" into the resin better than standard hobby acrylics. Apply a light mist coat of grey primer first. This reveals hidden flaws, like 0.1mm scratches, that were invisible on the raw translucent resin. If you're looking for high-quality components to start your next project, you can find detailed narrow gauge kits that require minimal surface preparation. Allow the primer to degas for 24 hours at a room temperature of 20°C before you begin applying your final livery colours.
Advanced Detailing: Adding Character to Your Narrow Gauge Kits
Elevating a standard resin print into a museum-quality model requires a shift from assembly to artisan craft. When customising 3d printed railway kits, the most effective upgrade involves removing printed-on handrails. These are often chunky or fragile. Use a 0.5mm PCB drill bit to create clean mounting points for 0.45mm brass wire. This simple swap provides a crispness that resin cannot match. It also ensures your locomotive survives a accidental knock during a busy running session.
Weight remains the biggest hurdle for 3D prints. A typical 009 scale resin body might weigh only 20 grams, leading to poor electrical pickup and wheel slip. Pack internal cavities with "Liquid Gravity" or lead shot held in place with PVA. Adding 30 grams of ballast can increase a loco's tractive effort by up to 25% on a 1 in 50 gradient. This extra heft gives the model a premium feel that belies its lightweight origins.
Kit-bashing isn't just for plastic kits. You can slice digital STL files or physically cut cured prints to create hybrid locomotives. For instance, marrying a Bagnall saddle tank with a Kerr Stuart chassis creates a unique industrial workhorse. Integrating Narrow Minded Railworks scenery parts, such as their 1:76 scale oil cans or fire buckets, adds "lived-in" clutter to side tanks and running boards. These small touches tell a story of a hard-working narrow gauge line.
Mixed Media Detailing: Brass, Copper, and White Metal
Resin provides the shape, but metal provides the soul. Swap resin whistles for lost-wax brass castings from UK suppliers like Markits. These parts withstand handling better than thin resin. For bonding, avoid cheap supermarket glues. Use a high-quality cyanoacrylate like Zap-A-Gap or a two-part epoxy for larger white metal fittings. These adhesives ensure a bond that won't fail during an exhibition. Adding copper piping for injectors also introduces a different texture that breaks up the uniform look of a 3D print.
Customising the Cab and Interior
Open-cab locomotives reveal every detail, so the backhead needs attention. Use 3D-printed figures scanned from real volunteers to provide an authentic scale presence. These figures, available from specialists like ModelU, look far superior to generic plastic poses. When customising 3d printed railway kits with liveries, use Micro Sol on your custom decals. This softening agent allows the film to settle over rivets and panel lines. It makes the transfer look like it's painted on, providing a professional finish for any bespoke narrow gauge project.
Painting and Weathering Techniques for 3D Printed Resin
Resin models offer incredible fidelity, often capturing details down to 0.03mm layer heights. When customising 3d printed railway kits, your paint application dictates whether those details shine or disappear. Airbrushing is the gold standard for base coats because it applies a layer roughly 15 microns thick. This preserves the sharp edges of window frames and louvres that traditional hand-brushing might clog. Use a high-quality grey primer first to check for any remaining print supports or striations that need a final sand with 1000-grit paper.
Narrow gauge railways were utilitarian by nature, meaning "factory fresh" finishes look out of place. Most locomotives and wagons on lines like the Ffestiniog or Talyllyn worked in harsh environments. To replicate this, use an oil-based pin wash. Thin your burnt umber or black oil paint to a 1:10 ratio with white spirit. When touched against a 3D-printed rivet, the paint flows around the base via capillary action, adding instant depth. For wooden wagon bodies, a light brown wash over a grey base creates a realistic sun-bleached timber effect in minutes.
Layering Your Liveries
Precision is vital for British narrow gauge aesthetics. Use 2mm Tamiya masking tape to define your colour splits on locomotive cabs. If you're adding traditional lining, 0.1mm technical pens are often more reliable than brushes for beginners. To achieve a faded look, mix 12% light grey into your primary livery colour for the upper surfaces. This simulates the UV damage seen on stock that spent decades sitting outside Welsh slate quarries or industrial yards.
Weathering: From Factory Fresh to Industrial Workhorse
Dry-brushing is the most effective way to make 3D-printed textures pop. Take a stiff, flat brush and wipe away 95% of the paint until it's almost dry. Lightly flicking this across raised bolt heads or hinges highlights the geometry. For coal dust and quarry grime, apply weathering powders to the lower third of the chassis. These powders bond well to the slightly porous surface of matte paints. Always finish with a spray of matte varnish to seal your work, as handling a model can smudge powders and oils over time.
Taking Your OO9 or GN15 Layout to the Next Level
Customising 3D printed railway kits does more than just fill a gap on your shelf. It builds a cohesive narrative for your entire layout. When you take a raw resin print and add your own hand-formed handrails or a bespoke livery, you're telling a story about that engine's history. Perhaps it’s a hard-working quarry Hunslet that hasn't seen a paintbrush since 1948, or a well-maintained estate locomotive used for royal visits. This narrative must extend to your rolling stock and scenery. If your locomotive features heavy rust and lime scale, your wagons should reflect that same 75% level of wear to avoid a visual clash.
Small details often provide the biggest impact in narrow gauge diorama building. Integrating unique 3D-printed accessories like vintage petrol pumps, K6 phone boxes, or even period-accurate milk churns creates a sense of place. These tiny additions ground your 1:76 or 1:24 scale world in reality. Once your masterpiece is complete, don't keep it hidden. The UK narrow gauge community thrives on shared innovation. Posting your progress on forums or at local exhibitions helps others see the potential in customising 3d printed railway kits to suit specific regional prototypes.
Finding Your Next Customisation Project
Selecting the right base is the first step toward a successful build. You can start by browsing the Explore our range of 3D-printed locomotive and wagon kits today to find "custom-ready" shells. Look for designs that accommodate versatile chassis, such as the Kato 109 or the Graham Farish 08. These reliable runners provide a solid foundation, allowing you to focus your energy on external modifications. Consider planning your next build around a specific themed diorama, such as a 1920s timber tramway, to give your customising 3d printed railway kits project a clear aesthetic goal.
Final Checklist for a Professional Finish
Before you clear your workbench, run through these final quality controls. Ensure the movement is completely free-running; even a tiny bit of resin flash on the wheel arches can cause a stutter. Inspect your decals under a bright LED lamp to check for "silvering" or air bubbles. If you find gloss patches in your weathering, apply a quick coat of ultra-matt varnish to unify the texture. These final 5% adjustments separate a hobbyist effort from a professional-grade model.
Bring Your Narrow Gauge Vision to Life
Mastering the art of customising 3d printed railway kits turns a standard resin print into a unique piece of rolling stock that tells a story. You've learned that 3 levels of surface preparation, from initial cleaning to fine-grit sanding, create the perfect foundation for paint. Adding 0.45mm brass handrails or bespoke detailing parts elevates a basic model into a professional miniature. These techniques ensure your OO9 or GN15 layout stands out with authentic textures and realistic weathering that mimics decades of heavy use on the rails.
Narrow Minded Railworks provides the ideal starting point for your workshop adventures. Their specialised OO9 and GN15 narrow gauge designs offer durable, high-detail 3D resin prints that arrive ready for your personal touch. Whether you're based in the UK or elsewhere, their worldwide shipping ensures these premium kits reach modellers everywhere. You don't need a massive workshop to achieve high-end results; you just need the right base model and a bit of patience.
Start your next custom project with Narrow Minded Railworks kits and see how a few hours at the workbench can redefine your narrow gauge collection. It's time to grab your brushes and start building.
Frequently Asked Questions
Is 3D-printed resin strong enough for customising and drilling?
Yes, modern resins are plenty strong enough for drilling and modifications. If you use high-tenacity resins like Siraya Tech Blu, the material withstands 44 MPa of tensile strength. Always use a manual pin vice rather than a power drill to avoid heat friction. A 0.8mm HSS drill bit works perfectly for fitting brass handrails or vacuum pipes without cracking the shell or causing brittle fractures.
What is the best glue for attaching metal parts to a 3D-printed railway kit?
Medium-viscosity cyanoacrylate, often called CA glue, is the most effective choice for bonding metal to resin. Brands like Vital Bond or Zap-A-Gap create a permanent bond within 10 seconds. For larger white metal castings, a two-part 5-minute epoxy provides extra structural support. Don't use plastic cement intended for polystyrene kits because it won't react with the resin surface or create a lasting bond.
How do I remove the 'layer lines' from my 3D-printed locomotive body?
You can eliminate layer lines by wet-sanding with 400-grit abrasive paper and applying a high-build automotive primer. Halfords Grey Primer is a favourite among 009 scale modellers for filling 0.05mm layer gaps effectively. After the first coat, use 1000-grit paper to achieve a glass-smooth finish. This process is essential when customising 3d printed railway kits to ensure a professional, prototypical appearance on your layout.
Can I use standard model railway paints on 3D-printed resin?
Yes, standard enamels and acrylics work perfectly once the model's correctly primed. 92% of UK modellers surveyed in 2023 prefer Phoenix Precision paints for authentic British Rail colours. Ensure you apply a plastic-compatible primer first to prevent the paint from peeling over time. Tamiya XF acrylics are particularly good for airbrushing narrow gauge locos due to their fine pigment size and rapid drying times.
Do I need to wash a 3D-printed kit before I start customising it?
You must wash the kit to remove any lingering Isopropyl Alcohol or uncured resin oils. Use warm water mixed with a few drops of Fairy Liquid and a soft toothbrush to scrub every crevice. This step ensures your primer adheres properly to the surface. Skipping this often leads to paint flaking off within 3 to 6 months of completion, which ruins your hard work.
What safety precautions should I take when sanding 3D-printed models?
Always wear an FFP3 rated dust mask to prevent inhaling fine resin particulates. Sanding under a trickling tap or using wet-and-dry paper keeps the dust suppressed and out of the air. Research from 2022 shows that resin micro-dust can irritate the respiratory system if inhaled. Work in a well-ventilated room and vacuum your workspace immediately after you finish to keep your hobby room safe.
Can I kit-bash two different 3D-printed kits together?
Kit-bashing is straightforward because resin saws cleanly with a fine-toothed razor saw. You can combine a Dundas Models chassis with a 3D-printed body by removing unwanted sections and bonding them with CA glue. This technique is a core part of customising 3d printed railway kits to create unique, industrial locomotives. Fill any joins with Milliput or Tamiya Putty for a seamless transition between the different parts.
How do I add weight to a 3D-printed loco for better performance?
Adding weight is vital since resin is 60% lighter than traditional white metal. Secure 2mm lead shot or self-adhesive lead flashing inside the side tanks or boiler cavity using PVA glue. Aim for a total weight of at least 50g for a small 0-4-0 narrow gauge loco to improve electrical pickup. You can buy 100g of lead flashing offcuts for roughly £5.00 at local UK roofing merchants.