

Have you ever stared into a box of resin or plastic parts, feeling more intimidated than inspired? The thought of choosing the right glues, figuring out the instructions, and wondering where the wheels and couplings are can be enough to put anyone off. But the reward of creating unique rolling stock from scratch is one of the most satisfying aspects of the hobby, and the world of oo9 wagon kits offers a fantastic place to start. Forget the confusion; this guide is designed to turn that apprehension into accomplishment.
We'll walk you step-by-step through the entire process, from the essential tools you'll need to expert techniques for assembly, painting, and weathering. You'll learn how to prepare your kit, choose the correct chassis, and apply those finishing touches that make a model truly stand out. By the end of this article, you won't just have a new wagon for your layout-you'll have the skills and confidence to tackle even more ambitious projects with pride.
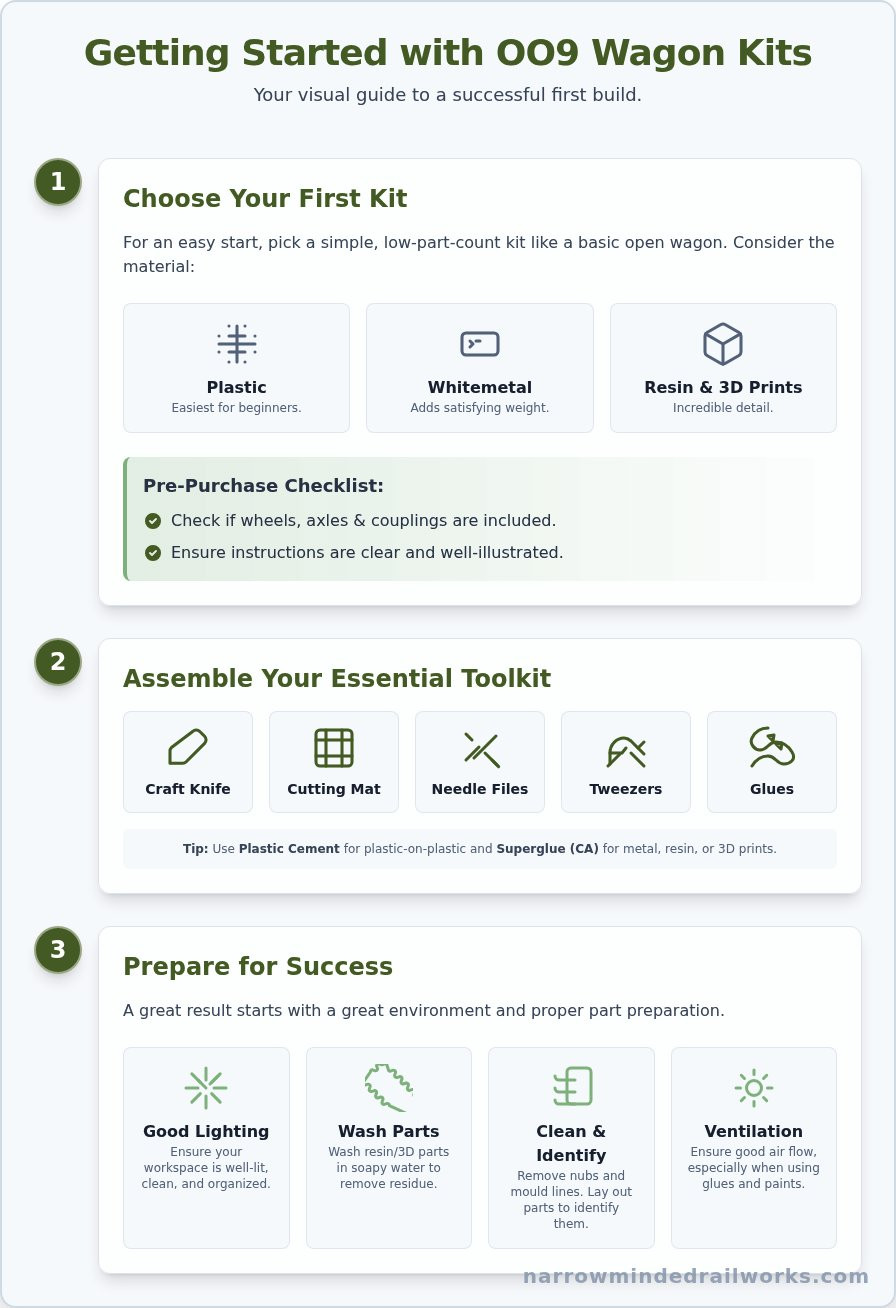
Getting Started: Choosing Your Kit & Essential Tools
There's a unique satisfaction in watching a wagon you've built yourself trundle along your layout-a feeling you just don't get from a ready-to-run model. Building your own rolling stock is a cornerstone of the model railway hobby, and thankfully, the world of oo9 wagon kits offers the perfect entry point. The process is far more achievable than you might think and serves as a fantastic way to develop essential modelling skills that will last a lifetime.
To see how a basic kit can be transformed into a stunning piece of rolling stock, watch this helpful video:
How to Choose Your First OO9 Wagon Kit
For your first project, choose a simple, low-part-count kit like a basic open wagon. Kits are made from various materials: traditional injection-moulded plastic is easiest for beginners, while whitemetal adds satisfying weight. Resin and modern 3D prints offer incredible detail and access to more unusual prototypes. Before you buy, always check what’s included. Many kits require you to source wheels, axles, and couplings separately. Finally, look for kits with clear, well-illustrated instructions-they are your best friend on this journey into understanding the OO9 scale and its unique models.
Your Essential Toolkit for Kit Building
You don't need a workshop full of expensive tools to start building oo9 wagon kits. A few key items will see you through your first build and many more to come. Your essential list should include:
- Craft Knife: A sharp scalpel or Swann-Morton handle with 10A blades is perfect for removing parts from sprues.
- Cutting Mat: A self-healing mat protects your work surface and your knife blades.
- Needle Files: A small set is crucial for cleaning up edges and ensuring a snug fit.
- Tweezers: Essential for handling tiny, delicate parts with precision.
- Glues: Use liquid plastic cement (like Humbrol Poly Cement) for plastic-to-plastic bonds and a good quality superglue (cyanoacrylate) for metal, resin, or 3D printed parts.
Helpful extras include a pin vice for drilling small holes, miniature clamps for holding parts while glue sets, and cocktail sticks for applying tiny amounts of adhesive.
Preparing Your Workspace for Success
A successful build starts with a good environment. Ensure your workspace is well-lit, clean, and organised. A desk lamp that you can position directly over your model is invaluable. Use a small tray or container to keep all the kit's parts in one place-it’s amazing how easily a tiny brake lever can vanish! Most importantly, ensure you have good ventilation, especially when working with glues and, later on, paints. Safety first is a golden rule in model making.
Of course, a successful build also means managing distractions. If you have young children, ensuring they have their own safe space to play away from sharp tools and glues is part of the setup. While you focus on your model, you can explore Ball pits and other soft play ideas to keep them happily and safely occupied.
The Core Build: Assembling the Wagon Body Step-by-Step
This is where your kit transforms from a collection of parts into a recognisable wagon. The key to success with all oo9 wagon kits is patience. Rushing at this stage leads to wonky bodies and visible glue marks. We'll use a standard 4-wheel open wagon as our example. Always 'dry-fit' your parts-hold them together without glue-to check for a perfect fit before committing.
Preparation is Key: Before You Glue
A great finish starts with great preparation. Before you even open the glue, taking a moment to understand the fundamentals is wise. Resources from established names like PECO offer excellent advice on getting started with 009 modelling, which provides a solid foundation. For your specific kit, follow these essential steps:
- Wash Parts: Give resin or 3D printed parts a gentle scrub in warm, soapy water with an old toothbrush. This removes any mould release agent or printing residue that could prevent glue and paint from adhering properly.
- Remove & Clean: Carefully cut parts from their sprue or supports using a sharp craft knife or sprue cutters. Gently file or sand away any remaining nubs, mould lines, or print layer artefacts for a smooth finish.
- Identify Components: Lay out all the parts and compare them against the instruction sheet. Knowing what each piece is and where it goes will prevent confusion later on.
Basic Assembly Techniques
With your parts prepped, it's time to build. The golden rule is to use glue sparingly; a small drop is often enough. For the main body-the floor, sides, and ends-the priority is ensuring everything is perfectly square. Use a small engineer's square or even a block of Lego to hold the sides at a perfect 90-degree angle to the floor while the glue sets. Attach smaller details like brake levers and door handles last, once the main structure is solid and stable.
Specific Tips for 3D Printed Kits
Modern 3D printed oo9 wagon kits offer incredible detail but have unique properties. You may notice fine layer lines; these can be smoothed with a couple of light coats of filler primer and a gentle sanding. For assembly, cyanoacrylate (superglue) is your best friend, and using an activator spray can create an almost instant, rock-solid bond. Be mindful that fine details can be delicate, so handle them with care. Explore our range of beginner-friendly OO9 wagon kits perfect for your first build.
Bringing it to Life: Painting, Lettering, and Decals
This is the stage where your assembled plastic and metal parts become a convincing miniature vehicle. A thoughtful paint job elevates your model from a simple construction to a realistic piece of rolling stock. You don't need an expensive airbrush to get great results; with a few basic tools and patience, you can achieve a finish to be proud of. The key is to remember that several thin coats of paint are always better than one thick, detail-obscuring coat.
The Crucial First Step: Priming Your Model
Never skip the priming stage! Primer is a special type of paint that creates a neutral, uniform surface for your topcoats to adhere to. It helps the paint stick properly to different materials (like plastic, resin, or metal) and reveals any small imperfections that need fixing before the main colour goes on. For most oo9 wagon kits, a grey aerosol primer from a brand like Halfords or Humbrol is a perfect all-rounder. Use it in a well-ventilated area, applying short, light sprays from about 20-30cm away to build up a thin, even layer.
Applying Base Coats and Livery Details
With your model primed, it's time for the main livery. For a smooth finish with a brush, use quality soft-bristled brushes and thin your acrylic paints with a little water to a milk-like consistency. Apply the base colour in two or three thin coats, allowing each to dry completely. This prevents unsightly brush marks. Once the main body colour is dry, you can pick out details like iron strapping and brake gear, typically in black or a dark grey. For crisp, straight lines between different colours, use low-tack masking tape.
Adding Lettering with Decals (Transfers)
Decals, or waterslide transfers, are the easiest way to add authentic lettering and numbering. For inspiration on authentic liveries and running numbers, resources from organisations like the 009 Society can be invaluable. To apply them successfully:
- Prepare the surface: Apply a coat of gloss varnish where the decal will sit. This smooth surface prevents tiny air bubbles from getting trapped underneath, a phenomenon known as 'silvering'.
- Soak and slide: Cut the decal from the sheet and soak it in lukewarm water for 20-30 seconds until it moves freely on the backing paper. Gently slide it into position on the model.
- Set in place: Use a soft brush to position the decal and a cotton bud to gently roll out any excess water. For a painted-on look, apply a decal setting solution like Micro Set and Micro Sol, which helps the decal conform to rivets and planks.
Once dry, a final coat of matt or satin varnish will seal the decal and give your wagon a consistent, realistic finish.
The Rolling Chassis: Wheels, Axles, and Couplings
You’ve carefully assembled the body, and it looks fantastic. But then comes a moment of confusion familiar to many newcomers: where are the wheels? Don't panic! Many oo9 wagon kits are designed as 'body-only' products. Sourcing the chassis, wheels, and couplings separately is a standard part of the process, giving you greater control over your model's performance and turning a potential hurdle into a satisfying part of the build.
Finding a Compatible Chassis
The good news is that most kit designers don't expect you to build a chassis from scratch. They often design their wagon bodies to be a direct fit onto a specific, commercially available ready-to-run (RTR) chassis. Common 'donor' chassis in the UK come from N gauge models by Graham Farish or dedicated OO9 chassis from manufacturers like Peco. The kit instructions will almost always specify the exact model you need. Attaching the new body is usually as simple as unclipping the old one and gently securing your new creation in its place.
Wheels and Axles
If your kit includes a chassis but no wheels, you'll need to source them. Your main choice is between:
- Plastic wheels: Cheaper, but can be less reliable for smooth running.
- Metal wheels: Highly recommended. They run more smoothly and their extra weight improves stability, reducing the risk of derailments.
Choosing and Fitting Couplings
To connect your wagon to a train, you'll need couplings. The most common type in OO9 is the 'loop and hook' style, which is simple and effective. Many modern chassis feature a standardised socket called an NEM pocket. This makes fitting couplings incredibly easy - you simply push the coupler into the pocket until it clicks. If your chassis doesn't have one, you'll typically glue the coupling directly onto a mounting block on the underside of the chassis, following the kit's instructions.
For a curated selection of wheels, chassis, and couplings suitable for your next project, explore the components available at Narrow Minded Railworks.
Finishing Touches: Weathering and Final Details
Your wagon is built, painted, and lettered. Now for the final, transformative stage: making it look like it belongs on a hard-working narrow-gauge railway. Weathering is the art of adding realism through simulated dirt, rust, and general wear. For beginners, the key is subtlety; less is almost always more. This is the step that truly brings your oo9 wagon kits to life, turning a plastic model into a convincing miniature replica.
Easy Weathering with Washes
The single most effective weathering technique for a beginner is applying a simple wash. A wash is just heavily thinned paint that flows into crevices and recesses, highlighting detail and creating an impression of accumulated grime. To make one, mix a tiny drop of black or dark brown acrylic paint with water in a small pot until it’s the consistency of milk. Brush this wash liberally over the entire model, letting it settle around rivets and in panel lines. After a minute, use a cotton bud or a piece of kitchen roll to gently wipe the excess from the flat surfaces, leaving the "grime" in the details. The transformation is immediate and impressive.
Adding Realistic Wagon Loads
An empty wagon is fine, but a loaded one tells a story. Adding a load is a simple way to add character and can cleverly hide any imperfections inside the wagon body. All you need is a thick layer of PVA glue on the wagon floor and your chosen material sprinkled on top. Great options for narrow gauge wagons include:
- Coal: Use real crushed model coal for the best effect.
- Slate: Small pieces of actual slate or pre-made slate loads look fantastic.
- Timber: Small twigs from the garden, cut to length, make a perfect log load.
- Barrels & Sacks: Many manufacturers produce cast resin or 3D printed scenic details that can be simply glued in place.
Protecting Your Work with Varnish
The final step is to seal your model with a coat of varnish. This protects the paintwork, decals, and weathering from handling and dust. It also unifies the finish of the different materials, giving the model a consistent look. Varnishes are typically available in aerosol cans or in bottles for airbrushing. You have three main choices of finish:
- Matt: A completely flat, non-reflective finish. Perfect for 99% of freight wagons.
- Satin: A slight sheen, good for representing a newer or better-maintained vehicle.
- Gloss: Very shiny, generally used for creating wet effects rather than an overall finish.
A light, even coat of matt varnish is the perfect way to complete your oo9 wagon kits, eliminating the plastic-like shine and giving your model a realistic, professional appearance. For scenic materials and other detailing parts, you can often find what you need at specialist suppliers like Narrow Minded Railworks.
From Kit to Masterpiece: Your OO9 Journey Begins
You've now walked through the entire process, from selecting your tools to applying the final, characterful touches of weathering. By breaking down the build into manageable stages-assembly, painting, and finishing the chassis-you can see that creating stunning, unique rolling stock is an achievable and incredibly rewarding part of the model railway hobby. The skills you've learned here are the foundation for a lifetime of satisfying projects.
The most exciting step is choosing your first project. Starting with high-quality oo9 wagon kits makes all the difference, providing a smooth and enjoyable building experience. At Narrow Minded Rail Works, we specialise in creating unique prototypes you simply won't find anywhere else. Our high-quality 3D printed designs are engineered for an excellent fit and finish, and with worldwide shipping, we support modellers everywhere.
Ready to start building? Browse our unique range of OO9 Wagon Kits!
We can't wait to see what you create. Happy modelling!
Frequently Asked Questions about OO9 Wagon Kits
What is the best glue for 3D printed resin model kits?
For most 3D printed resin parts, a good quality cyanoacrylate adhesive (superglue) is the best choice. Look for different viscosities; a thin superglue is great for tight-fitting joints as it works by capillary action, while a medium or gel-type is better for filling small gaps. For major structural components that need maximum strength, a two-part epoxy adhesive provides a more robust and durable bond. Always work in a well-ventilated area when using these adhesives.
Do I need an airbrush to get a good finish on my wagon kits?
No, an airbrush is not essential for a great finish. Many expert modellers achieve fantastic results using traditional brush painting techniques. The key is to use quality model acrylic paints, such as those from Vallejo or Humbrol, and thin them correctly. Apply several thin coats rather than one thick one to avoid brush marks. An airbrush can provide a smoother finish, but it's a significant investment, often starting from around £80-£100 for a starter kit.
How long does it take to build a typical OO9 wagon kit?
The time can vary greatly depending on the kit's complexity and your experience. A simple, four-wheel open wagon kit might be assembled in one or two evenings, totalling 2-4 hours. This doesn't include painting, applying transfers, and weathering, which can add several more hours depending on the level of detail you want to achieve. More complex kits, such as bogie wagons with intricate details, can take considerably longer. It's a marathon, not a sprint!
Where can I buy the chassis and wheels for my wagon body kit?
In the UK, there are several excellent suppliers for ready-to-run chassis and components. Peco is a very common choice, offering a range of chassis that fit many kits. Dundas Models also produces a wide variety of chassis kits specifically for OO9. Always check the kit manufacturer's instructions, as they will typically recommend a specific chassis or provide the required wheelbase and wheel diameter measurements to help you find the perfect match from suppliers.
Are OO9 wagon kits suitable for complete beginners to model railways?
Absolutely! Many oo9 wagon kits are specifically designed as an entry point into the hobby. Start with a simple plastic or resin kit of a basic open wagon or van, as these have fewer parts and are more forgiving. They provide a fantastic opportunity to learn core skills like parts clean-up, assembly, and painting without being overwhelming. It's best to avoid complex etched brass or multi-media kits until you have a few successful builds under your belt.
How do I fix a part if I glue it in the wrong place?
If you've used superglue, the easiest method is to apply a de-bonder, which is available from most model shops. Apply it sparingly with a small brush to dissolve the adhesive, then gently separate the parts. For parts joined with plastic cement, which welds the plastic, the bond is permanent. In this case, you may need to carefully cut the parts apart with a hobby knife and then sand the surfaces smooth before attempting to re-glue them correctly.