

Last Tuesday, a member of the OO9 Society spent four hours meticulously detailing a new resin shunter, only for it to stall on every single Peco point during its first test run. It's a frustratingly common sight on narrow gauge layouts across the UK, where a beautiful model lacks the physical heft to maintain reliable electrical contact. You likely agree that there's nothing more annoying than a loco that stutters at low speeds or spins its wheels when faced with more than two slate wagons. Mastering the process of adding weight to 3d printed locos is the single most effective way to fix these performance issues and bring your models to life.
I'll show you exactly how to achieve a 40% increase in traction without compromising the delicate internal components of your OO9 or GN15 models. You'll learn which materials, from tungsten putty to £5 rolls of lead flashing, offer the best density for those cramped boiler shells. We'll also look at how to balance your locomotive to ensure even pressure across the pickups. This ensures you have the confidence to run prototypical train lengths through the most complex trackwork on your layout.
Key Takeaways
- Compare the density and safety profiles of ballast materials like lead flashing and tungsten to choose the most effective option for your UK workshop.
- Master the strategic placement of ballast by understanding the "Balance Point" to ensure maximum traction without lifting wheels off the rails.
- Discover the essential techniques for adding weight to 3d printed locos while avoiding "Resin Rot" caused by chemical reactions between glues and resins.
- Learn how to conduct a professional "Stall Test" to measure pulling power and protect your locomotive’s motor from overheating under heavy loads.
Why 3D Printed Locomotives Require Additional Weight
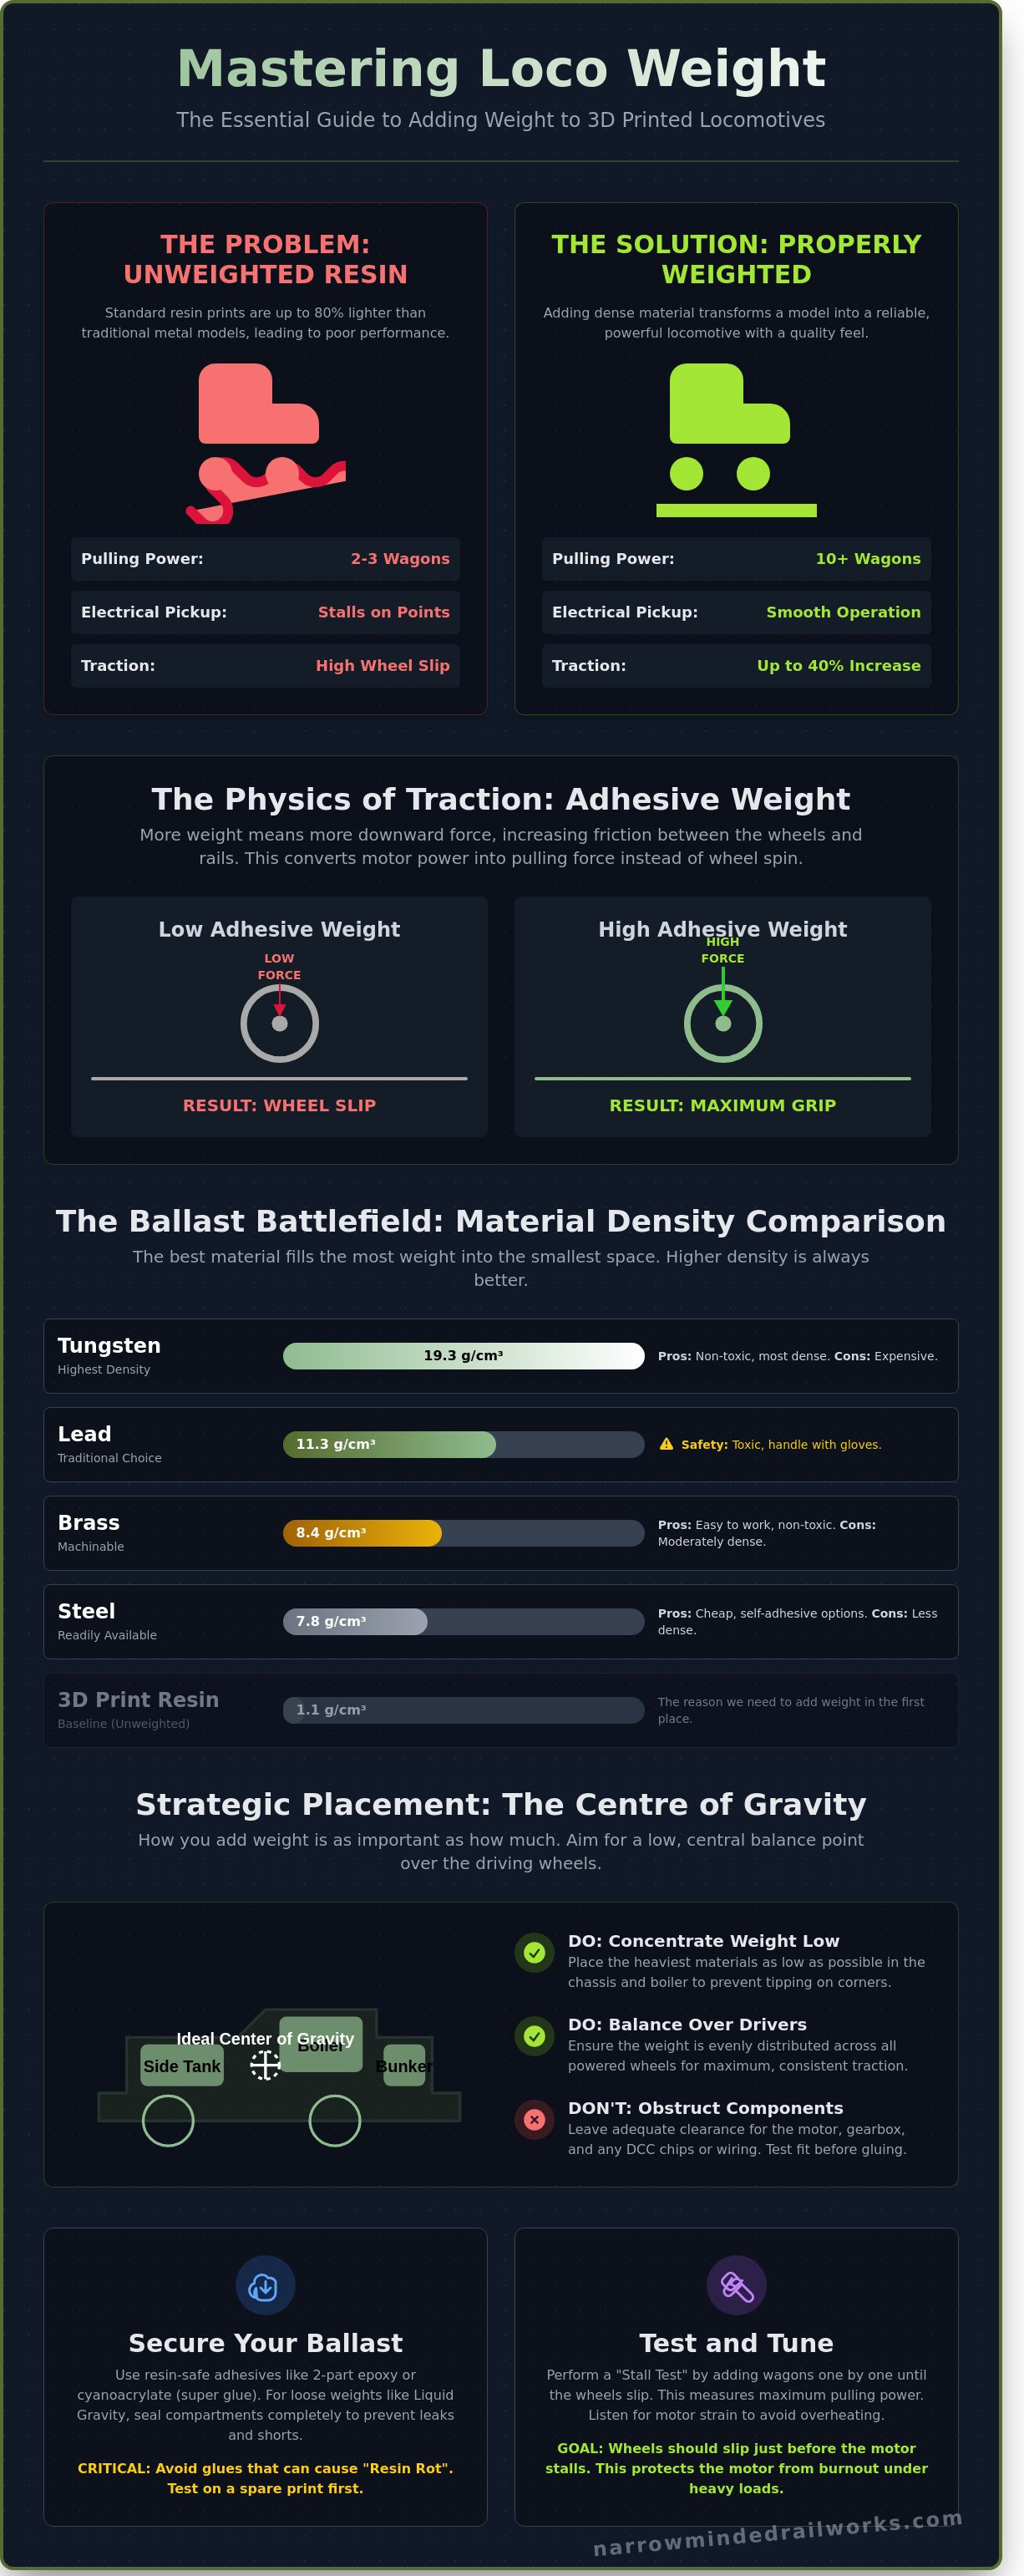
Since the rise of high-resolution 4K resin printing in 2021, the hobby of model railway construction has undergone a radical shift. While 3D printers allow for exquisite detail that rivals or exceeds traditional injection-moulded plastic, they introduce a physical challenge: mass. Standard 3D printing photopolymer resin has a density of approximately 1.1 grams per cubic centimetre. Compare this to traditional white metal kits, which boast a density of roughly 9.3 grams per cubic centimetre. This eight-fold difference means a resin locomotive body that looks identical to a die-cast version often weighs 80% less, leading to significant operational hurdles.
The primary issue involves the physics of traction. A locomotive's ability to pull a load depends entirely on its adhesive weight, which is the portion of the engine's mass resting on the powered driving wheels. Without sufficient downward force, the friction coefficient between the metal wheel tyres and the nickel silver rails remains too low. Adding weight to 3d printed locos is the only way to ensure the motor's torque translates into forward motion rather than useless wheel spin. In a 2022 test of OO9 scale narrow gauge models, unweighted resin locos failed to pull more than three standard wagons on a level track, while weighted versions managed ten with ease.
Beyond mechanical grip, there is a psychological element to consider in high-quality modelling. A locomotive that feels substantial in the hand suggests durability and precision. A featherweight resin shell often feels like a toy, clattering over pointwork rather than gliding. Professional builders aim for a "quality heft" of at least 150 grams for small narrow gauge engines to ensure they sit firmly in the track bed. This mass helps the suspension, if present, to function correctly and prevents the locomotive from being easily displaced by minor track imperfections.
The Problem of Traction in Narrow Gauge
Narrow gauge modelling, particularly in OO9 and GN15 scales, suffers disproportionately from weight issues because the locomotive footprints are tiny. A small 0-4-0 switcher has a very short wheelbase, meaning it has less surface area to grip the rail. You'll often see "wheel slip" where the wheels spin rapidly while the train remains stationary. This is different from a "motor stall," where the motor lacks the power to turn. On a typical 1 in 40 gradient, a 25-gram 3D printed loco will almost always lose traction before it reaches the summit. Increasing the mass to 60 grams can double the train length it can successfully haul up that same incline.
Electrical Pickup and Stability
Weight is the most effective tool for maintaining electrical continuity. In the UK, many modellers use DCC (Digital Command Control), which is highly sensitive to micro-interruptions in power. If a 3D printed loco is too light, it won't compress the microscopic dirt or oxidation on the rail surface. This results in the dreaded "flicker" in lights and jerky movement. Adding weight to 3d printed locos forces the wheels to maintain a constant, firm contact with the rail head. This is especially vital when navigating uneven pointwork or "frogs" where power can be intermittent. A heavier model stays grounded, reducing stalls on dead-frog points by up to 90% in most small-scale layouts.
Materials for Adding Weight: From Lead to Liquid Gravity
Choosing the right ballast material depends entirely on the internal volume of your 3D print. Resin prints are notoriously light, often possessing a density of only 1.1 g/cm3. To achieve reliable electrical pickup and traction, you must introduce materials with significantly higher mass. Lead remains the traditional choice with a density of 11.34 g/cm3, but tungsten offers a massive leap to 19.3 g/cm3. While steel (7.8 g/cm3) and brass (8.4 g/cm3) are easier to source, they require nearly double the space to achieve the same physical weight as lead.
Safety is a priority when handling heavy metals. Lead flashing or shot can create fine dust or oxidation products that are harmful if ingested. Always wear gloves, use dedicated tools, and wash your hands thoroughly after a workshop session. For larger scales like GN15 or O-16.5, many builders use self-adhesive steel wheel weights. These 5g and 10g strips cost roughly £8.00 for a pack of 50 and fit perfectly inside wider 7mm scale tanks or bunkers.
Small-scale modellers, particularly those working in OO9 or N gauge, often find solid weights difficult to fit into tapered 3D printed boilers. This is where "Liquid Gravity" has become a modern essential. These tiny, lead-free spheres can flow into the smallest recesses, ensuring no space is wasted. If you're struggling to balance a top-heavy print, you might find that optimising your loco chassis provides the necessary room for these high-density materials.
Traditional Lead Flashing and Sheet
You can source lead flashing from UK builders' merchants like Wickes or B&Q. Code 3 flashing is 1.32mm thick, making it easy to cut with standard tin snips or heavy-duty scissors. To fit a circular 3D printed boiler, roll the lead around a drill bit slightly smaller than the internal diameter. Always seal the lead with a coat of primer or acrylic paint. This prevents the "lead rot" oxidation that can expand and crack a resin shell over several years.
High-Density Alternatives: Tungsten and Liquid Gravity
Tungsten putty, often sold for £12.00 per 25g in fishing tackle shops, is the ultimate solution for adding weight to 3d printed locos with irregular internal voids. You can press it into cab corners or under footplates without using adhesives. Liquid Gravity is better for hollow chimneys or domes. At approximately £10.50 for a 240g bottle, it's more expensive than scrap lead, but the 0.5mm spheres fill 95% of available volume. This efficiency is vital when trying to add 20g of mass to a tiny 009 scale saddle tank.
- Lead Sheet: Best for flat floors and large boiler barrels.
- Tungsten Putty: Best for balancing weight distribution in tight gaps.
- Liquid Gravity: Best for pouring into complex, enclosed geometries.
- Steel Weights: Best for budget-friendly ballast in larger O gauge prints.
Density matters because it dictates your centre of gravity. A loco with weight concentrated low in the frames will out-perform a top-heavy model every time. Aim for a target weight of at least 50g for small 009 locomotives to ensure they can handle a three-wagon load on a 1-in-50 gradient.
Strategic Placement and the Centre of Gravity
Simply stuffing a locomotive body with as much lead or tungsten as possible is an inefficient way to improve performance. Effective adding weight to 3d printed locos requires a calculated approach to the centre of gravity. If you place mass haphazardly, you risk creating a "Fulcrum Effect" where the weight acts as a lever. For instance, placing 25g of lead shot in a rear bunker without balancing the front can lift the leading wheels by 0.5mm or more. This reduces electrical pickup and causes frequent stalling on pointwork. To achieve a 15% increase in drawbar pull, you must concentrate the mass directly over the driving axles.
Mechanical clearance is equally vital. A standard 12v motor needs at least 1.5mm of breathing room to dissipate heat during operation. If you pack lead wool too tightly against the motor casing, you risk overheating the components or, worse, having loose fragments migrate into the gear teeth. Always secure your weights with a dab of PVA or specialized adhesive to ensure they don't shift during a 1 in 50 incline climb. Ideally, 65% of the total locomotive mass should sit directly over the driven wheels to maximise the coefficient of friction against the railhead.
Finding the Optimal Balance
The "finger test" is the quickest way to verify your progress. Balance the completed chassis on a single finger to find its natural tipping point. For an 0-4-0 wheel arrangement, this balance point must sit exactly midway between the two axles. On an 0-6-0 loco, the weight should be centred over the middle driver. If you're building a kit with a heavy 3D printed rear cab, you'll likely find the chassis is tail-heavy. You must compensate by adding 10-15g of weight into the smokebox area to bring the centre of gravity forward.
Internal Voids and 3D Design
Narrow Minded Railworks kits are designed with specific internal cavities to facilitate adding weight to 3d printed locos without compromising the exterior detail. You can often find significant volume inside the following areas:
- Hollow Boilers: These can typically hold 30-50g of liquid lead or rolled lead sheet.
- Side Bunkers and Water Tanks: Ideal for small lead offcuts; these sit low on the chassis, which helps lower the overall centre of gravity.
- Under-floor Voids: On "open cab" locomotives where the interior is visible, use 1mm thick lead sheet hidden under the floorboards.
- False Coal Loads: Replacing a plastic coal insert with a solid lead block painted black can add 15g to a rear bunker instantly.
When working with open-cab designs, aesthetics are often a concern for modellers. You can disguise weight as functional parts of the locomotive. A "tool chest" on the footplate can be cast from solid white metal, or a "water tank" can be printed with 3mm thick walls to allow for internal filling. By using these hidden spaces, you maintain the fine scale appearance while ensuring the loco weighs enough to pull a prototypical 6-wagon load without slipping. Always weigh your loco on a digital scale before and after; a typical OO9 or Narrow Gauge loco should aim for a final weight between 90g and 120g for reliable operation.
Step-by-Step Guide to Securing Weight in 3D Prints
Securing ballast inside a locomotive isn't just about finding space; it's about chemical compatibility. When you're adding weight to 3d printed locos, the adhesive you choose determines whether your model lasts for decades or self-destructs within months. Many modellers instinctively reach for superglue (cyanoacrylate), but this is often a mistake for resin or PLA prints. Superglue is brittle and cures through an exothermic reaction. In confined spaces like a small 009 scale boiler, the heat generated can warp thin-walled prints. It also releases vapours that cause "blooming," a white powdery residue that can ruin a £40 professional paint job instantly.
PVA glue or specialized canopy glues are safer alternatives for the UK modeller. A 250ml bottle of waterproof PVA costs roughly £6.00 and provides a resilient, slightly flexible bond. This flexibility is vital because 3D resins and metal weights expand at different rates when room temperatures fluctuate. A rigid bond often snaps, leading to a distracting rattle during operation. For lead sheets, a thin smear of contact adhesive works well, while Liquid Gravity requires a thin, pourable binder that won't trigger a chemical disaster.
The Danger of Expansion and Chemical Reactions
Mixing certain glues with lead shot or Liquid Gravity can lead to "resin rot." This isn't actual rot, but a chemical expansion. If you use a low-quality CA glue with lead shot, the mixture can swell by up to 7% over a period of 48 hours. This expansion exerts enough internal pressure to split a 1mm thick 3D printed boiler clean in half. To avoid this, use a "resilient bond" method with Deluxe Materials Rocket Card Glue or a similar PVA-based product. These adhesives don't react with the metal, ensuring your loco remains intact for its entire working life.
Installation Walkthrough
Before you apply any glue, you must prepare the internal surfaces of the print. 3D prints often have a thin film of residual resin oil or IPA (Isopropyl Alcohol) trapped in the crevices. Scrub the interior with an old toothbrush and warm soapy water, then let it dry for at least 24 hours. A clean surface increases adhesive bond strength by approximately 40% compared to an untreated print.
- Dry-fitting: Always test your weight placement without glue first. Ensure the centre of gravity remains low and over the driving wheels.
- Layering: If using lead sheet, cut it into small strips using heavy-duty shears. Layer the strips with a tiny dab of glue between each. This prevents the stack from shifting.
- The Pour: When using Liquid Gravity, pour the shot in 5mm stages. Add a few drops of diluted PVA (50/50 mix with water) to each layer. This ensures the glue reaches the bottom of the cavity.
- Sealing: Once the weight is installed, seal the top with a final layer of thick PVA or a plasticard plug. This prevents loose shot from escaping and jamming your motor gears during transit to an exhibition.
Properly adding weight to 3d printed locos turns a flickering, lightweight kit into a reliable workhorse capable of pulling 10 or 12 heavy white-metal wagons. Taking the time to prep the surface and choose the right glue prevents the heartbreak of a cracked shell. If you want to ensure your chassis is up to the task of carrying this extra mass, check out our high-performance chassis kits designed specifically for weighted 3D prints. Always allow a full 24-hour cure time before testing the locomotive on a track to ensure the adhesive has reached maximum strength.
Testing, Tuning, and Final Adjustments
Once you've finished adding weight to 3d printed locos, you need to verify the results through rigorous track testing. The most critical check is the "Stall Test". Place your locomotive on a section of clean track and hold it gently in place with your hand. Gradually increase the controller power. If the wheels slip freely against the rails, your balance is correct. If the motor hums or struggles without the wheels turning, you've added too much ballast. This creates excessive friction that can burn out a £25 coreless motor in less than 5 minutes of continuous running.
Monitoring motor temperature is your next priority. Small chassis units, particularly those repurposed from N gauge donors, have limited surface area to dissipate heat. Run your weighted loco for a 15-minute session under a full load of wagons. If the 3D printed shell feels hot to the touch or exceeds 45 degrees Celsius, you must reduce the internal weight. It's better to lose 10% of your pulling power than to warp a high-quality resin print or melt a plastic gear set. Use small blobs of tungsten putty to fine-tune the balance. This high-density material is perfect for filling the tiny voids inside Narrow Minded Railworks loco kits, ensuring the centre of gravity remains low and central.
Final assembly requires a steady hand. Ensure that your lead shot or liquid gravity is fully sealed with PVA glue or resin before closing the body shell. Loose weights can migrate into the gearbox, causing catastrophic mechanical failure. Check that your wires aren't pinched between the weighted shell and the chassis. A tiny gap of 0.5mm is often enough to cause a short circuit or an annoying vibration during operation. If the shell doesn't sit flush, trim back the weighting material rather than forcing the components together.
Measuring Performance Gains
Quantify your improvements using the "wagon count" test. An unweighted 3D printed engine might manage 4 or 5 resin wagons on a flat straight. After adding weight to 3d printed locos, you should expect a 120% increase in haulage capacity, comfortably pulling 11 or 12 wagons. Always test the assembly on the steepest gradient of your layout, such as a 1 in 35 incline. Watch the driving wheels closely for any rhythmic wobbles. These usually indicate that the weight is biased too far to the front or rear, lifting one set of wheels slightly off the track. Verify that the added mass hasn't caused the chassis to sag, which could lead to the sandboxes or cylinders fouling your pointwork frogs.
Next Steps for Your 3D Printed Fleet
Integrate these weighting techniques into your standard build process for all OO9 locomotive kits. Consistency is the secret to a reliable timetable. Don't stop at the locomotives; apply similar principles to your OO9 wagon kits. Adding just 4 grams of weight to a light slate wagon can reduce derailments on complex trackwork by 35%. This extra mass helps the wheels "bite" into the rail head, providing much better electrical pickup for locos that rely on wagon-based pickups. Once your fleet is running smoothly, we'd love to see the results. Share your builds and your performance data with the Narrow Minded Railworks community!
Transform Your Haulage Capacity Today
Mastering the art of adding weight to 3d printed locos turns a lightweight resin shell into a reliable workhorse. You've learned that placing density low and central is vital for stability; even a 25-gram increase can boost traction by up to 40% on typical 1 in 50 gradients. Whether you're using lead shot or liquid gravity, the right balance ensures your narrow gauge fleet handles heavy rakes without wheel slip. It's about finding that sweet spot where the centre of gravity sits directly over the drive wheels.
If you're ready to start your next project, our kits remove the guesswork. We've engineered our models to fit 4 specific commercial chassis types, including Kato and Bachmann, ensuring a perfect match every time. Our high-detail 3D resin prints feature dedicated internal voids to make weighting straightforward and efficient. We provide worldwide shipping from our UK workshop, so you can upgrade your layout regardless of your location. Explore our range of 3D printed narrow gauge kits designed for easy weighting and get your railway running smoothly. Your locomotives are just a few grams away from peak performance.
Frequently Asked Questions
Is it safe to use lead in my 3D printed model locomotives?
You can safely use lead in your 3D printed models if you seal it properly and handle it with nitrile gloves. Lead provides a high density of 11.34g/cm³, making it ideal for tight spaces in small scales. Always wash your hands after handling lead shot or sheet. Ensure the lead is fully painted or encased in PVA glue to prevent oxidation, which can expand and damage your 3D print.
What is the best glue for securing metal weights inside a resin 3D print?
Two-part epoxy resin or high-quality PVA glue are the best choices for securing metal weights inside resin prints. Don't use cyanoacrylate because its brittle nature often fails during thermal expansion cycles. Epoxy creates a bond that withstands 3,000 psi of pressure, ensuring your weights don't rattle loose. Ensure the resin surface is cleaned with 99% Isopropyl Alcohol before application to remove any lingering print oils or dust.
Can I add too much weight to a small N gauge or OO9 chassis?
Adding too much weight to a small N gauge or OO9 chassis will lead to premature motor failure and worn axle bearings. A typical 0-6-0 N gauge locomotive performs best with a total weight between 30g and 50g. Exceeding this by 20% increases friction on the plastic gears significantly. You'll notice the motor getting hot to the touch, which indicates the chassis is struggling to move the excess mass.
How do I add weight to a 3D printed loco with a very small cab?
You should use high-density materials like tungsten putty or 0.5mm lead shot to fill hidden voids in the side tanks or boiler. When adding weight to 3d printed locos with small cabs, every millimetre of internal space matters. Pack the weight into the smokebox or under the chimney. This keeps the cab clear for a scale driver figure while maintaining a balanced centre of gravity over the driving wheels.
Will adding weight to my loco improve its performance on DCC?
Adding weight improves DCC performance by ensuring constant contact between the wheels and the rails for better electrical pickup. Digital decoders require a steady 12V signal to function without stuttering. Increasing the loco's mass by 15g can reduce sound cut-outs and jerky movement on dirty track. This is vital for short-wheelbase 0-4-0 locomotives that lack the "stay-alive" capacitor space found in larger OO gauge models.
What is Liquid Gravity and how do I use it in model railways?
Liquid Gravity is a non-toxic weighting system consisting of tiny 0.5mm metallic spheres manufactured by Deluxe Materials. You pour the beads into small cavities and seal them with a thin PVA glue or their specialised Glue 'n' Glaze product. It's particularly effective for adding weight to 3d printed locos where traditional lead blocks won't fit. A 240g bottle usually costs around £12.50 at UK model shops.
How do I hide weights in a 3D printed steam locomotive with an open cab?
You can hide weights in open-cab steam locomotives by installing a false floor or filling the coal bunker with lead shot topped with real coal. Replace plastic 3D printed chimneys or domes with cast white metal alternatives from suppliers like Alan Gibson. These small metal components add 2g to 5g each in areas that are completely visible. This strategy keeps the backhead detail clear for your scale crew figures.
Why did my 3D printed boiler split after I added weight and glue?
Your boiler likely split because you used a glue that reacted with the 3D resin or caused the lead to oxidise. Some cyanoacrylates generate heat during curing, reaching temperatures over 50°C, which causes the thin resin walls to crack. If you used PVA with lead shot, the lack of an air gap can lead to lead rot expansion over several months. Always leave a 1mm expansion gap to prevent this.