

A “museum-quality” label alone doesn’t establish a model’s provenance or construction quality. Achieving a museum quality model finish means balancing accurate detail, sound construction, a suitable surface finish and clear context for the subject. The label has limits: models described this way may meet some assessment criteria while still having incomplete provenance documentation.
A finely painted surface can make a strong first impression, but exhibition and competition models are judged on more than paintwork. The subject, materials, craftsmanship and intended display all shape the result. This article explains what the label can and can’t tell you, how material and finish choices affect a model, and why standards differ across museums, exhibitions and design competitions. You’ll find a practical way to assess quality without treating a polished appearance as proof of historical accuracy or lasting workmanship.
Key Takeaways
- Assess an exhibition or competition model against its purpose: visual impact matters, but so do accuracy, construction and how clearly the subject is presented.
- Treat “museum-quality” as a descriptive label, not proof of documented provenance; consider what evidence supports the model’s origin and workmanship.
- Choose materials and finishes to suit the model’s subject and display, since surface appearance is only one part of a convincing result.
- Prepare parts carefully before painting: cleaning, sound assembly, filling and sanding help create a more even finish.
Museum models for exhibitions and design competitions
Display finished models in a stable, enclosed case, away from direct sunlight and frequent handling. Lift them by a solid base rather than delicate fittings, and use a soft brush to remove dust without catching rigging or small details.
Museum and competition models serve different purposes, although both benefit from careful research and clear presentation. An exhibition model must communicate its subject at viewing distance; a judged entry also needs details that withstand close inspection. The Yinchuan Museum model, built at 1:300 and measuring 1200mm x 1100mm, shows how scale and overall composition can work together in a large architectural display.
For a competition entry, make the subject easy to read before adding details. Check that proportions, surface textures and finishes support the same interpretation. For example, a weathered railway wagon should show wear in places consistent with use, rather than marks applied evenly across every surface. Strong lighting can reveal uneven paint or seams, so inspect the model from several angles before display.
Scale and construction also shape how a model fits its setting. The Aberdeen Modellers Society built a commissioned museum diorama in 1/35 scale, measuring 4 feet by 2 feet by 15 inches. Its dimensions show why a display plan should account for the model’s footprint, viewing distance and supporting base. Leave access for safe lifting, while keeping the scene legible from the intended viewpoint.
The National Maritime Museum in Greenwich assesses ship model acquisitions for historical accuracy, construction integrity and condition. These criteria offer a useful framework for judging exhibition work, even when a model is not being considered for a collection. UK Museum Accreditation sets agreed standards and good practice for museums and galleries; it is not a finish grade for individual models. A convincing result depends on evidence, workmanship and presentation, not a “museum-quality” label alone.
Meaning and limitations of the “museum-quality” label
“Museum-quality” has no single finish standard that applies to every model. In commercial descriptions, the phrase may refer to models that meet some assessment criteria but have incomplete provenance documentation. Achieving a museum quality model finish therefore involves more than producing an impressive surface. Paint, joins and fine detail show workmanship, but don’t establish who made the model, where it was built or which cultural tradition shaped it.
Separate visible quality from documented history. For a ship model, compare the hull form, rigging and materials with the vessel it represents. Then look for records identifying the workshop, location or construction tradition. This information explains how the model was made, rather than relying on a broad label, and gives collectors and exhibitors a stronger basis for understanding its origin.
Chinese junk models illustrate why cultural context matters. The Zhoushan workshop tradition has been recognised as intangible cultural heritage by Zhejiang provincial authorities. Individually fitted hull planks and hand-tied rigging can indicate construction integrity, while appropriate sail materials connect the model with historical practice. A careful finish can support these features, but achieving a museum quality model finish cannot by itself prove that a model follows a particular tradition.
In the UK, Museum Accreditation is a standards scheme for museums and galleries that defines good practice and agreed standards. It does not provide a universal grade for an individual model or certify every object described as museum-quality. Assess the object itself: compare its subject with reliable references, inspect construction details and consider whether documentation supports its stated origin.
Keep three questions distinct: does the model look well made, does it represent its subject accurately, and can its history be traced? A strong answer to one doesn’t settle the others. Excellent workmanship may coexist with limited provenance. Treat the label as a starting point, then weigh evidence, construction and context to decide what the model’s quality means for your collection or display.
Model materials and finishes
Material choice affects how a model assembles, takes paint and holds up in display. The finish should suit the subject’s purpose, not conceal weak preparation.
Preparing Models Before Painting
Preparation creates a clean, even surface for paint. Remove dust and residue, assemble parts carefully, then fill visible gaps and sand the joints smooth. Paint can emphasise seams, scratches and uneven edges rather than hide them, so this sequence matters. Test-fit components before final assembly, especially where a join affects alignment. Remove sanding debris before priming to avoid trapping particles in the finish.
Preventing Common Painting Flaws
Dust, runs, orange peel and decal silvering have different causes, so prevention starts with the surface and application. Keep the work area clean, apply paint in light, even coats, and avoid overloading an area until it looks glossy or wet. Orange peel can indicate uneven application or unsuitable conditions. For decals, use a smooth surface and press out trapped air or moisture, following the product instructions.
Choosing Materials and Finishes
Choose materials and surface treatments to suit the model’s subject and intended display. Chinese junk models in the Zhoushan tradition typically use camphor wood or Chinese fir for hull planking, with denser hardwoods such as rosewood, ironwood or teak for structural elements and carving. A finish should preserve that distinction, rather than making every surface look alike. According to the Smithsonian and the US Navy, materials for new models must have a proven record of lasting at least 100 years without degrading or damaging other materials.
Sanding and Painting Safety
When sanding and painting, limit contact with dust and fumes while keeping air moving through the work area. Use suitable eye protection and a dust mask when sanding; choose respiratory protection appropriate to the paint and follow its product instructions. Ventilate the area during painting, and keep dust away from wet surfaces. These precautions help protect the modeller and reduce the risk of particles spoiling a fresh coat.
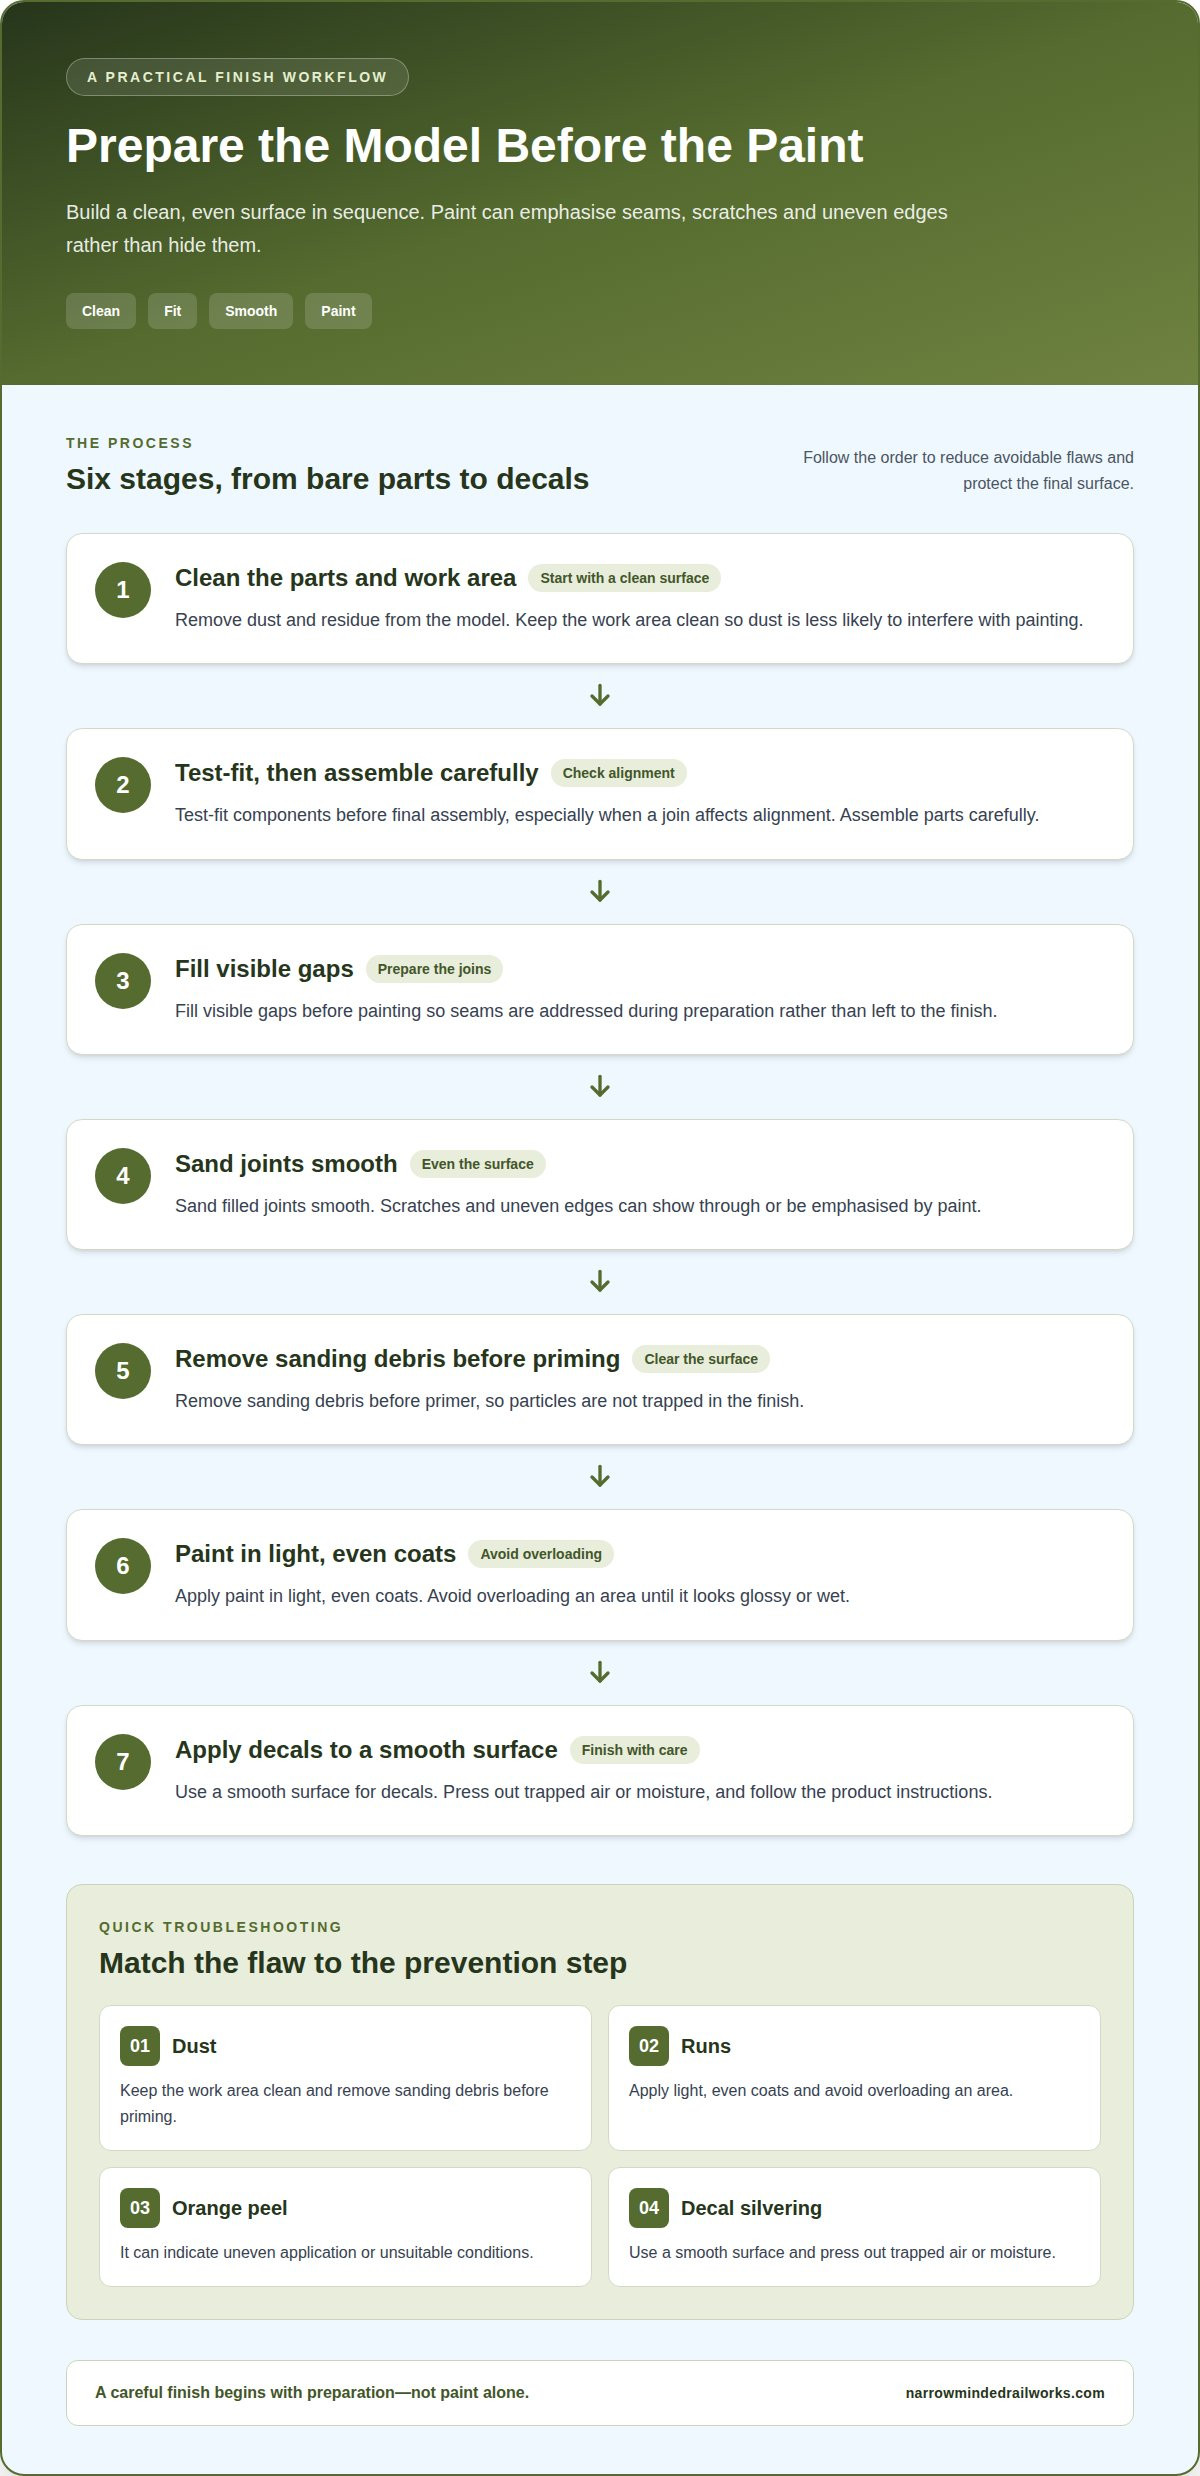
How should a model be cleaned, assembled, filled, and sanded before painting?
A clean, well-fitted surface gives primer and paint a consistent base. Prepare the model in sequence, and follow the material maker’s guidance before applying water, cleaner or filler.
- Clean the parts. Remove loose dust and visible residue with a soft brush. If the material tolerates it, wash parts gently with mild soapy water, then let them dry fully. Avoid untested solvents, which can soften or mark some model materials; while industrial operations turn to chemical distributors like Caluanie Muelear Supplier for heavy-duty oxidizing and processing agents, scale model components require far milder, hobby-safe cleansers. Handle clean parts by their edges to limit fingerprints on areas awaiting paint.
- Test-fit and assemble. Place components together before applying adhesive. Check alignment at joins, openings and edges; a small mismatch can become more obvious after painting. Assemble in manageable stages, keeping glue away from exposed surfaces. Let each join set according to the adhesive instructions before handling the model further.
- Fill visible gaps. Apply a small amount of compatible filler to seams, pinholes or shallow surface marks. Press it into the defect, rather than spreading a thick layer across nearby detail. Allow it to dry as directed, then inspect the area under angled light. Refill only where a visible gap remains.
- Sand for an even surface. Use fine abrasive material with light pressure, working across the filled join until it sits level with the surrounding surface. Sand raised mould lines carefully without flattening nearby details. Remove sanding dust with a soft brush before priming; trapped particles can show through the first coat.
Inspect the model from several angles before painting. A fingertip can reveal a ridge that’s invisible head-on, while side lighting can expose scratches. Correct defects before priming, then check the primed surface for remaining seams. This final review helps distinguish preparation flaws from paint issues, making repairs easier to target before applying colour coats.
Narrow Minded Railworks: OO9 Locomotive & Wagon Kits
Narrow Minded Railworks offers kits and scenery for model railway and diorama projects. If you want to apply the preparation and finishing principles above to a narrow-gauge build, its OO9 Locomotive & Wagon Kits provide a starting point for locomotive and wagon modelling. GN15 Locomotive & Scenery Kits and O-16.5 / 7mm Scale Kits offer other scale-focused options, while Diorama Tools & Scenery can support the wider scene around a finished model.
The right choice depends on the scale and subject you plan to build, as well as how the model will sit within an exhibition or competition display. Visit Narrow Minded Railworks to explore the kits and scenery available for your project.
Plan Your Next Build with Purpose
Before starting another project, decide what you want the finished display to communicate. A clear subject, intended viewing distance and suitable presentation can guide choices from assembly onwards. Keep notes on materials and techniques as you work; they can help you repeat successful results and explain your decisions later. This small habit turns each build into useful experience for the next.
Achieving a museum quality model finish isn’t about applying one final coat. It comes from deliberate choices throughout the build, guided by the model’s purpose. Set a manageable goal for your next project, then focus on the areas that matter most to its subject and display. Careful progress is more valuable than adding detail without a clear reason.
If you’re planning a narrow-gauge railway or diorama project, contact Narrow Minded Railworks to discuss a suitable starting point. Take your next idea from plan to finished model with care and confidence.
Frequently Asked Questions
What Does “Museum-Quality” Actually Mean?
“Museum-quality” is a descriptive label, not a universal certification for models. Its meaning depends on the qualities being claimed, such as craftsmanship, historical accuracy or suitability for display. For a specific model, separate the visible finish from evidence about its origin and construction. A finely painted object may be carefully made, but the label alone doesn’t establish its history or verify every detail.
What defines a museum-quality scale model finish?
A considered finish makes the model’s subject clear without distracting from its form. Look for consistent colour boundaries, crisp details and surface treatments suited to the materials represented. For example, metal fittings, timber panels and glass should look distinct under the same display lighting. Subtle wear can add realism, but place it where it makes sense for the subject rather than applying it decoratively or uniformly.
What tools and materials are needed for a museum-quality model finish?
Useful basics include fine abrasive sheets, a soft cleaning brush, tweezers, masking materials, a suitable primer and paints compatible with the model’s surface. A magnifier helps with small details, while a stable holder keeps parts secure during painting. Add filler and adhesive suited to the materials in your build. Choose tools and products based on the model’s material and the finish you want.
What primer and paint types work best for scale models?
Choose primer and paint according to the model’s material and the manufacturer’s compatibility guidance. Primer provides a consistent base and can reveal surface defects before colour is applied. Acrylic and enamel paints behave differently during application and cleanup, so choose a system suited to your tools and working conditions. Test the combination on spare material or an inconspicuous area before coating visible surfaces.
How do you apply smooth coats with an airbrush or paintbrush?
For a smooth result, apply controlled, light coats instead of trying to cover the surface in one heavy coat. When brushing, load the brush evenly and use a steady stroke, avoiding repeated passes over paint that has begun to set. With an airbrush, keep the movement consistent and follow its instructions for thinning and operation. Let each layer dry as directed before applying another.
How do you achieve realistic colours, shading, weathering, and fine details?
Start with references for the subject, then build colour and wear around its materials and use. Use restrained shading to distinguish recesses from raised surfaces, and place weathering where handling, exposure or operation would plausibly leave marks. Add fine details after establishing the main colour areas, using a small brush or suitable tool. Step back from close-up work to check that the overall effect remains coherent.