

There's a unique satisfaction in watching a train of wagons you've built yourself trundle along your layout. But taking that first step into the world of 7mm narrow gauge rolling stock kits can feel a little daunting. Faced with a dizzying choice of materials from whitemetal to 3D-printed resin, and a huge variety of prototypes, it’s easy to feel overwhelmed. Are you worried about tackling a complex brass kit, or simply unsure which manufacturer offers the best value for your budget? Perhaps you're just looking to add something more interesting than another open wagon.
If that sounds familiar, you're in the right place. This guide is designed to be your friendly signalman, clearing the line ahead. We’ll explore the different types of kits available across the UK, help you choose the perfect project for your skill level and interests, and give you the confidence to get started. Get ready to discover your next favourite model and bring your narrow gauge vision to life, one wagon at a time.
Key Takeaways
- Understand the difference between 7mm scale and 'narrow gauge' to ensure you choose the correct models for your railway's prototype.
- Learn how to select your first kit by matching it to your layout's specific era, location, and purpose for a cohesive and realistic scene.
- Compare the pros and cons of materials, from plastic to 3D prints, to find the best 7mm narrow gauge rolling stock kits for your skill level.
- Discover the essential building stages, from cleaning parts to final weathering, to confidently assemble your next wagon or carriage.
What is 7mm Narrow Gauge Rolling Stock?
Diving into the world of model railways can feel complex, but the concepts are quite straightforward once broken down. At its heart, 7mm narrow gauge modelling combines a large, detailed scale with the unique character of railways that ran on tracks narrower than the UK's 'standard gauge' of 4ft 8½in. These were often industrial, rural, or military lines, built to tackle challenging terrain or serve specific industries like quarrying and mining.
The term 'rolling stock' simply refers to any vehicle that runs on the railway tracks but isn't a locomotive. This includes all the wagons, vans, and carriages that a locomotive would pull or push, forming the heart of your train and telling the story of your layout's purpose.
To see how these elements come together, this video provides an excellent overview of modern ready-to-run options that share the same principles as kit building:
Common Types of Rolling Stock Vehicles
The variety of 7mm narrow gauge rolling stock kits available allows modellers to create authentic and visually interesting trains. Common types you will encounter include:
- Goods Wagons: These are the workhorses of any freight line. They include versatile open wagons for general merchandise, covered box vans for weather-sensitive goods, and simple flatbeds for bulky items.
- Mineral Wagons: Built for heavy-duty industrial use, this category includes tipping wagons (tippers), V-skip wagons, and hoppers for moving materials like coal and stone. Iconic slate wagons, designed for Welsh quarries, are also a popular choice.
- Passenger Coaches: Operations varied from basic, open-sided workmen's carriages used in quarries to more comfortable, fully-enclosed coaches for public narrow gauge lines like the Ffestiniog or Lynton & Barnstaple Railways.
- Brake Vans & Non-Revenue Stock: Essential for operational realism, the brake van provides a guard's accommodation and extra braking force. Non-revenue stock includes maintenance wagons, tool vans, and other vehicles used to keep the railway running.
Understanding Scale vs. Gauge in 7mm
For newcomers, the distinction between 'scale' and 'gauge' is crucial. Though often used interchangeably, they mean different things.
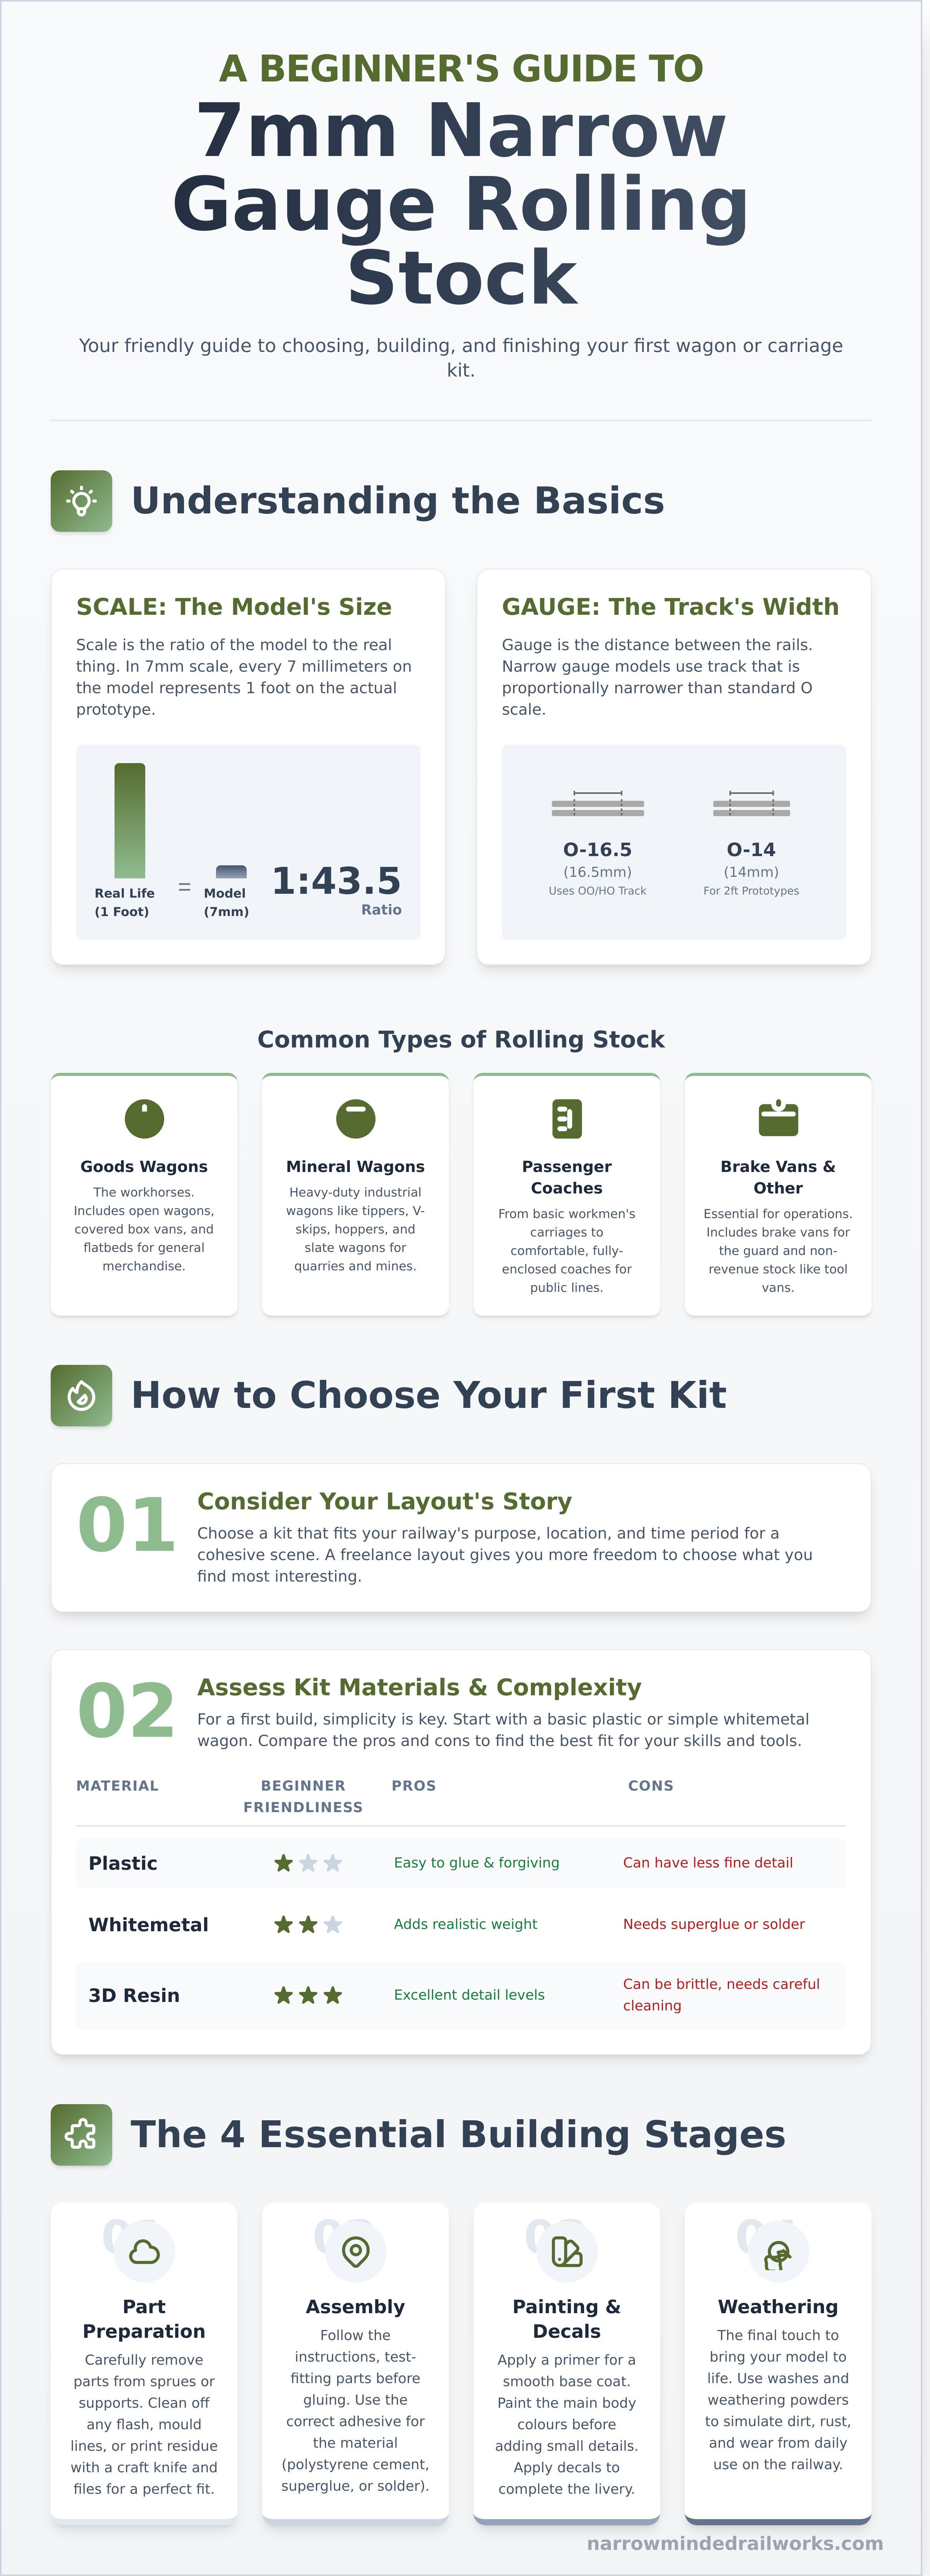
- Scale refers to the size of the model in proportion to its real-life counterpart. In this case, we are working in 7mm scale (British O scale), where 7mm on the model represents 1 foot on the real thing (a ratio of 1:43.5). This large scale allows for a superb level of detail.
-
Gauge is the measurement between the two rails of the track. Because we are modelling narrow gauge, the track is proportionally narrower than it would be for a standard gauge O scale model. The two most common gauges are:
- O-16.5: This uses 16.5mm gauge track, which is identical to the track used for OO and HO scale models. This makes it incredibly popular as track and chassis components are widely available and affordable. It represents prototype gauges around 2ft 3in to 2ft 6in.
- O-14: This uses a finer 14mm gauge track to more accurately represent 2ft gauge prototypes, which were very common on industrial and estate railways across the UK.
How to Choose Your First 7mm Rolling Stock Kit
Stepping into the world of kit building is one of the most rewarding aspects of model railways. Your first build sets the foundation for your skills and enjoyment, so choosing the right project is key. This guide will walk you through selecting from the wide variety of 7mm narrow gauge rolling stock kits available, ensuring a successful and satisfying start.
Consider Your Prototype and Era
The most important factor is how a kit fits your layout's story. Are you aiming to replicate the iconic slate wagons of the Ffestiniog & Welsh Highland Railways, or perhaps the distinctive coaches of the Lynton & Barnstaple? Choosing a kit that aligns with your chosen railway and time period creates a cohesive and believable scene. Alternatively, a freelance layout gives you the freedom to mix and match, selecting wagons and coaches based purely on what appeals to you. Think about the industries your line serves-quarries, farms, or local goods traffic-and choose rolling stock that reflects that purpose.
Assess the Kit's Complexity and Materials
For your first build, simplicity is your friend. Start with a basic four-wheel open wagon. These kits typically have a low parts count and straightforward construction, allowing you to learn core skills without feeling overwhelmed. Pay attention to the materials:
- Plastic (Polystyrene): Very forgiving and easy to glue. An excellent choice for beginners.
- Resin: Offers superb detail but can be brittle and requires superglue. Best tackled after a plastic kit.
- 3D Prints: Provide access to unique prototypes but often require more cleanup of support structures before assembly.
Before you buy, read reviews and check the manufacturer's website for instructions to gauge the difficulty level.
What's in the Box? (And What's Not)
Understanding what you are purchasing is crucial for managing your budget and expectations. Very few 7mm narrow gauge rolling stock kits are truly "all-inclusive." A standard kit typically contains the main body and chassis components. However, you will often need to purchase other essential items separately:
- Wheels and axles
- Couplings
- Paint, glue, and transfers (decals)
- Glazing for coach windows
Factoring in these extras is important. A kit priced at £25 might require an additional £10-£15 for wheels and couplings to be ready to run. Always read the kit description carefully to avoid any surprises.
A Deep Dive into Kit Materials: From Plastic to 3D Prints
Choosing your next project often comes down to the prototype, but the material the kit is made from is just as crucial. It dictates the tools you'll need, the skills required, and the level of detail you can achieve. Understanding the differences between plastic, metal, resin, and 3D prints will help you select the perfect 7mm narrow gauge rolling stock kits for your layout and ability.
Traditional Plastic and White Metal Kits
For decades, injection-moulded plastic has been the go-to for model kits. It's affordable, widely available, and forgiving for beginners. Assembly is straightforward, typically requiring only liquid polystyrene cement to create a strong, permanent bond. Complementing this, white metal castings are often included for detail parts like axleboxes and brake gear. These add valuable weight for smooth running but require superglue, epoxy, or low-melt solder for assembly.
Resin and Etched Brass Kits
For modellers seeking ultimate fidelity, resin and etched kits represent a step up. Cast resin captures exquisite surface detail, from subtle wood grain to fine rivet patterns, far surpassing what's possible with older plastic moulds. Assembly requires superglue and careful preparation of the parts. Etched brass or nickel silver kits are for the advanced builder. These metal frets allow for incredibly fine yet strong components, but demand specialised tools and skills, with soldering being the preferred method for a robust build.
The Rise of 3D Printed Resin Kits
The latest evolution in kit manufacturing is 3D printing, which combines incredible detail with accessibility. This technology allows for the creation of unique and obscure prototypes that would be uneconomical to produce using traditional methods. The key advantages include:
- Exceptional Detail: Modern resin printers produce parts with sharp, intricate detail straight from the design, often integrating many small components into a single, easy-to-handle part.
- Unique Prototypes: The barrier to entry is lower than injection moulding, opening the door for a huge variety of interesting wagons and vans.
- Simplified Assembly: While you'll need to carefully remove small support structures with a sharp craft knife, the part-count is often lower, leading to a quicker build.
This modern approach delivers a rewarding building experience with a stunning final result. See the detail in our 3D printed rolling stock kits.
Essential Steps for Building Your Rolling Stock Kit
Building your first of many 7mm narrow gauge rolling stock kits can feel daunting, but it's one of the most rewarding aspects of the hobby. By breaking the process down into manageable stages, you can achieve a professional result you'll be proud to run on your layout. This guide provides a high-level overview of the key steps, from opening the box to placing your completed wagon on the track.
Preparation: The Key to a Great Finish
A successful build begins long before you reach for the glue. Proper preparation ensures parts fit correctly and that your paintwork has a flawless finish. Taking your time at this stage will save you headaches later on.
- Read the Instructions: Always read the manufacturer's instructions from start to finish. This helps you understand the sequence of assembly and identify any potentially tricky steps.
- Wash All Parts: Resin and white metal parts often have a fine layer of mould release agent. Gently wash them in warm, soapy water and allow them to dry completely to ensure strong glue bonds and smooth paint adhesion.
- Careful Removal: Use a sharp craft knife or sprue cutters to carefully remove parts from their sprues or supports. Clean up any remaining flash or mould lines with a file or fine-grit sandpaper.
- Test Fit Everything: Before applying any adhesive, dry-fit the main components like the body, floor, and chassis. This allows you to check for a snug fit and make any minor adjustments.
Assembly, Painting, and Weathering
With your parts prepared, the creative process of construction begins. Working in logical sub-assemblies, such as the chassis and the body separately, makes handling and painting much easier. Use the correct adhesive for the material-typically a superglue (cyanoacrylate) for resin and metal kits, or a plastic solvent for polystyrene. Once assembled, a light coat of primer is essential. It reveals any surface imperfections and provides a perfect key for your top coats of paint. Finally, weathering with washes, powders, and dry brushing techniques is what truly brings your model to life, giving it a realistic, in-service appearance.
Finishing Touches: Couplings and Wheels
The final steps transform your static model into a functional piece of rolling stock. Choose your wheelsets carefully to match your track, whether it's O-16.5 (running on standard OO/HO track) or a broader gauge like O-14. Ensure they are fitted correctly and spin freely without any wobble. Select and fit couplings that are compatible with the rest of your locomotives and stock. Lastly, adding a small amount of weight-such as self-adhesive car wheel weights hidden inside the wagon-dramatically improves running performance and reduces the chance of derailments.
For more detailed tutorials on specific techniques, keep an eye on our upcoming blog posts, and explore the full range of kits at Narrow Minded Railworks.
Bringing Your Narrow Gauge Vision to Life
Embarking on your narrow gauge project is an exciting step for any modeller. As we've explored, the key to a rewarding build lies in choosing a kit that matches your skill level and understanding the unique properties of today's materials, from classic etched brass to modern, high-resolution 3D prints. The journey from a box of parts to a beautifully finished wagon is one of the most satisfying aspects of our hobby, creating something truly unique for your layout.
Now that you're equipped with the knowledge to build with confidence, it's time to find that perfect project. If you're searching for exceptional 7mm narrow gauge rolling stock kits that stand out from the crowd, we can help. At Narrow Minded Railworks, we specialise in high-detail 3D printed designs, focusing on the unique and interesting prototypes that bring character to any scene. With worldwide shipping available for modellers everywhere, your next masterpiece is closer than you think.
Explore our unique range of 7mm scale rolling stock kits and discover a model that inspires your next build. Happy modelling!
Frequently Asked Questions
What is the difference between O-16.5 and On30?
Both O-16.5 and On30 describe 7mm scale models (1:43.5) that run on 16.5mm gauge track. The key difference is the real-world railway they represent. O-16.5 is the British standard, representing prototype gauges around 2ft 3in. In contrast, On30 is the American term for models of 30-inch (2ft 6in) gauge prototypes. While the models are physically compatible, they reflect different national railway styles and traditions.
Do 7mm narrow gauge rolling stock kits come with wheels and couplings?
This varies between manufacturers, but most specialist kits require you to source wheels and couplings separately. This gives modellers the flexibility to choose their preferred standard, such as those from Slaters Plastikard or Peco. Always read the kit’s description carefully before buying. While some beginner-focused plastic kits may be all-inclusive, it is not the norm for the majority of resin or etched brass 7mm narrow gauge rolling stock kits.
What basic tools do I need to start building my first wagon kit?
For your first kit, you will need a few core tools. A high-quality craft knife (like a Swann-Morton), a steel rule, and a self-healing cutting mat are essential for precision. A set of small needle files and fine-grit sandpaper are crucial for cleaning up parts. For assembly, you’ll need tweezers for handling small components and a suitable adhesive, such as a liquid plastic solvent for plastic kits or superglue (cyanoacrylate) for resin and metal parts.
Are 3D printed kits more fragile than traditional plastic kits?
Not necessarily. While early 3D printed resins could be brittle, modern formulations are remarkably tough and can even be more flexible than some injection-moulded plastics. They can be more susceptible to snapping under sharp impact, so careful handling during assembly is always wise. However, a well-designed, modern 3D printed kit is a robust and highly detailed option that will prove durable enough for regular use on a layout.
How do I choose the right paint for my rolling stock model?
Your choice of paint depends on personal preference. Water-based acrylics from UK-available brands like Vallejo or Lifecolor are popular due to their low odour and easy cleanup with water. For a very hard-wearing finish, traditional solvent-based enamels such as Humbrol or Phoenix Precision Paints are an excellent choice. Regardless of type, always start with a suitable primer to ensure the paint adheres smoothly and evenly to the model’s surface.
Can I use OO gauge track for my 7mm narrow gauge layout?
Yes, you can. OO gauge track has a rail spacing of 16.5mm, which is the correct gauge for both O-16.5 and On30 modelling. This makes standard OO track, such as Peco Streamline Code 75 or 100, a very popular and cost-effective option for 7mm narrow gauge layouts in the UK. While the sleeper size and spacing may not be perfectly prototypical for narrow gauge, it is a widely accepted and convenient compromise.