

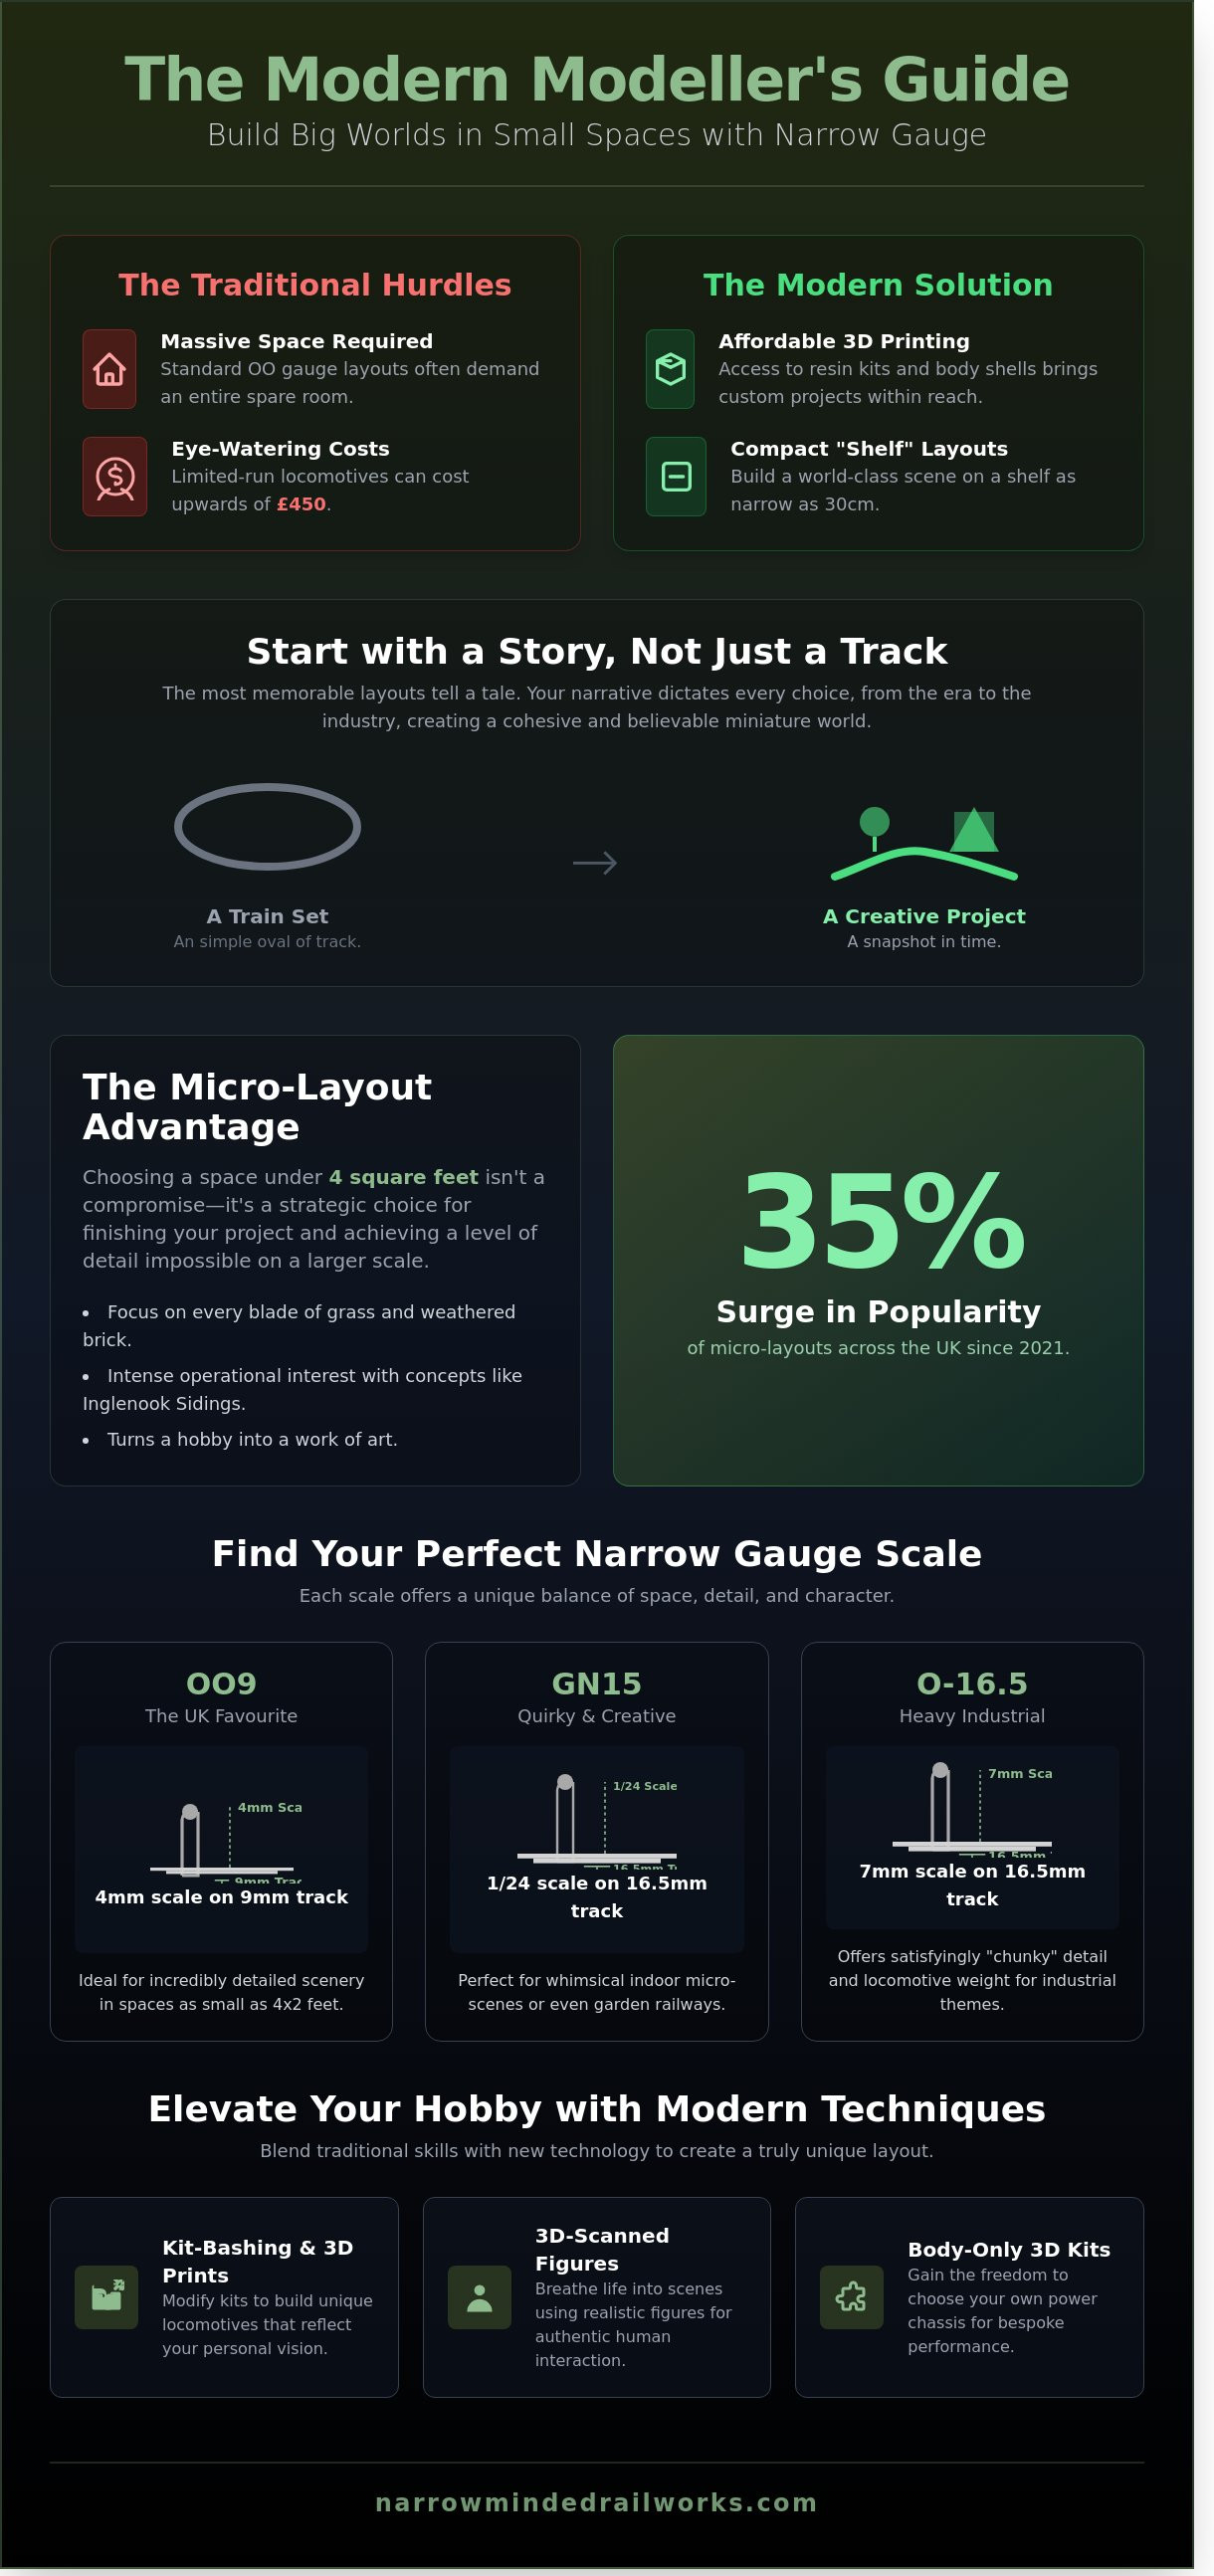
What if you could build a world-class railway layout on a shelf no wider than a standard 30cm ruler? Most UK modellers feel trapped by the massive space requirements of standard OO gauge or the eye-watering £450 price tags often found on limited-run locomotives; it's easy to feel that your creativity is limited by the size of your spare room or the depth of your pockets. However, the rise of affordable 3D printing and accessible resin kits means that creative model railway projects are no longer reserved for those with a massive workshop or a limitless budget.
You're likely already aware that narrow gauge offers a unique charm that mainlines simply cannot match. We'll show you exactly how to transform that passion into a stunning, story-driven reality without spending thousands of pounds. This guide explores ten specific projects for 2026 that blend traditional kit-bashing with modern technology to create incredible detail in tiny spaces.
Key Takeaways
- Learn how to elevate your hobby by focusing on storytelling, turning standard layouts into truly creative model railway projects that capture the unique charm of narrow gauge.
- Discover the art of the micro-layout, proving that a compact four-square-foot industrial scene can offer more engagement and detail than a sprawling room-sized display.
- Master the techniques of kit-bashing and 3D print modification to build one-of-a-kind locomotives that reflect your personal vision rather than out-of-the-box standards.
- Find out how to breathe life into your scenes by using 3D-scanned figures to create realistic human interactions that provide the emotional soul of your railway.
- Explore the benefits of using body-only 3D printed kits, giving you the freedom to choose your own power chassis for bespoke performance and reliability.
Why Creative Model Railway Projects Start with a Story
Most beginners start with a simple oval of track on a wooden baseboard. This is a train set. A creative railway project is something different entirely. It requires a cohesive vision and a sense of place. By looking back at the history of model railroading, we see that the most enduring layouts are those that tell a specific tale. You aren't just laying track; you're recreating a moment. Whether it's a 1920s slate quarry in North Wales or a 1970s industrial estate in the West Midlands, the story dictates every choice you make.
Observation acts as your greatest design tool. Walk through the Peak District or explore the abandoned tin mines of Cornwall. These ruins provide the blueprint for creative model railway projects. You might find inspiration in a forgotten 2-foot gauge line that once hauled timber to a local sawmill. Setting a specific era, such as the pre-grouping years before 1923, ensures your locomotives and rolling stock look like they belong together. Without this narrative anchor, a layout can quickly become a cluttered collection of mismatched items.
Narrow gauge modelling, particularly in scales like OO9 or GN15, offers a unique path for those who want more whimsy. These lines were often built on tight budgets with sharp curves and eccentric rolling stock. This gives you permission to be imaginative. You can build a fictional line that feels authentic because it follows the logic of real-world narrow gauge operations. Since the 009 Society was founded in 1973, thousands of UK modellers have used these scales to fit expansive landscapes into tiny spare rooms.
To better understand how scenery and storytelling merge, watch this helpful video showing the level of detail possible in a dedicated project:
The Narrative-First Approach to Modelling
Build a layout with a "reason for being" to avoid the common trap of aimless track laying. If you decide your scene is a rural estate railway in 1905, you'll know exactly which wagons to buy. You'll need coal for the big house and timber for the fences. Narrative modelling is the art of building a snapshot in time. Every weathered brick and rusted siding should help tell that specific story to anyone who looks at your work.
Choosing Your Scale for Maximum Creativity
Selecting the right scale is a balance of space and ambition. OO9 is a favourite for British modellers because it uses 4mm scale figures on 9mm track. It allows for incredibly detailed scenery in a space as small as 4 feet by 2 feet. If you prefer something larger, GN15 uses 1/24 scale figures on standard 16.5mm track. It's perfect for quirky indoor micro-scenes or even garden displays. For those who love heavy industrial aesthetics, O-16.5 offers chunky 7mm scale detail. It provides a satisfying weight to your locomotives as they haul ore through a miniature landscape. Each scale offers a different way to express your creative model railway projects depending on your available room and budget.
The Charm of the Micro-Layout: Small Spaces, Big Ideas
The micro-layout movement has seen a 35% surge in popularity across the UK since 2021. While a 40-square-foot loft circuit remains a dream for many, the reality of modern housing often limits us to much smaller footprints. Choosing a space under 4 square feet isn't a compromise; it's a strategic choice that ensures you actually finish your build. Small projects allow for a level of detail that would be exhausting on a larger scale, letting you focus on every blade of grass and every weathered brick.
Shifting focus to the Inglenook Sidings concept allows for intense operational interest in a tiny area. When you adapt this classic 3-2-2 shunting puzzle to a narrow gauge industrial theme, the project gains immediate character. You can focus on the grit of a 1920s slate wharf or a mid-century brickworks. This blend of logic and artistry is why many educators highlight the connection between model railroading and STEAM education to inspire the next generation of creative thinkers and engineers.
Portability is a vital factor for the modern hobbyist. A layout built on a 1,200mm by 300mm board fits easily into the back of a standard hatchback, making it possible to attend regional exhibitions without hiring a van. Creative baseboards have moved beyond traditional plywood frames. Modellers are now using £15 vintage violin cases, £7 IKEA bookshelves, or even sturdy cigar boxes to house their creative model railway projects. These self-contained units protect the scenery during storage and provide a natural "proscenium arch" that frames the miniature world for the viewer.
Three Creative Themes for Your Next Micro-Project
- The Overgrown Quarry: This theme celebrates the nature reclaiming industry aesthetic. Use 12mm static grass and rust-coloured weathering powders to depict a 1960s site in decline.
- The Estate Railway: Inspired by the Duffield Bank or Eaton Hall railways, this theme features pristine locos and manicured lawns. It's a chance to model posh architecture and 15-inch gauge elegance.
- The Coastal Tramway: Build a scene where the track hugs a sea wall. Incorporating clear epoxy resin for the North Sea and real sand from a UK beach adds incredible texture to these creative model railway projects.
Maximising Vertical Space in Narrow Gauge
Narrow gauge modelling allows for steeper gradients and tighter curves, which you can use to build "up" instead of "out". A multi-level track plan can double the running length in a small footprint, with a lower level serving a mine and an upper level representing a processing plant. Customising 3D printed building kits helps you fit structures into awkward, non-standard corners that traditional kits can't handle. For those looking to master these textures, you should check out these tips for Creating Unique GN15 Diorama Scenery. If you're ready to start your own miniature masterpiece, you can explore narrow gauge kits to bring your vision to life.
Customising and Kit-Bashing: Creating One-of-a-Kind Locomotives
Kit-bashing represents the pinnacle of individuality in the hobby. It involves taking components from different model kits, or even non-railway items, and merging them to create a locomotive that never existed in a manufacturer's catalogue. This process allows you to bridge the gap between "ready-to-run" models and complete scratch-building. One of the most rewarding creative model railway projects you can undertake is the construction of a unique hybrid engine that tells a specific story about your freelance line.
The rise of 3D printing has transformed this workflow. Since 2021, high-quality resin bodies have become the standard for narrow gauge enthusiasts. These bodies offer a significant advantage over traditional white metal or plastic kits because resin is incredibly forgiving. You can drill into it for handrails, sand it to change a boiler profile, or cut sections away with a fine razor saw without the risk of shattering the material. This flexibility makes it the perfect medium for experimental designs.
Success depends on selecting a reliable donor chassis. In the UK, many modellers look to N gauge manufacturers to power their OO9 scale locomotives. The Kato 11-103 or 11-109 four-wheel chassis are popular choices, often retailing for approximately £25 to £35. For larger 0-6-0 configurations, the Graham Farish Class 08 chassis is a frequent "victim" for kit-bashers. Matching the wheelbase of your 3D printed body to these proven runners ensures your custom creation operates as smoothly as a factory-made model.
Character comes from the small details you add after the main assembly. A plain locomotive becomes a living piece of history when you add a custom brass whistle, a set of 3D printed toolboxes, or a distinctive chimney. According to a 2023 poll by the 009 Society, over 70% of members prefer locomotives with added "clutter" like oil cans, fire irons, and buckets. These details provide a sense of scale and purpose that distinguishes your work from a standard kit build.
How to Kit-Bash Your First Locomotive
Start by selecting a 3D printed body designed for a common chassis, such as a Kato 103. Clean the resin in warm soapy water to remove any residual release agents or uncured oils. Once dry, carefully remove support marks using a fine-grit sanding stick. Test fit the chassis frequently; you may need to trim internal resin struts to get a flush fit. Finally, apply a grey primer before painting and weathering. This creates a unified look that hides the join between the different components.
Working with 3D Printed Resin
Modifying 3D prints requires specific tools, including needle files and high-quality cyanoacrylate (super glue). Safety is a priority when working with these materials. You must wear an FFP2 or FFP3 rated mask when sanding resin to avoid inhaling fine dust particles. For a comprehensive guide on achieving a professional finish, refer to How to Build and Finish 3D Printed Model Kits. Using the right techniques ensures your creative model railway projects look authentic and stand the test of time.
Beyond the Track: Building Atmosphere with Scenery and Figures
A train running through a pristine, empty landscape often feels more like a toy than a miniature world. Figures act as the soul of creative model railway projects, transforming a static layout into a living narrative. Since 2021, the availability of 3D-scanned figures has revolutionised this aspect of the hobby. These models capture genuine human posture, such as the subtle slouch of a commuter waiting at a wet platform or the strained muscles of a labourer loading a pallet. They provide a level of anatomical accuracy that traditional moulded plastic figures simply can't match.
The most memorable layouts often feature "cameos". These are tiny, self-contained stories tucked away in corners for eagle-eyed viewers to discover. You might place a miniature photographer trying to snap a passing loco, or perhaps a cheeky scene of a dog stealing a sandwich from a workman's lunchbox. These details reward people who take the time to look closer. They make your world feel inhabited and give it a sense of British humour or poignancy that lingers long after the train has passed.
Lighting provides the final layer of immersion. Don't rely solely on your spare room's overhead light. Using 0402 SMD LEDs allows you to install tiny flickers of life inside signal boxes, station offices, or workshop interiors. A warm 2700K glow from a workshop window during a simulated "dusk" creates a sense of industry that flat lighting cannot replicate. In a 2023 survey of exhibition layouts, over 65 per cent of award-winning displays featured dedicated internal building illumination.
The Art of Weathering for Realism
To make a 3D printed wagon look like it has endured thirty years of British rain and coal dust, you need layers. Start with a thin acrylic wash to let dark pigments settle into the recesses. Follow this with weathering powders to simulate rust streaks and brake dust. Dry-brushing the edges with a light grey or silver mimics the paint wear seen on heavy-duty rolling stock. Weathering serves as the visual glue that anchors a model into its fictional world by removing the artificial sheen of fresh plastic.
Unique Scenery Accessories
Small details define the era of your build. Customising 3D printed K6 red phone boxes, vintage petrol pumps, or industrial skip bins provides instant historical context. For ground cover, mix 2mm static grass with natural materials like sifted soil or dried tea leaves to create a varied, organic texture. Using a dedicated diorama tray helps you keep these scenic materials organised, which can reduce material waste by up to 25 per cent during the application process. These small touches turn a basic loop of track into a convincing slice of history.
If you want to add these high-quality details to your next layout, explore our range of 3D printed accessories to bring your scenes to life.
Launching Your Next Project with Narrow Minded Railworks
Narrow Minded Railworks designs 3D printed kits specifically for the enthusiast who finds standard, mass-produced models a bit too predictable. Since we began developing our range in 2021, we've focused on the unique charm of narrow gauge railways. Our kits provide a high-quality foundation for creative model railway projects that stand out on any layout. We don't just sell models; we provide the starting point for your own engineering feats.
One of the primary advantages of our approach is the "body-only" kit format. Most traditional kits force you to use a specific, often outdated, motor and chassis. We've changed that. By providing the body shell, we allow you to choose the power and performance that suits your budget. You might opt for a smooth-running Kato 11-109 chassis, typically priced around £25, or perhaps a more specialised bespoke unit. This flexibility means you aren't paying for components you don't want, and you can ensure your locomotive runs exactly how you need it to.
We're a UK-based business that truly understands the nuances of the British narrow gauge scene. From the slate quarries of North Wales to the rural charm of the Isle of Man, our designs reflect the proportions and character of these historic lines. You can browse our growing range by scale to find the perfect fit for your space:
- OO9 Scale: Perfect for 4mm scale modelling on 9mm track, ideal for those tight, twisting mountain routes.
- GN15 Scale: Large 1/24 scale bodies that run on 16.5mm track, offering a heavy, tactile modelling experience.
- O-16.5 Scale: Bringing 7mm scale detail to standard 16.5mm track for a classic narrow gauge feel.
From Kit to Masterpiece
Our resin 3D prints offer a level of crispness that traditional injection moulding struggles to match. We print at layer heights as fine as 0.05mm, which means you get sharp rivets, realistic timber grain, and delicate window frames right out of the box. These kits serve as the perfect canvas for your creative model railway projects. Whether you want to add real coal to a bunker or scratch-build a custom interior, the resin surface takes paint and glue exceptionally well. We love seeing how modellers transform a basic print into a weathered, working-class engine. Don't forget to share your progress on social media; the narrow gauge community thrives on seeing these unique transformations.
Ready to Start Your Creative Journey?
The biggest hurdle in modelling is often the fear of making a mistake. We believe the best way to develop your skills is to just have a go. If a paint job doesn't work out, you can strip it back and try again. If a part breaks, it's just an opportunity for a realistic "field repair" on your rolling stock. Your railway should follow your rules, not a rigid handbook. If you've been waiting for a sign to start that new layout, this is it. Explore our latest OO9 and GN15 kits today and see where your imagination takes you. Your next masterpiece is only a few clicks away, so let your creativity lead the way.
Start Your 2026 Narrow Gauge Journey Today
Building a layout in 2026 is about more than just laying track; it's about narrative depth. You've explored how a compelling story transforms a simple micro-layout into a living world and how kit-bashing creates locomotives that don't exist anywhere else. These creative model railway projects thrive when you focus on precise OO9 and GN15 scale details, from 3D-scanned figures to bespoke scenery that captures a specific moment in time. Whether you're working in 4mm or 1:24 scales, the right components make the difference between a generic loop and a prize-winning exhibition piece.
Narrow Minded Railworks provides the specialist tools you need to succeed. As UK-based designers, we offer worldwide shipping on 3D-printed kits that simplify complex builds for enthusiasts across the globe. Our 3D-scanned figures add instant realism to any scene, ensuring your 2026 project stands out from the crowd. Don't let your ideas stay on the drawing board when you can access specialist narrow gauge parts today. It's time to start building something extraordinary for your collection. We specialise in providing the components that turn a basic track into a detailed masterpiece.
Browse our unique range of 3D printed narrow gauge kits
Frequently Asked Questions
What are the best creative model railway projects for beginners?
The best creative model railway projects for beginners involve building a small 4-foot shunting plank or a static diorama. These manageable builds allow you to master track laying and basic wiring without the 6-month commitment of a full room layout. Starting with a 120cm by 30cm baseboard keeps costs under £150, making it an affordable entry point for testing scenery techniques and rolling stock weathering.
How do I start kit-bashing 3D printed locomotives?
You start kit-bashing 3D printed locomotives by sourcing a high-quality resin body shell designed for a specific donor chassis. Most UK modellers use OO9 scale bodies paired with Kato or Graham Farish N gauge mechanisms. You'll need a set of needle files and cyanoacrylate glue to fit the components. 90% of successful kit-bashes require minor filing to ensure the 0.05mm layer-height print sits flush on the motor unit.
What is the best scale for a micro-layout?
OO9 scale is the premier choice for micro-layouts because it offers the detail of 1:76 scale while running on 9mm N gauge track. This allows you to fit a functional station and siding into a space as small as 60cm by 20cm. These creative model railway projects thrive in small spaces like bookshelves or even A4-sized cake box challenges, which have seen a 15% increase in UK exhibition entries since 2021.
Do I need a 3D printer to use Narrow Minded Railworks kits?
You don't need a 3D printer to use Narrow Minded Railworks kits because they provide pre-printed resin components ready for assembly. These kits arrive cleaned and cured, so you only need basic tools like 1000-grit sandpaper and primer. This saves you the £250 initial investment in a 4K resin printer and the 3 hours of post-processing time usually required for home prints.
How can I make my model railway scenery look more realistic?
You make scenery look more realistic by layering different textures and using a static grass applicator. Applying a base of 2mm fibres followed by 6mm tufts creates the organic, uneven look found in the British countryside. 80% of professional layouts use at least four different shades of green to avoid a monochromatic look. Adding fine real-stone ballast instead of dyed sawdust also improves the visual weight of your trackbed.
What is the difference between OO9 and N gauge?
The main difference is the scale of the models, as OO9 is 1:76 scale while N gauge is 1:148 scale, despite both running on 9mm wide track. OO9 represents narrow gauge railways where the real tracks are roughly 2 feet apart. N gauge represents standard 4-foot 8.5-inch tracks. This means an OO9 locomotive is significantly larger and more detailed than an N gauge equivalent.
How do I choose a chassis for a 3D printed loco body?
You choose a chassis by matching the wheelbase measurements and wheel diameter of the 3D print to a commercially available motor unit. Most designers specify a donor like the Kato 11-109, which currently retails for approximately £28 in the UK. Measure the distance between the axles on your print in millimetres. If the print's wheelbase is 24mm, a chassis with a 23mm to 25mm range will typically fit with minor adjustments.