

A pristine, factory-fresh locomotive is often the least realistic element on a narrow gauge layout. While modern ready-to-run releases offer incredible technical detail, they frequently lack the weathered, hard-worked soul that defines the "make do and mend" spirit of industrial lines. If you feel that your collection looks more like a row of plastic toys than a functional railway, you aren't alone. Many modellers hesitate to begin customising oo9 models because they fear ruining an expensive £150 model or simply cannot find the specific parts they need.
We understand that taking a craft knife to a factory finish is a daunting prospect. However, bespoke modelling doesn't have to be a gamble. This guide demonstrates how to transform standard stock into unique, characterful narrow gauge models using proven detailing techniques and 3D-printed kit conversions. You'll discover how to safely apply weathering, select the correct tools, and fit custom bodies to reliable commercial chassis. From subtle grime to complete structural overhauls, we provide the clarity you need to ensure your rolling stock tells a story that's entirely its own.
Key Takeaways
- Learn why customising oo9 models is essential for capturing the unique, weathered character of industrial narrow gauge railways.
- Identify the specific weathering powders and acrylic washes required to transform flat plastic finishes into realistic, hard-worked surfaces.
- Discover the process of re-bodying reliable donor mechanisms with 3D-printed resin kits to create locomotives that are truly one-of-a-kind.
- Understand how to maintain visual consistency across your layout by matching the finish of your wagon kits to your locomotive fleet.
- Master the planning stage by effectively balancing the costs of 3D-printed bodies and detailing parts for a successful bespoke project.
The Philosophy of Customising OO9 Models
The essence of OO9 narrow gauge modelling lies in its imperfection. Unlike standard gauge railways that often adhered to strict corporate liveries and maintenance schedules, narrow gauge lines were frequently eclectic, resourceful, and weathered by harsh industrial environments. Customising oo9 models is the process of reclaiming this history. It involves taking a mass-produced item and modifying it to reflect a specific, fictional or historical railway identity. This approach ensures your layout doesn't just look like a collection of products, but like a working environment with a tangible past.
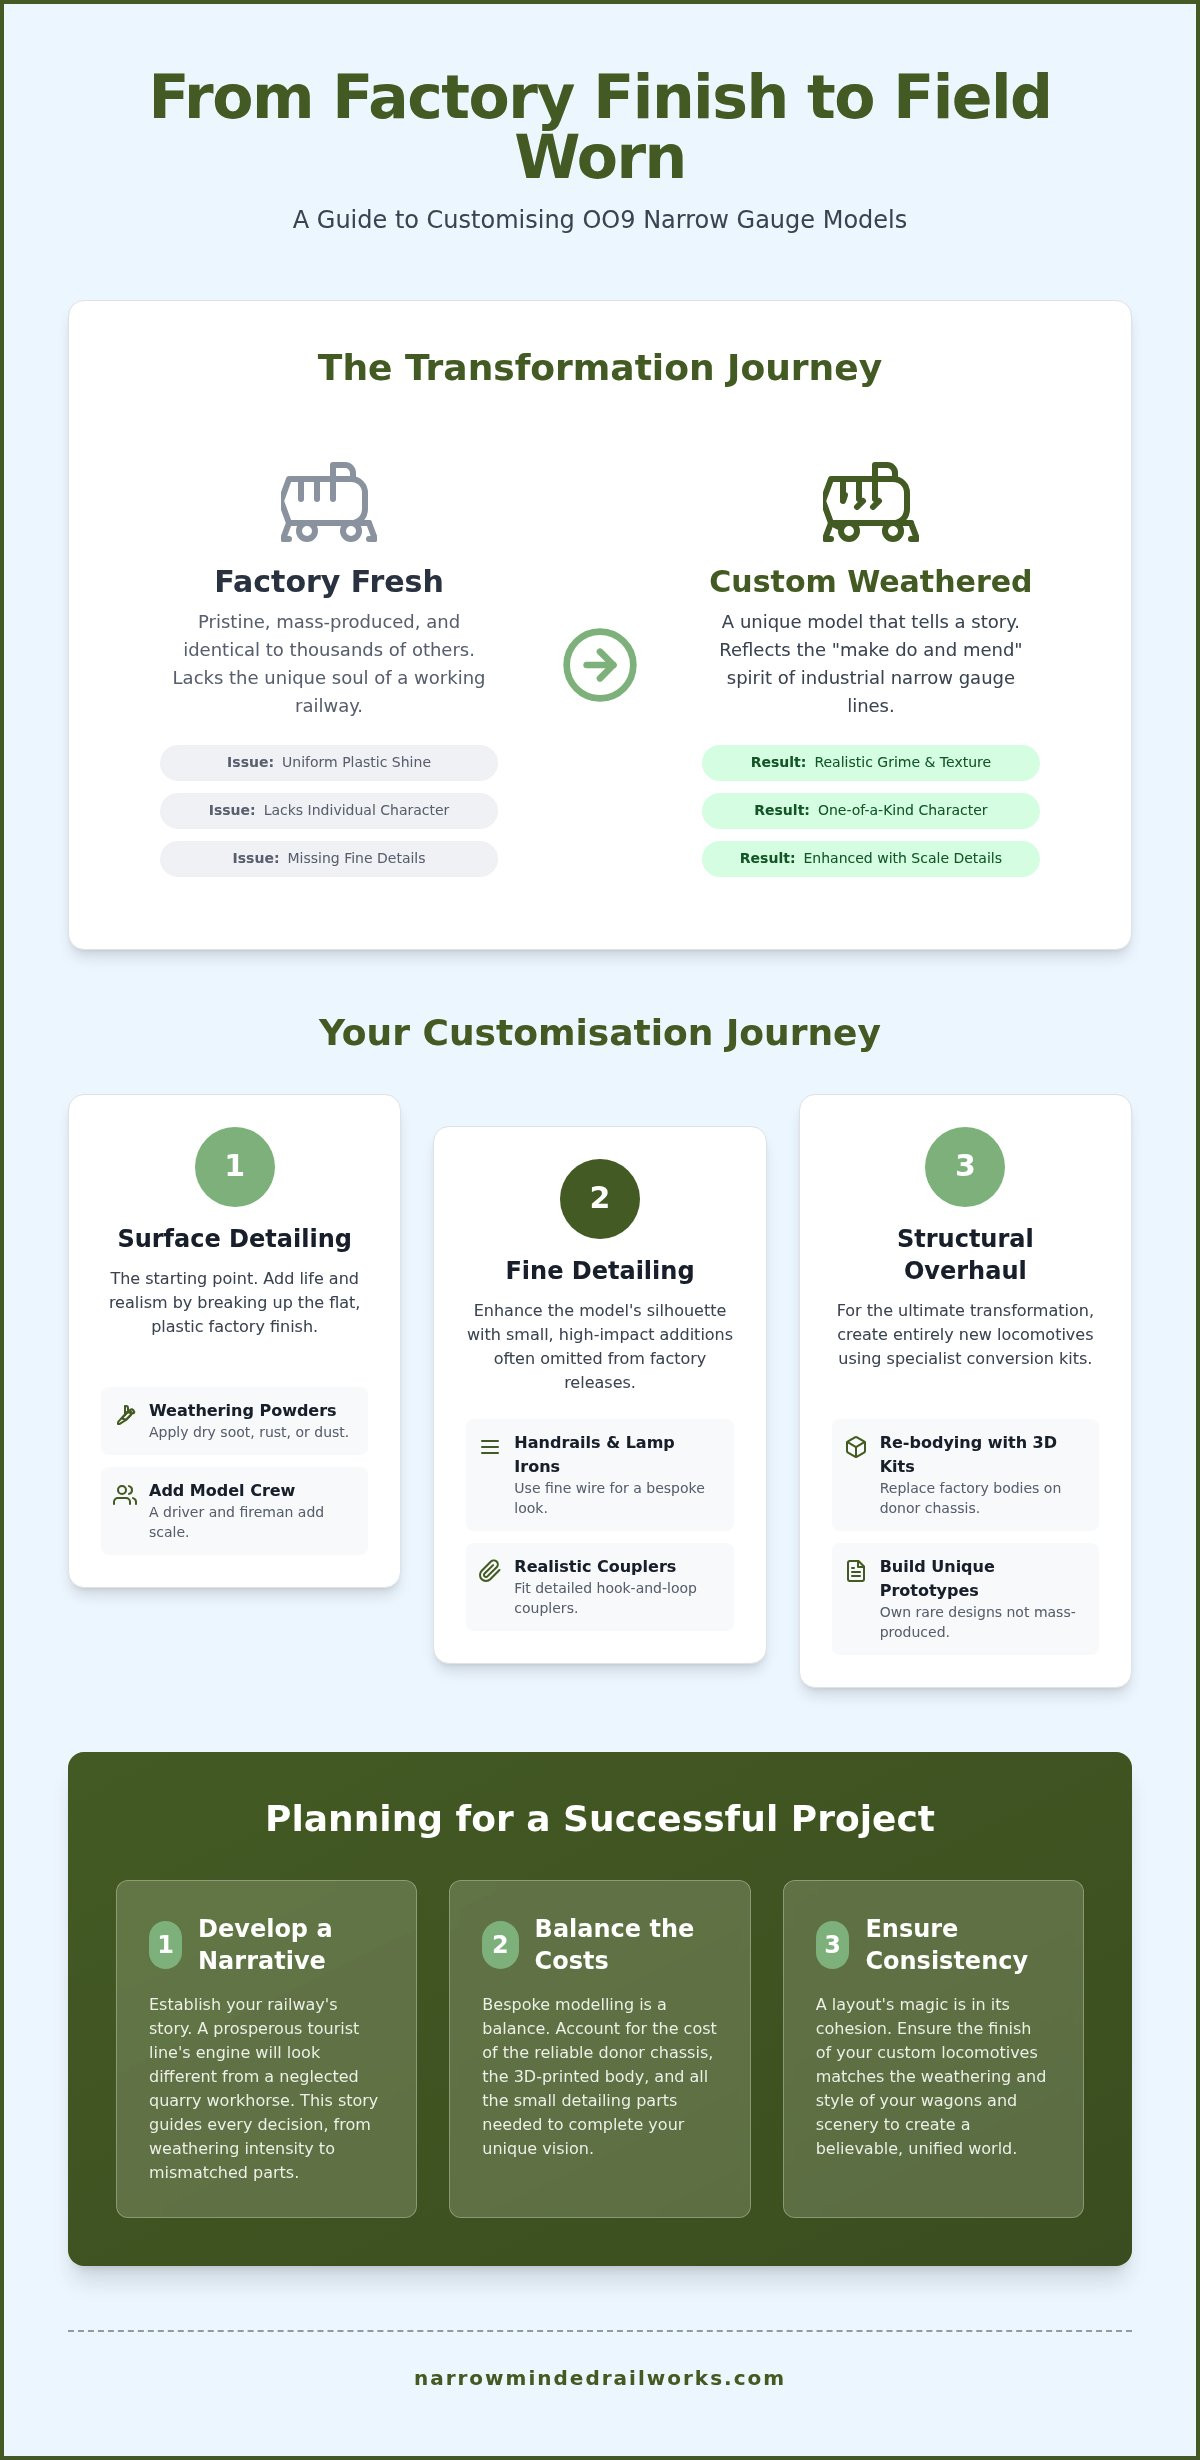
Modern ready-to-run (RTR) models from major manufacturers are technically impressive. They offer smooth running and fine detail straight out of the box. However, they are also identical to thousands of others on layouts across the country. While factory-finished models are technically excellent, they lack individual character; however, customising these pieces provides a proactive solution to build a fleet that tells a unique story. By engaging in customisation, you move beyond the limitations of factory finishes to create something that belongs exclusively to your line.
Developing Your Railways Visual Identity
Creating a cohesive look requires a clear narrative. Before you apply paint or glue, decide on the operational status of your fleet. A locomotive serving a prosperous seaside tourist line might be kept in a "well-maintained" state with occasional soot. Conversely, a quarry engine operating on a shoe-string budget might appear "neglected," showing signs of rust, mismatched replacement parts, and heavy grime. Establishing this story early helps you choose the right detailing parts and weathering intensities, ensuring every wagon and locomotive feels like it belongs to the same world.
The Scale of Customisation: From Details to Re-bodying
The scope of customising oo9 models ranges from minor surface adjustments to complete structural overhauls. Beginners might start with surface detailing, which includes adding real coal to bunkers or applying weathering powders to dull down plastic shine. For those seeking a deeper transformation, re-bodying is an effective solution. This involves removing the factory-made body from a donor chassis and replacing it with a specialized 3D-printed kit. This method allows you to own rare prototypes or unique industrial designs that mainstream manufacturers don't produce. It's a proactive way to build a bespoke fleet without needing to scratch-build every component from metal.
Surface Detailing: Weathering and Finishing Techniques
Surface detailing is the bridge between a plastic object and a miniature machine. While ready-to-run models are technically accurate, their uniform finishes often look artificial under layout lights. Customising oo9 models through weathering allows you to break up these flat surfaces and simulate the heavy-duty reality of narrow gauge operations. You don't need expensive equipment to start; a set of fine brushes, weathering powders, and acrylic washes are the fundamental tools for any modeller. These materials help you highlight panel lines and add the layers of grime that define a working railway.
Adding a "model crew" is perhaps the fastest way to inject life into a locomotive. A well-painted driver and fireman provide a sense of scale and purpose that an empty cab lacks. When you move to lettering, applying decals and transfers requires patience. To avoid "silvering," where air gets trapped under the film, always apply transfers to a gloss surface before sealing them with a matte finish. This ensures the markings look painted on rather than stuck on.
Simulating Working Conditions with Weathering Powders
Weathering powders are ideal for representing dry soot on locomotive roofs or lime dust on quarry wagons. Unlike liquid paint, powders are forgiving. If you apply too much, you can simply brush it away or blend it with a damp cloth. For inspiration on authentic working conditions, many modellers refer to the archives of the Narrow Gauge Railway Society, which document the gritty reality of historical industrial lines. Start with light applications of "soot" or "rust" powders, focusing on areas where moisture or heat would naturally accumulate.
Adding Scale Details: Couplers, Handrails, and Lamp Irons
Small additions like handrails, lamp irons, and realistic couplers transform the silhouette of a locomotive. While factory models often omit these for durability during shipping, adding them yourself creates a bespoke look. Using fine wire for handrails or fitting detailed hook-and-loop couplers makes the model feel more like a precision instrument. You can find many of these diorama tools and scenery items to help refine your models and add those final touches of realism.
The Importance of Finishing: Matte vs. Gloss Coatings
The final varnish determines the perceived "age" and maintenance level of your model. A matte coating is essential for industrial engines to hide the unnatural sheen of plastic and protect your weathering work. Conversely, a satin or gloss finish is better suited for well-maintained tourist stock or highlighting polished brass fittings. Always test your spray varnish on a scrap piece of plastic first to ensure it doesn't react with your paint or powders. This proactive step prevents the heartbreak of a clouded finish on a nearly completed project.
Structural Customisation: Re-bodying and Kitbashing
While surface detailing adds depth, structural modification allows for a complete transformation of a fleet. Customising oo9 models through re-bodying is a proactive solution for modellers who find standard ready-to-run releases too restrictive. This process involves taking a high-quality commercial mechanism and pairing it with a bespoke 3D-printed body. It allows you to model rare industrial prototypes that aren't available as finished products.
Choosing the right donor chassis is the most critical step. For industrial diesel outlines, the Kato 11-109 or 11-103 mechanisms are industry standards due to their reliability and compact size. Steam outlines often utilise the Bachmann Percy chassis. While Narrow Minded Railworks doesn't sell these chassis or motors, our locomotive kits are specifically designed to fit these popular units precisely. You'll need to remove the original plastic shell, which usually unclips easily, and check for any protrusions on the chassis that might interfere with the new resin body. Once the structure is sound, you can apply weathering and finishing techniques to blend the new body with your existing rolling stock.
Selecting the Right 3D-Printed Body Kit
Narrow Minded Railworks specialises in 3D-printed bodies for prototypes like the WG Bagnall or Hunslet quarry locos. These kits offer a higher level of detail than traditional resin casts and are designed for specific donor mechanisms. This targeted design reduces the technical barrier to entry, as you don't need to scratch-build complex mounting brackets or worry about motor clearances. It's a direct way to expand your roster with unique locomotive types.
Adapting N Gauge Chassis for OO9 Narrow Gauge
OO9 models run on 9mm track, making N gauge chassis the ideal donor. However, the scale difference means you must ensure the new body sits at the correct height. If the locomotive sits too high, it won't clear your layout's tunnels or bridges. If it sits too low, the wheels may foul the resin wheel arches. A few minutes spent testing the ride height with temporary spacers prevents mechanical issues later.
Securing the Body: Magnets, Pegs, and Friction Fits
You need a secure yet removable way to attach the body for motor maintenance. Friction fits are common, but small neodymium magnets provide a more professional solution. Glue a magnet to the chassis and a corresponding one inside the body kit. This approach allows for instant access to the mechanism without risking damage to the paintwork or delicate detailing parts. It ensures your model remains functional and easy to service throughout its working life.
Beyond the Locomotive: Customising Wagons and Scenery
Consistency is the foundation of a believable narrow gauge scene. If your locomotive is heavily weathered to represent years of service in a Welsh slate quarry, a pristine wagon coupled behind it will look out of place. Customising oo9 models effectively requires you to treat your entire fleet as a single, cohesive unit. While factory-painted rolling stock is readily available, it often lacks the specific industrial character needed for bespoke layouts; however, modifying these items or building from kits provides a proactive way to achieve visual harmony across your train movements.
The "Narrow Gauge Spirit" is often found in the details of the rolling stock. Industrial lines were notorious for mixing and matching parts, often repairing wagons with whatever timber or metal was available. By adding individual planks, mismatched paint patches, or even simulated damage to your wagon bodies, you create a narrative of a railway that is working hard to stay operational. These small, intentional imperfections are what separate a professional-looking layout from a standard collection of toys.
Weathering Rolling Stock for Heavy Industry
Wagons often experience harsher working conditions than locomotives. While a loco might be wiped down by a dedicated crew, a mineral wagon is subjected to constant abrasion from stone, coal, or timber. When customising oo9 models for heavy industry, focus your weathering on the interior of open wagons and the lower frames. Realism is enhanced by using removable loads. Using real crushed slate or coal allows you to change the operational state of your railway, with loaded trains heading toward the wharf and empties returning to the source.
Integrating Scenery Kits into Your Layout
A customised locomotive needs a world that matches its level of detail. Standard scenery items can sometimes feel generic; however, utilizing specialist kits for period-specific items provides a proactive solution to ground your model in a specific era. Items like period petrol pumps or unique trackside sheds act as anchors for the eye. These details help define whether your line is a rural agricultural branch or a heavy industrial artery, ensuring the environment supports the story your rolling stock is telling.
Creating a Sense of Place with Unique Figures
Scale figures are often the most overlooked element of customisation. Standard plastic figures can appear stiff and repetitive; however, using unique, scanned figures provides a proactive way to add life to your cabs and platforms. A driver leaning out of a cab or a group of workers waiting by a shed provides a sense of scale and purpose. These figures transform a static diorama into a living scene, making the mechanical details of your models feel more authentic. You can find these essential "raw materials" for your layout in our collection of OO9 locomotive and wagon kits.
When assembling 3D-printed wagon kits, tracking can sometimes be a challenge due to the lightweight nature of resin. While these kits offer superior detail, they lack the heft of metal or heavy plastic. You can solve this by adding small amounts of lead or steel shot into the underframe during assembly. This extra weight ensures that your wagons stay on the rails during complex shunting and provides a more realistic "thump" over rail joints, improving both the look and performance of your fleet.
Planning Your Custom OO9 Project
Successful customisation is the result of thorough preparation rather than trial and error. While the creative process is rewarding, it requires a structured approach to avoid common pitfalls like mechanical interference or budget overruns. Budgeting for customising oo9 models involves balancing the cost of the body kit with the price of a donor mechanism. If a premium chassis feels like a significant investment for a first attempt, starting with a 3D-printed wagon kit is a proactive solution that allows you to master resin assembly at a lower price point, typically between £20 and £25.
Before you commit to a complex locomotive build, we recommend completing a "dry run" assembly. This involves fitting the unpainted body to your chosen chassis to check for electrical pick-up clearance and coupler height. If you find the body sits too high or the wheels foul the resin, trimming the internal supports now is a proactive solution that prevents damage to a finished paint job. This final checklist ensures your model performs as well as it looks on the track.
Essential Toolkit for Narrow Gauge Customisers
Working with 3D-printed resin presents unique challenges compared to traditional injection-moulded plastic. Resin is brittle and will not react to standard poly cement; however, using high-quality cyanoacrylate (superglue) provides a proactive solution for a permanent bond. Your toolkit should include a set of fine-toothed saws for removing printing supports, high-grit sanding sticks for smoothing surfaces, and a pin vice with drills ranging from 0.3mm to 1mm for adding handrails or lamp irons. A well-ventilated workspace is essential when sanding to ensure safety.
Where to Find Inspiration: Real-World Narrow Gauge Prototypes
Finding a specific prototype to model can be difficult if you rely solely on memory. If you struggle to decide on a livery or weathering style, visiting preserved lines like the Ffestiniog or Talyllyn Railway is a proactive solution to see how narrow gauge machinery ages in the British climate. Photographic archives of industrial sites, such as slate quarries or gasworks, provide invaluable data on how grime accumulates on specific locomotive types. These real-world references help ground your bespoke project in historical reality.
Joining the Community: Sharing Your Custom Builds
The narrow gauge community is famously supportive of kit-builders and customisers. If you feel isolated in your modelling journey, joining the 009 Society or local regional groups is a proactive solution to gain feedback and technical advice. Sharing your progress on forums or social media allows you to learn from others who have tackled similar chassis conversions. This exchange of knowledge is often the quickest way to discover which detailing parts or paint brands work best for the specific look you want to achieve.
Building Your Bespoke Narrow Gauge Future
Customising oo9 models is more than a technical hobby; it's a way to reclaim the gritty, resourceful spirit of industrial history. By moving beyond factory-standard finishes, you can create a fleet that feels authentic to your specific railway narrative. Applying surface detailing adds necessary depth, while structural re-bodying completely transforms a locomotive's silhouette. While mass-produced models offer a reliable mechanical starting point, they often lack the unique character required for an immersive layout; however, bespoke customisation provides a proactive solution to build a truly one-of-a-kind collection.
Just as a well-crafted model brings a sense of accomplishment, other curated experiences can offer a similar spark of inspiration; for those who enjoy the excitement of discovery, visit AmsCustoms to explore playful bundles designed to bring joy to any creative journey.
If you find standard ready-to-run options too limiting for your vision, our specialist kits provide a proactive solution. You don't need to be a master engineer to achieve professional results; you simply need the right "raw materials" to begin. To start your next project, explore our range of 3D-printed OO9 locomotive and wagon kits. Our specialist narrow gauge designs are specifically engineered for popular commercial chassis and are available with worldwide shipping from our UK base. Taking that first step toward a bespoke collection is a rewarding challenge. We look forward to seeing how you bring your unique narrow gauge world to life.
Frequently Asked Questions
What is the best chassis to use for custom OO9 locomotive bodies?
The Kato 11-103 and 11-109 are the most reliable donor mechanisms for industrial diesel prototypes, while the Bachmann Percy chassis is a standard choice for steam outlines. While we don't supply these mechanisms, our 3D-printed bodies are specifically engineered to fit these popular units. Using a proven N gauge chassis provides a proactive solution for modellers who want high-quality running without the complexity of scratch-building a motor.
Do I need special paint for 3D-printed model railway kits?
You don't need specialist paints for resin kits, but you must use a high-quality primer designed for plastics. Standard model acrylics or enamels work effectively once the surface is prepared. Resin can be non-porous; however, washing the kit in warm soapy water to remove printing residues provides a proactive solution to ensure your base coat adheres perfectly. This preparation prevents paint from peeling during the detailing stage.
How do I remove the body from a Bachmann OO9 locomotive safely?
Most Bachmann OO9 locomotives utilize a friction-fit or clip system to secure the body to the chassis. You should gently spread the sides of the body shell to release the plastic lugs from the metal frame. If the body feels resistant, check for a single screw hidden under the cab or behind the buffer beam. Taking a slow, methodical approach provides a proactive solution to avoid snapping delicate plastic detail parts during disassembly.
Can I use N gauge wagons on my OO9 narrow gauge layout?
N gauge wagons will run on OO9 track because both use a 9mm gauge; however, the scale difference makes them look out of place. N gauge is 1:148 scale, whereas OO9 is 4mm scale (1:76). This means standard N gauge stock will appear significantly smaller than your narrow gauge locomotives. Investing in dedicated 4mm scale wagon kits provides a proactive solution to maintain a consistent visual identity across your layout.
What is the difference between weathering and painting a model?
Painting involves applying the primary livery and base colours to a model, while weathering is the process of simulating environmental wear and tear. When customising oo9 models, painting creates the "ex-works" look, but weathering adds the soot, rust, and grime that ground the model in reality. Using powders and washes provides a proactive solution to break up flat plastic colours and highlight the fine details of a 3D-printed body.
How do I add weight to a 3D-printed wagon kit for better performance?
You can add weight by securing lead shot or "liquid gravity" into the hollow spaces of the wagon's underframe or floor. Because 3D-printed resin is lightweight, these models can struggle with tracking during complex shunting. Gluing small metal weights into the chassis provides a proactive solution to improve stability without compromising the external detail. Aim for a consistent weight across your fleet to ensure smooth operation on gradients.
Is it possible to custom-build OO9 models without a 3D printer?
You don't need to own a 3D printer to create bespoke models; instead, you can purchase pre-printed resin bodies and wagon kits. This approach allows you to focus on the creative aspects of assembly and painting without the technical burden of CAD design or machine maintenance. Buying specialist kits provides a proactive solution for modellers who want unique prototypes but lack the space or desire for 3D printing equipment.
How do I fix a 3D-printed body to a chassis if there are no screws?
Neodymium magnets or simple friction fits are the most effective alternatives to screws for securing a body to a chassis. If your kit doesn't have screw holes, gluing small magnets into the corners of the chassis and the interior of the body provides a proactive solution for a secure hold. This method allows for instant removal for maintenance while ensuring the locomotive remains stable during operation when customising oo9 models.