

Did you know that first-time purchasers of narrow gauge model railway kits have increased by 19% since the start of 2026? This surge reflects a growing desire for unique layouts, though many modellers still find the prospect of custom On30 locomotive kits somewhat intimidating. It's common to worry about chassis compatibility or the difficulty of painting 3D-printed resin. While these technical challenges are significant, they are easily managed with the right approach and a few specialised tools.
This guide helps you transform standard chassis into unique narrow gauge masterpieces by providing a clear, step-by-step assembly framework. You'll gain a thorough understanding of how to select bodies for O-16.5 or On30 scales and how to achieve a professional finish on every model. We will cover the essential equipment for your workbench and the painting methods that ensure your custom builds look like high-end, professional commissions.
Key Takeaways
- Learn how custom On30 locomotive kits bridge the gap between O scale detail and HO scale track accessibility by utilizing high-quality 3D printed bodies.
- Understand the technical differences between US On30 and UK O-16.5 scales to ensure your chosen body kit fits perfectly onto a commercial donor chassis.
- Master the specific techniques required for cleaning and bonding 3D printed resin parts to achieve a professional, durable finish.
- Discover how to use diorama tools and aftermarket accessories to add unique character and realistic textures to your narrow gauge models.
- Explore the advantages of using 3D printed designs that are engineered specifically for easy assembly and global shipping.
What are Custom On30 Locomotive Kits?
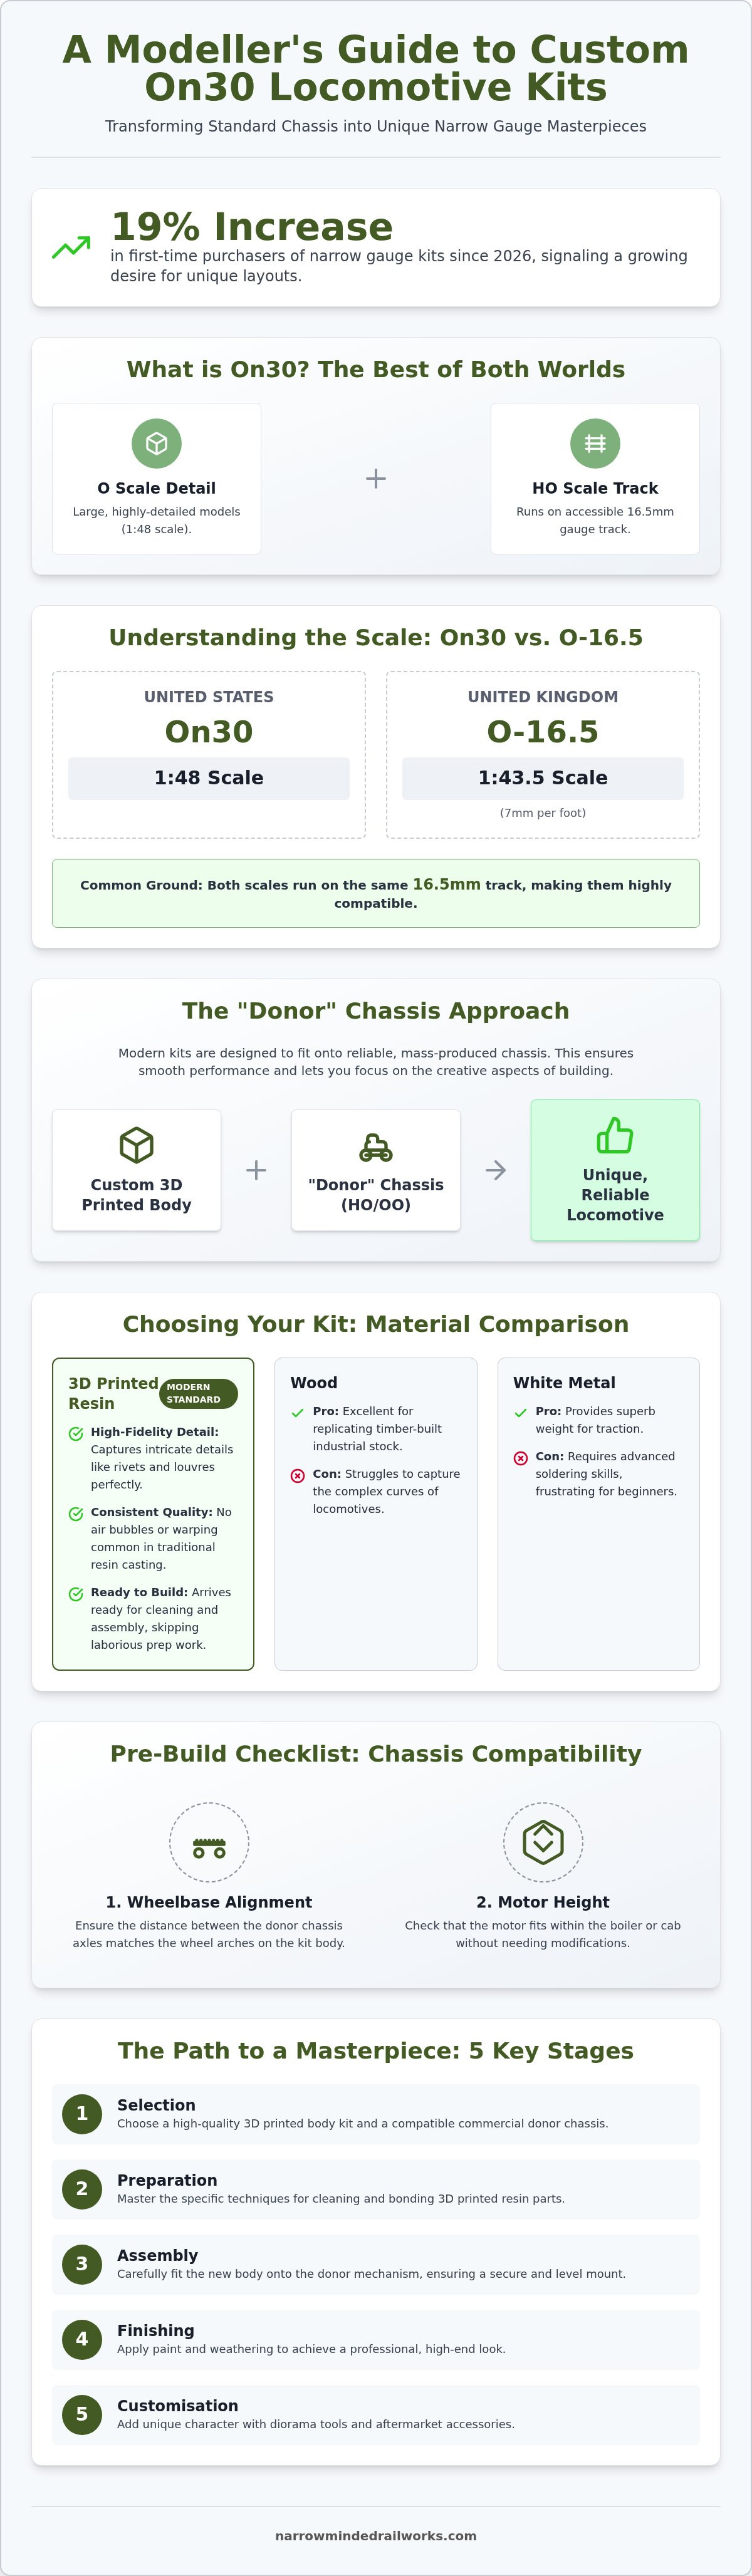
On30 modelling offers a unique blend of large scale detail and small scale track requirements. At its core, the On30 gauge involves O scale models (1:48 in the US or 1:43.5 in the UK) running on 16.5mm track. This track is the same gauge used for HO and OO scale, making it incredibly accessible for those with limited space. By 2026, this niche has grown significantly as modellers look for ways to distinguish their layouts from standard, mass-produced offerings.
The primary appeal of custom On30 locomotive kits lies in the ability to create prototypes that major manufacturers simply ignore. While ready-to-run models focus on the most popular steam engines, custom kits allow you to build niche Hungarian forestry diesels or specific industrial shunters. It's important to distinguish between "all-in" kits and body kits. Many modern builders prefer body kits because they offer a faster route to a unique model. 3D printing has now become the standard for these builds, allowing for intricate details like rivet heads and louvres to be printed directly into the shell.
To better understand how a modified model looks in action, watch this detailed walkthrough:
The On30 vs. O-16.5 Distinction
Although the track gauge remains 16.5mm, modellers should understand the scale differences. US On30 typically uses 1:48 scale, while the British equivalent, O-16.5, uses 7mm per foot (1:43.5). While many custom On30 locomotive kits are designed to look correct in both contexts, checking the specific scale ensures your crew figures and scenery remain proportional. Selecting the right scale is the first step toward a cohesive and professional-looking layout.
The Role of the "Donor" Chassis
Most modern kits are designed with a specific mechanism in mind. This is known as the "donor" chassis approach. While sourcing a separate motor might feel like an extra step, it ensures your locomotive runs smoothly from day one. Kits are precisely measured to clip or screw onto mass-produced chassis, such as the Smokey Joe or various Kato units. This method prioritizes reliable performance and allows the modeller to focus on the creative aspects of painting and detailing rather than mechanical troubleshooting. It is a proactive solution that provides a reliable running engine without the frustration of complex mechanical assembly.
Choosing the Right Kit: Materials and Compatibility
Selecting the right starting point for your project is vital. While the variety of custom On30 locomotive kits on the market is exciting, it can also be overwhelming for the uninitiated. You must balance your desired aesthetic with your technical comfort zone. Engaging in this level of precision work provides documented mental health benefits by allowing the builder to enter a state of focused flow, which reduces daily stress and improves cognitive focus.
Material Comparison: Resin vs. 3D Print vs. Wood
Traditional kit materials each come with specific constraints. Wood kits are excellent for replicating timber-built industrial stock, but they often struggle to capture the complex, fluid curves of a steam locomotive boiler or a rounded diesel cab. White metal kits provide superb weight for traction, yet they require advanced soldering skills that can frustrate beginners. To resolve these issues, 3D printed resin has become the modern standard. These kits offer the high-fidelity detail of cast resin without the risk of air bubbles or warping. They arrive ready for cleaning and assembly, allowing you to bypass the labor-intensive filing required by older manufacturing methods.
Matching Bodies to Commercial Chassis
A common hurdle in narrow gauge modelling is the perceived need for expensive, bespoke motors and gearboxes. A proactive solution is to select a kit specifically engineered to fit a "donor" chassis from a mass-produced HO or OO scale locomotive. When choosing your kit, pay close attention to the following technical requirements:
- Wheelbase Alignment: Ensure the distance between the axles on the donor chassis matches the wheel arches or splashers on the kit body.
- Motor Height: Check that the vertical clearance inside the boiler or cab is sufficient to house the donor motor without modifications.
- Scale Ratio: Decide if you are building to US On30 (1:48) or UK O-16.5 (1:43.5). While both run on 16.5mm track, the slight size difference affects how the model sits on the chassis.
If you are looking for a reliable entry point, exploring O-16.5 / 7mm scale kits designed for common chassis like the Smokey Joe is a practical way to ensure a successful first build. By starting with a body designed for a proven mechanism, you eliminate the mechanical troubleshooting that often stalls custom projects. This approach lets you focus your energy on the creative aspects of the hobby, such as painting and weathering, resulting in a high-quality locomotive that runs as well as it looks.
The Build Process: Assembling and Finishing 3D Printed Kits
Building custom On30 locomotive kits has evolved significantly with the rise of 3D printing. While traditional kits often required hours of filing white metal or soldering brass, modern resin bodies offer a more streamlined experience. The assembly process does require specific techniques to ensure the final model is both durable and visually striking. You cannot use standard plastic solvent on 3D printed resin as it won't create a bond. A proactive solution is to stock your workbench with high-quality Cyanoacrylate (CA) for small detail parts and a two-part epoxy for larger structural bonds, such as attaching the cab to the footplate.
As you assemble the footplate and prepare to mate it with the chassis, it's vital to ensure your work aligns with the NMRA Standards and Recommended Practices. This ensures your custom locomotive remains compatible with standard track and clearances on any layout. The workflow should always move from the foundation upwards. Secure the footplate first, then add the boiler or main body shell, and finish with the cab and smaller details like whistles, handrails, or lamps.
Support Removal and Surface Preparation
3D printed kits often feature small support structures that look like tiny plastic pillars. You might feel hesitant to remove these for fear of damaging the delicate resin. Instead of pulling them, use a pair of sharp side cutters to snip them at the base. Once you've removed the supports, use 400 to 600-grit wet-and-dry sandpaper to smooth the attachment points. This step is essential for removing the subtle "layer lines" that are a byproduct of the 3D printing process. Working slowly prevents over-sanding and preserves the crisp detail of the print.
Priming for Success: The Secret to a Smooth Finish
A common frustration for modellers is discovering print lines only after the final coat of paint is applied. This often happens because resin can look perfectly smooth to the naked eye when unpainted. To resolve this, apply a thin layer of high-build automotive primer. This specific type of primer fills minor imperfections while providing a "tooth" for your topcoat to grip. Inspect the model under a bright light after the primer has dried. If any lines are still visible, a light sanding followed by a second thin primer coat will create the professional finish you desire. This structured approach ensures your custom On30 locomotive kits transition from raw prints to high-quality models ready for the layout.
Customising and Detailing Your On30 Locomotive
The true appeal of custom On30 locomotive kits lies in the opportunity to create a model that feels lived-in and functional. While the 3D-printed body provides a mathematically perfect foundation, it's the subsequent detailing that adds historical context. You might find that a standard resin shell looks too uniform for a rugged industrial setting. A proactive solution is to integrate aftermarket parts such as brass whistles, wire handrails, and lamps to break up the silhouette and introduce varied material textures. These small additions transform a generic kit into a specific prototype that reflects your layout's unique story.
Painting techniques are equally vital for achieving a professional result. Airbrushing remains the superior choice for applying a smooth, uniform base coat, particularly on large surfaces like boilers or water tanks. However, narrow gauge locomotives often benefit from a more artisanal touch. Using a fine brush for cab controls, window frames, or copper piping adds a layer of depth that replicates the character of real-world equipment. This combination of precision airbrushing and careful hand-painting ensures your model looks both high-quality and authentically narrow gauge.
Detailing with Figures and Scenery Parts
A locomotive without a crew can often look like a toy rather than a piece of machinery. Modellers sometimes struggle to find figures that match the specific scale of their build. A proactive solution is to utilise 3D-scanned figure sets, such as a Loco crew Multi-Pack, which provides assorted poses designed to fit naturally within a cab environment. Additionally, adding wagon loads or internal cab detailing helps ground the model in reality. These small elements provide a sense of scale and purpose, making the locomotive appear as though it's actively working on a Hungarian forestry line or a Welsh slate quarry.
Weathering for Realism: Rust, Soot, and Grime
Narrow gauge engines were rarely pristine. They were hardworking industrial beasts that operated in harsh environments. Achieving this "work-worn" look requires a layered approach to weathering. Modellers often worry about over-applying paint and ruining their hard work. A proactive solution is to use specialised diorama tools to apply weathering powders and washes in thin, controlled layers. Focus on areas where grime naturally accumulates, such as:
- Soot and Ash: Apply matte black powders around the chimney and smokebox door.
- Oil and Grease: Use gloss washes around the axle boxes and motion gear to simulate lubrication.
- Rust and Corrosion: Add subtle orange and brown tones to the lower footplate and water tanks where moisture would gather.
To find the right equipment for these finishing touches, you can browse our range of diorama tools and scenery. By taking the time to detail and weather your build, you ensure that your custom On30 locomotive kits stand out as unique, high-quality masterpieces on any layout.
Why Narrow Minded Railworks is Your Partner in Custom Building
Narrow Minded Railworks bridges the gap between complex engineering and creative modelling. Many builders struggle with the mechanical precision required for narrow gauge projects. We resolve this by specialising in O-16.5 / 7mm scale kits that are specifically designed to interface with reliable, mass-produced chassis. This approach allows you to focus on the artistic elements of your layout while ensuring your custom On30 locomotive kits possess the mechanical integrity required for consistent operation.
Our Focus on Quality 3D Printed Designs
Our commitment to 3D printing ensures a level of detail and consistency that traditional casting often lacks. Each kit, such as our Billard T75d or Hungarian Forestry Diesel bodies, is printed to order to maintain high quality control. We understand that starting a new project involves a degree of uncertainty. To support our customers, we offer a 30-day return policy on unused items, ensuring you feel confident in the quality and compatibility of the parts you receive for your build.
Beyond the Loco: Complete Layout Support
A realistic locomotive requires a detailed environment to truly shine. We provide more than just locomotive bodies; our range includes essential diorama tools and scenery accessories designed to the same high standards. You can enhance your models with our 3D-scanned loco crew multi-packs or specific wagon loads for a more immersive scene. This integrated approach ensures that every element of your layout, from the rolling stock to the trackside details, maintains a professional and cohesive appearance.
Ordering is a transparent and efficient process through our official website. Since we offer international shipping to over 40 countries, modellers across the globe can access our growing range of custom On30 locomotive kits. Each order is handled with a modeller-first perspective, meaning we prioritise clarity in our instructions and set realistic expectations for assembly. By choosing Narrow Minded Railworks, you gain a partner dedicated to helping you achieve a high-quality, unique narrow gauge railway.
Mastering Your Next Narrow Gauge Build
Narrow Minded Railworks provides highly detailed 3D printed bodies designed by modellers for modellers. We offer worldwide shipping to over 40 countries, ensuring you have access to quality kits regardless of your location. You can explore our range of 3D printed locomotive and wagon kits to find the perfect starting point for your next project. Taking that first step into custom building is a rewarding journey that elevates your skills and your layout's realism. We look forward to seeing the unique locomotives you bring to life on your tracks.
Frequently Asked Questions
Do On30 kits come with a motor and wheels?
Most custom On30 locomotive kits do not include a motor or wheels. These are typically sold as body kits designed to fit onto a donor chassis. While this requires you to source the mechanism separately, it allows you to choose a motor that fits your specific performance needs and budget without being locked into a single manufacturer's drive system.
What is the best chassis for an On30 locomotive kit?
The best chassis depends entirely on the specific kit you are building. Many O-16.5 / 7mm scale kits are engineered to fit popular, reliable mechanisms like the Hornby Smokey Joe or various Kato power units. You should always check the kit manufacturer's recommendations for wheelbase and motor height to ensure a precise fit without needing complex modifications.
How do I remove 3D printing lines from my model?
3D printing lines can be frustrating, but they are easy to manage with the right tools. You should start by sanding the resin with 400 or 600-grit paper. A proactive solution is to apply a high-build automotive primer, which fills the microscopic ridges and reveals any areas that need further smoothing before you apply the final paint layers.
What is the difference between On30 and O-16.5?
The difference lies in the scale ratio while the track gauge remains the same at 16.5mm. On30 is the American designation for O scale (1:48) models running on 30-inch gauge track. O-16.5 is the British equivalent, using 7mm per foot (1:43.5) scale. While custom On30 locomotive kits are often compatible with both, you should consider the scale of your crew figures to maintain a consistent look.
Can I use DCC and sound in a custom On30 kit?
You can definitely use DCC and sound in your custom builds provided there is sufficient physical space within the locomotive body. While the kits themselves are static shells, the donor chassis you select will determine the electrical capabilities. Many modellers find that the hollow boilers and large cabs of O scale models provide ample room for decoders and small speakers.
What glue should I use for 3D printed model kits?
You cannot use standard plastic solvents on these models because they don't melt resin. A proactive solution is to use Cyanoacrylate (CA) for small detail parts and two-part epoxy for structural joints. This ensures a permanent bond that won't fail under the weight of the locomotive or during handling, whereas traditional model glue would simply fail to stick.
Is On30 the same as O scale?
On30 is a specific subset of O scale that focuses on narrow gauge prototypes. It uses the same 1:48 scale as standard O scale, but the "30" indicates that the locomotive runs on 30-inch gauge track. This allows you to model larger, more detailed custom On30 locomotive kits while using the same track width as HO scale layouts, making it a space-efficient choice.
Do I need a special track for On30 locomotives?
You don't need special track to run these models because they are designed for 16.5mm gauge. While standard HO track is functional, it often looks out of place because the sleeper spacing is too tight for O scale. A proactive solution is to use dedicated narrow gauge track with wider sleeper spacing to achieve a more authentic industrial appearance on your layout.