

The most discreet coupling isn’t automatically the best choice for your OO9 fleet. Choosing automatic couplings for oo9 is about more than appearance: the system needs to connect reliably across the locomotives and wagons you plan to run together.
Comparing the options can be difficult. Hook-and-loop, magnetic and other coupling approaches each have trade-offs, and there’s no single standard across all OO9 stock. Even models with NEM pockets need checking, while kit-built wagons may have different mounting arrangements.
This guide compares common coupling approaches and explains what to check for compatibility, mounting and dependable uncoupling. Your curves, layout and operating style all influence the choice, as does coupling height. If you’re building an OO9 fleet from kits, planning the coupling arrangement early can help you avoid fitting problems later. Start with the stock you already own, then choose a practical system for the way you want to run it.
Key Takeaways
- Compare hook-and-loop and magnetic options by how they couple, uncouple and look on your models.
- Before choosing automatic couplings for oo9, check each vehicle’s pocket or mounting arrangement rather than assuming the fleet uses one standard.
- Use a test vehicle to assess coupling height, clearance and operation before converting more stock.
- Check manufacturer instructions and dimensions before ordering or modifying couplings, especially for kit-built vehicles.
- Plan coupling choices alongside your OO9 locomotive and wagon kits, then confirm fit for each individual model.
What Do Automatic Couplings Need to Do on an OO9 Layout?
An automatic coupling joins vehicles when compatible couplings meet and, in some systems, lets you separate them without handling each vehicle directly. Connecting and uncoupling are separate functions. A system may connect wagons automatically but still require a hand tool or careful access to release them.
OO9 combines 4mm-to-the-foot modelling with 9mm gauge track, as described in this overview of the OO9 scale. That defines scale and track gauge, not a universal coupling standard. Modellers therefore need to weigh reliable running, appearance and fleet compatibility, especially when combining stock from different makers or kit-built vehicles.
A short demonstration can help show how magnetic uncoupling works in practice:
What makes an OO9 coupling automatic?
With compatible designs, bringing a locomotive and wagon together can engage their coupling parts, joining the wagon to the train without connecting each end by hand. During a shunting move, for example, you might push a wagon into a siding and release it with a magnet, tool or another method supported by the system. Hands-free release is not a feature of every automatic coupling, so check how it uncouples before choosing.
When considering automatic couplings for oo9, start with the jobs you want the system to do. A coupling that connects reliably may be enough for straightforward running. Frequent shunting calls for a practical way to uncouple vehicles at chosen spots. The mechanism must also suit your layout and remain accessible for adjustment or maintenance.
Why can OO9 coupling compatibility vary?
OO9 locomotives and wagons can differ in coupling type, mounting position and the space around the buffer beam or chassis. A locomotive’s coupling may sit at a different height from a wagon’s, or its mount may not accept the same fitting. Getting two vehicles to work together may therefore require an adaptor or a change to the mounting, depending on the model’s construction and instructions.
Check both ends of the vehicle pairing rather than assuming a coupling will fit because the models share a gauge. For kit-built stock, plan the mounting around the actual model and its available clearance. This can help you avoid choosing a system that looks suitable but proves difficult to fit or operate consistently.
How Common OO9 Coupling Systems Work in Practice
Couplings can look similar but behave differently during a shunting move. Some hook-and-loop designs engage when vehicles are brought together, but need a hand or uncoupling tool to separate. Magnetic systems can allow release over a trackside magnet, provided the coupling is designed for that method and positioned to interact with it. Automatic engagement and hands-free uncoupling are separate features, not something every design provides.
For example, Greenwich couplings are described as having magnetic uncoupling, while other hook-and-loop arrangements may need manual intervention. Check the instructions for the specific coupling before relying on a particular operating method. The NMRA model railway standards offer a wider example of how common technical standards can support interoperability, but they are not a universal OO9 coupling specification.
Manual, magnetic, and automatic operation
Manual uncoupling means reaching the vehicles with your fingers or a tool to release the mechanism. A trackside magnet can reduce hands-on uncoupling, but only if the coupling responds to it and the magnet is correctly placed. Automatic engagement describes how vehicles connect when brought together. Check what each system requires for both actions rather than assuming one feature guarantees the other.
Mounting and alignment affect performance
Even compatible coupling designs can fail to meet cleanly if they sit at different heights or approach at an angle. The 009 Society’s recommended coupling centre-line height is given as 5.5mm to 7.5mm above rail level, although sources vary on the precise target within that range. Use it as a reference when checking your chosen system, not as a substitute for its fitting instructions.
Compatibility depends on both the coupling design and its installation on each model. Type, height, reach, alignment and clearance all affect whether vehicles connect and release reliably. A coupling that projects too far may look intrusive or foul nearby parts; one with too little reach may not meet its partner. Check clearances around buffers, the body, bogies and chassis, particularly on curves and over points.
Mounting position matters as well. A bogie-mounted coupling turns with the bogie, while a body- or chassis-mounted one stays aligned with the vehicle body. Either arrangement may suit a particular model, but tight curves and limited space can affect the choice. Before drilling, cutting or gluing a mount, consult the manufacturer’s or kit instructions and test the proposed position on the actual vehicle.
These checks are useful when planning a kit-built OO9 fleet. Narrow Minded Railworks’ OO9 locomotive and wagon kits are designed around commercially available chassis, so consider the completed model’s mounting space and coupling arrangement as part of the build plan. Confirm fit for each individual model.
Comparing OO9 Automatic Couplings: Which Trade-Offs Matter?
There isn’t one best option for every OO9 layout. Compare how each coupling behaves with your stock, how visible it is from your usual viewing angles, and whether its fitting and uncoupling methods suit your operating plan. The examples below illustrate trade-offs, not guaranteed compatibility across brands or models.
| Coupling type and example | Operation | Appearance | Fitting | Limitations |
|---|---|---|---|---|
| Hook-and-loop, such as Bachmann’s narrow-gauge wagon coupling | Hooks or loops connect; uncoupling may need hand or tool access. | The coupling can be noticeable, depending on viewing angle and vehicle design. | Check the model’s existing mount and coupling height. | Different makers’ versions may not engage consistently; confirm before mixing. |
| Hook-and-eye, such as Peco GR-105 close couplers | The eye engages with the hook; don’t assume it uncouples magnetically. | Close coupling may reduce visible gaps, but the mechanism remains visible. | Designed for NEM pockets on Peco OO9 rolling stock. | That stated fit doesn’t establish compatibility with other models or pockets. |
| Magnetic, such as Greenwich couplings | Offers magnetic uncoupling; check the system’s instructions for the required trackside arrangement. | Often chosen for a discreet appearance, though the actual result depends on installation. | Available for NEM 355 pockets; verify the vehicle’s socket. | Depends on correct setup and access to the uncoupling point. |
| Magnetic, such as Hunt Couplings Elite | Magnetic coupling; the dual-polarity design removes concern about magnet orientation. | A compact option, but assess visibility on your particular stock. | Specified for NEM 355 sockets. | Confirm socket fit and how uncoupling is intended to work before fitting. |
Appearance versus dependable operation
A discreet coupling may suit a close-up model, but appearance alone won’t show how readily it connects or releases. Compare options from the height and angles at which you normally view the layout, then try them during routine moves. Before converting a fleet, test a representative locomotive and wagons, including vehicles with different mounts or body shapes.
Uncoupling method and layout design
Manual uncoupling can be practical in an open siding where you can reach the stock. A trackside magnetic system may provide a repeatable release point, but a platform track, concealed siding or hard-to-reach section can make installation and adjustment more demanding. Check each system’s magnet or tool requirements before choosing.
When choosing automatic couplings for oo9, consider shunting frequency, access and the mix of vehicles together. A layout with occasional wagon changes may benefit from straightforward fitting, while regular shunting may make a dedicated uncoupling method worth testing. No option is best without considering the stock and layout it needs to work with.
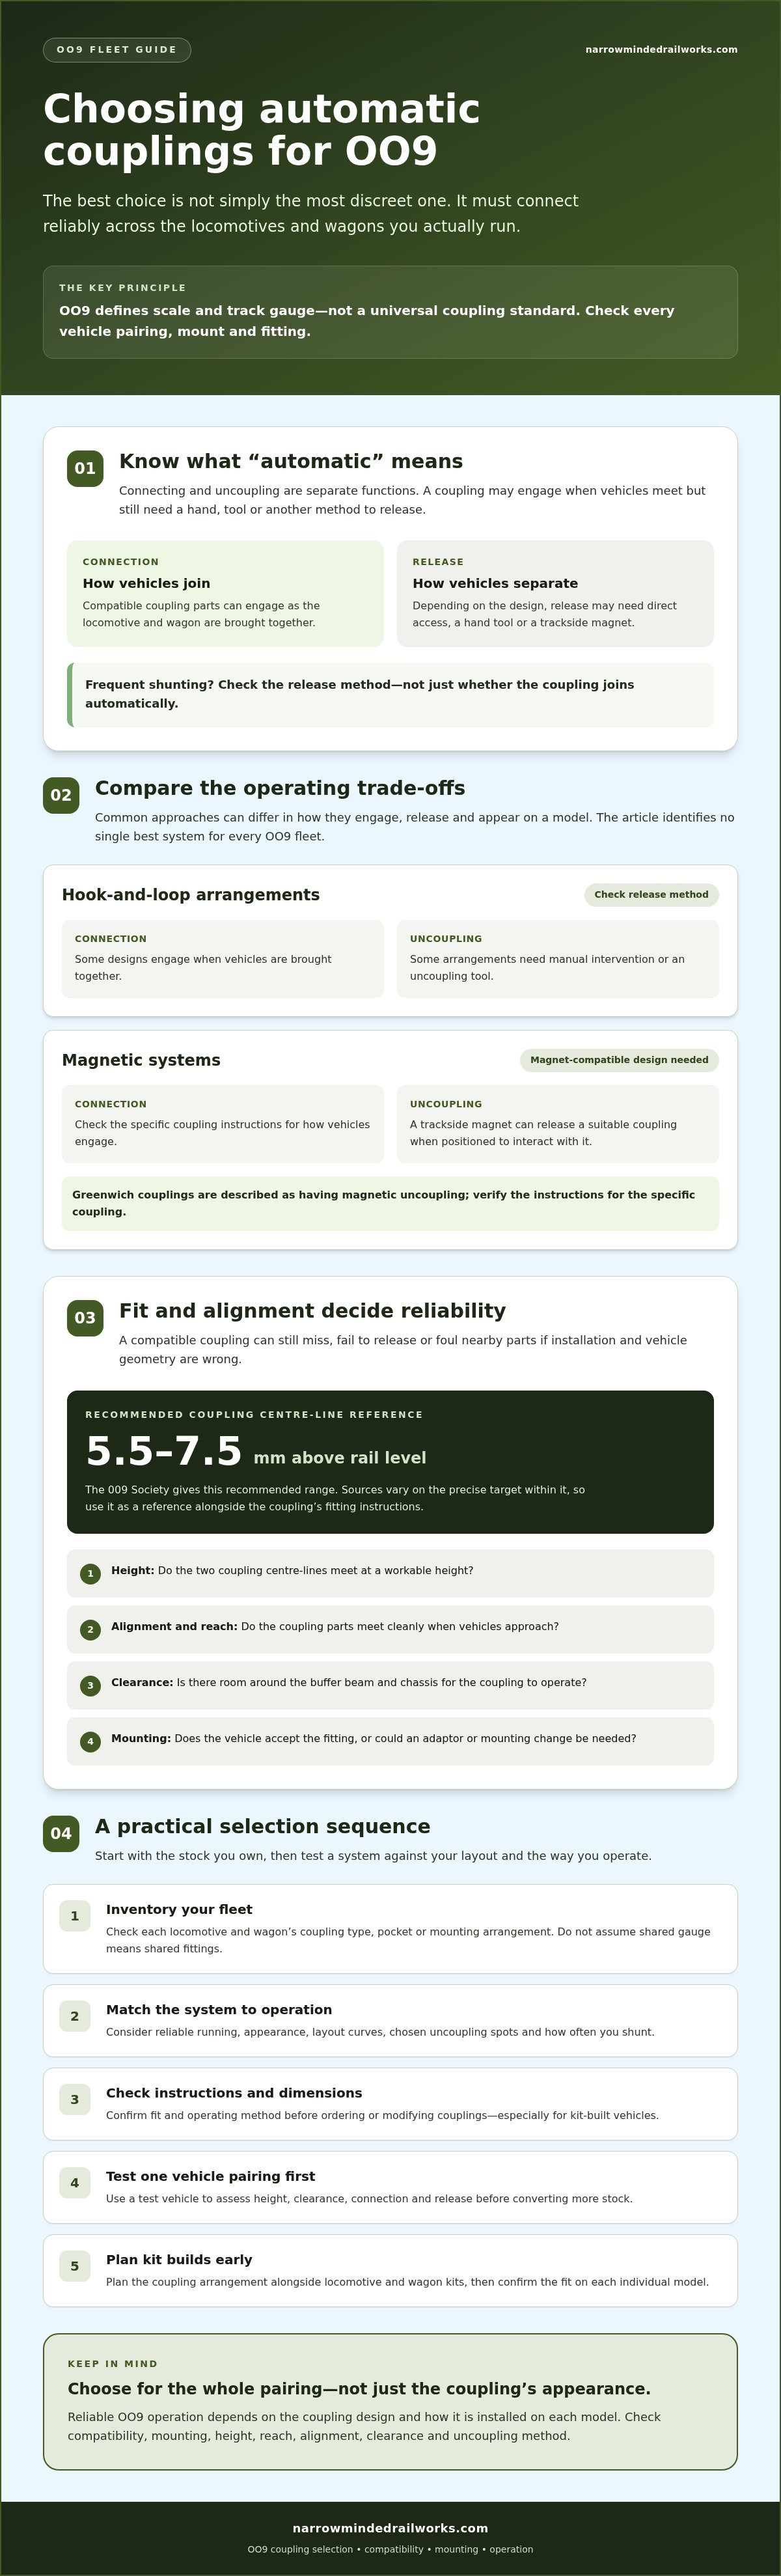
How to Choose and Test Couplings for Your OO9 Fleet
Start with the vehicles you actually run, not a coupling’s label or appearance. This process helps narrow the options, identify fitting constraints and trial the setup before changing more of the fleet.
- Inventory the fleet. Note each locomotive and wagon’s current coupling, mounting point, operating role and any visible clearance issues. Identify the vehicles that need to work together most often.
- Inspect the mounts. Check the coupling height, available space and whether the fitting is attached to the body, bogie or chassis. For kit-built models, consult the instructions and examine the actual chassis arrangement before settling on a mounting plan.
- Choose your priorities. Decide whether you value convenient uncoupling, a less prominent appearance, consistency across mixed stock or straightforward installation most. Confirm that the candidate system can be fitted to the locomotives and wagons you plan to run together.
- Fit one test vehicle. Choose a representative wagon or locomotive rather than starting with the whole fleet. Follow the coupling and model instructions, and confirm dimensions before ordering parts or modifying a mount.
- Trial before standardising. Couple the test vehicle to several intended partners and assess the setup under realistic operating conditions.
Test the setup on the layout
Run the test pairing through curves and points, push it in reverse and try slow-speed shunting. Check coupling and uncoupling, including at the places where you plan to separate vehicles. Watch for missed engagements, unwanted releases or restricted bogie movement. If performance varies, first inspect coupling height and horizontal alignment, then check for interference from buffers, the body or chassis.
Keep a brief record of the fitting dimensions and adjustments that work. If different wagons need different solutions, note the differences rather than forcing the same mounting arrangement onto every model. Standardise gradually and repeat the checks as you convert each vehicle. This gives you a practical way to assess automatic couplings for oo9 across a mixed fleet without assuming every model will accept the same fitting.
If you’re also choosing a first locomotive, use the published guide to selecting and buying a first OO9 locomotive as part of your planning. For kit-built stock, you can also explore OO9 locomotive and wagon kits, then check the coupling arrangement against the instructions and completed model before fitting anything.
Planning Couplings for OO9 Kit-Built Locomotives and Wagons
For a kit-built fleet, coupling choice is easier to manage if you consider it before final assembly. Mounting position, clearance and how a locomotive will connect to its wagons can affect later fitting, particularly if you want one coupling system throughout. Plan ahead, but stay flexible: use the finished model and its actual chassis arrangement to guide the final fit.
Plan the coupling before completing a kit build
Before painting or closing up the body, review the kit instructions and identify possible mounting points. Check that the proposed coupling can move freely without fouling the body, buffer area, bogie or chassis. Then compare the locomotive’s planned fitting with the wagons it will haul. A fleet-wide system may simplify operation, but don’t assume every model can accept the same mount or coupling without adjustment.
Narrow Minded Railworks designs and sells 3D-printed OO9 locomotive and wagon kits intended to fit commercially available chassis. The company doesn’t sell coupling systems or chassis, so select those separately and check the proposed fit against the relevant kit instructions, chassis arrangement and supplier guidance. For broader planning, the guide to choosing and building a first OO9 locomotive kit can help you consider the locomotive as part of a working layout, not in isolation.
Choose a kit with the wider layout in mind
Think about the routes and tasks the completed models need to handle. A locomotive working tight curves may have different clearance considerations from one mainly shunting in open sidings. Likewise, a layout with frequent wagon changes puts more emphasis on practical uncoupling than one where trains mostly run as complete consists. These needs can guide what you check during a build, but they don’t confirm that a particular coupling will fit a particular kit.
Before ordering or modifying components, confirm dimensions and installation requirements. If you’re uncertain, check with the kit or coupling supplier rather than relying on scale or appearance alone. A test fit during construction can reveal interference while the mounting area is still accessible, and a running trial can confirm whether the completed arrangement works with your intended stock.
Once you’ve identified your layout, operating style and preferred coupling approach, you can consider suitable rolling stock to build around those plans. Explore Narrow Minded Railworks OO9 kits as one possible next step, and verify any specific coupling arrangement for the individual model before fitting.
Build a Coupling Setup That Suits Your OO9 Fleet
The right choice of automatic couplings for oo9 depends on the vehicles you want to run together and how you operate your layout. Compare how each system couples and uncouples, check mounting points and clearances, then test it on representative stock before changing the whole fleet. A discreet design may appeal visually, but reliable operation and compatibility matter just as much.
For kit-built models, plan the coupling arrangement early, then confirm the fit against the actual model and its instructions. Narrow Minded Railworks designs and sells 3D-printed OO9 locomotive and wagon kits intended to fit commercially available chassis. Check kit details and coupling suitability for each model. The business doesn’t sell coupling systems or chassis.
Ready to plan a kit-built OO9 locomotive or wagon around your layout? Explore Narrow Minded Railworks OO9 kits, and check the individual model’s coupling arrangement before fitting.
Frequently Asked Questions
Are automatic couplings standard on OO9 models?
No single coupling standard should be assumed across every OO9 model. Locomotives, wagons and kits can differ in coupling design, mounting position and available clearance, even when they run on the same track gauge. Check the instructions and inspect the models you plan to run together. For a mixed fleet, test a representative locomotive-and-wagon pair before fitting a chosen system throughout the layout.
Which coupling is best for OO9?
There isn’t one coupling that suits every OO9 layout. Your choice depends on the models in your fleet, how often you shunt, whether a discreet appearance matters and how you want to uncouple vehicles. Weigh these needs, check the fitting requirements and trial the coupling on one vehicle. A successful test with representative stock is a more useful guide than choosing by appearance or type alone.
Can I mix different coupling types on an OO9 layout?
Yes, you can run different coupling types on one layout, but incompatible couplings may not connect directly. Some modellers use a transition vehicle or adapt a mounting, though the result depends on the specific models and coupling designs. Test the exact combination you intend to run, checking height, alignment and clearance. Don’t rely on an untested pairing for regular operation, especially if the vehicles need to travel together over curves or points.
How do I check whether a coupling will fit my OO9 locomotive or wagon?
Start with the model instructions, then inspect the coupling mount, available space and nearby body or chassis parts. Compare the coupling’s dimensions and mounting method with the model, and confirm uncertain measurements with the supplier. For a kit-built vehicle, assess the actual chassis and assembly before modifying anything. A test fit on one model can reveal alignment or clearance problems before you change more of the fleet.
Do automatic couplings need magnets on the track?
No, magnets aren’t required by every automatic coupling system. Some designs use a trackside magnet or other equipment to uncouple vehicles; others use a different method, such as hand access or a tool. Requirements depend on the coupling design, so check its instructions before planning the layout. Also consider where you need to uncouple: a magnet may be less practical in a hard-to-reach location or where fitting trackside equipment is difficult.
Can I fit automatic couplings to a 3D-printed OO9 kit?
It may be possible, but fit depends on the kit, chassis, mounting point and available clearance. Don’t assume a particular coupling is compatible without checking the kit instructions or confirming the arrangement with the supplier. Narrow Minded Railworks designs and sells 3D-printed OO9 locomotive and wagon kits intended to fit commercially available chassis, but individual kit details still need checking. Trial the proposed fit before final assembly, painting or irreversible changes.
How can I make OO9 couplings work reliably on curves?
Check coupling height, alignment, movement and clearance on the vehicles you plan to run together. Test them on the tightest curves and turnouts on your layout, at slow speed and while reversing. Watch for unwanted uncoupling, binding or restricted movement. If a problem appears, check the test vehicle for height differences, misalignment or interference before adjusting other models. This helps isolate the cause and avoids repeating an ineffective change across the fleet.