

A pristine, factory-fresh finish is often the biggest obstacle to achieving a truly convincing narrow gauge layout. You've likely spent hours carefully assembling a 3D-printed kit, only to worry that one heavy-handed application of paint might ruin the delicate resin details. It's a common concern that keeps many modellers from attempting weathering rolling stock for realism, as the line between a hard-working wagon and a ruined model often feels incredibly thin.
While resin surfaces require specific handling compared to traditional plastics, utilizing a structured approach allows you to build layers of grime without losing fine detail. This guide provides the professional techniques needed to transform your kits into heavy, metallic-looking models that reflect years of service in a slate quarry or peat bog. We will cover the best paint choices for 3D-printed materials and a repeatable process for applying rust and soot. By following these steps, you'll gain the confidence to create a consistent, realistic appearance across your entire fleet of OO9 or GN15 rolling stock.
Key Takeaways
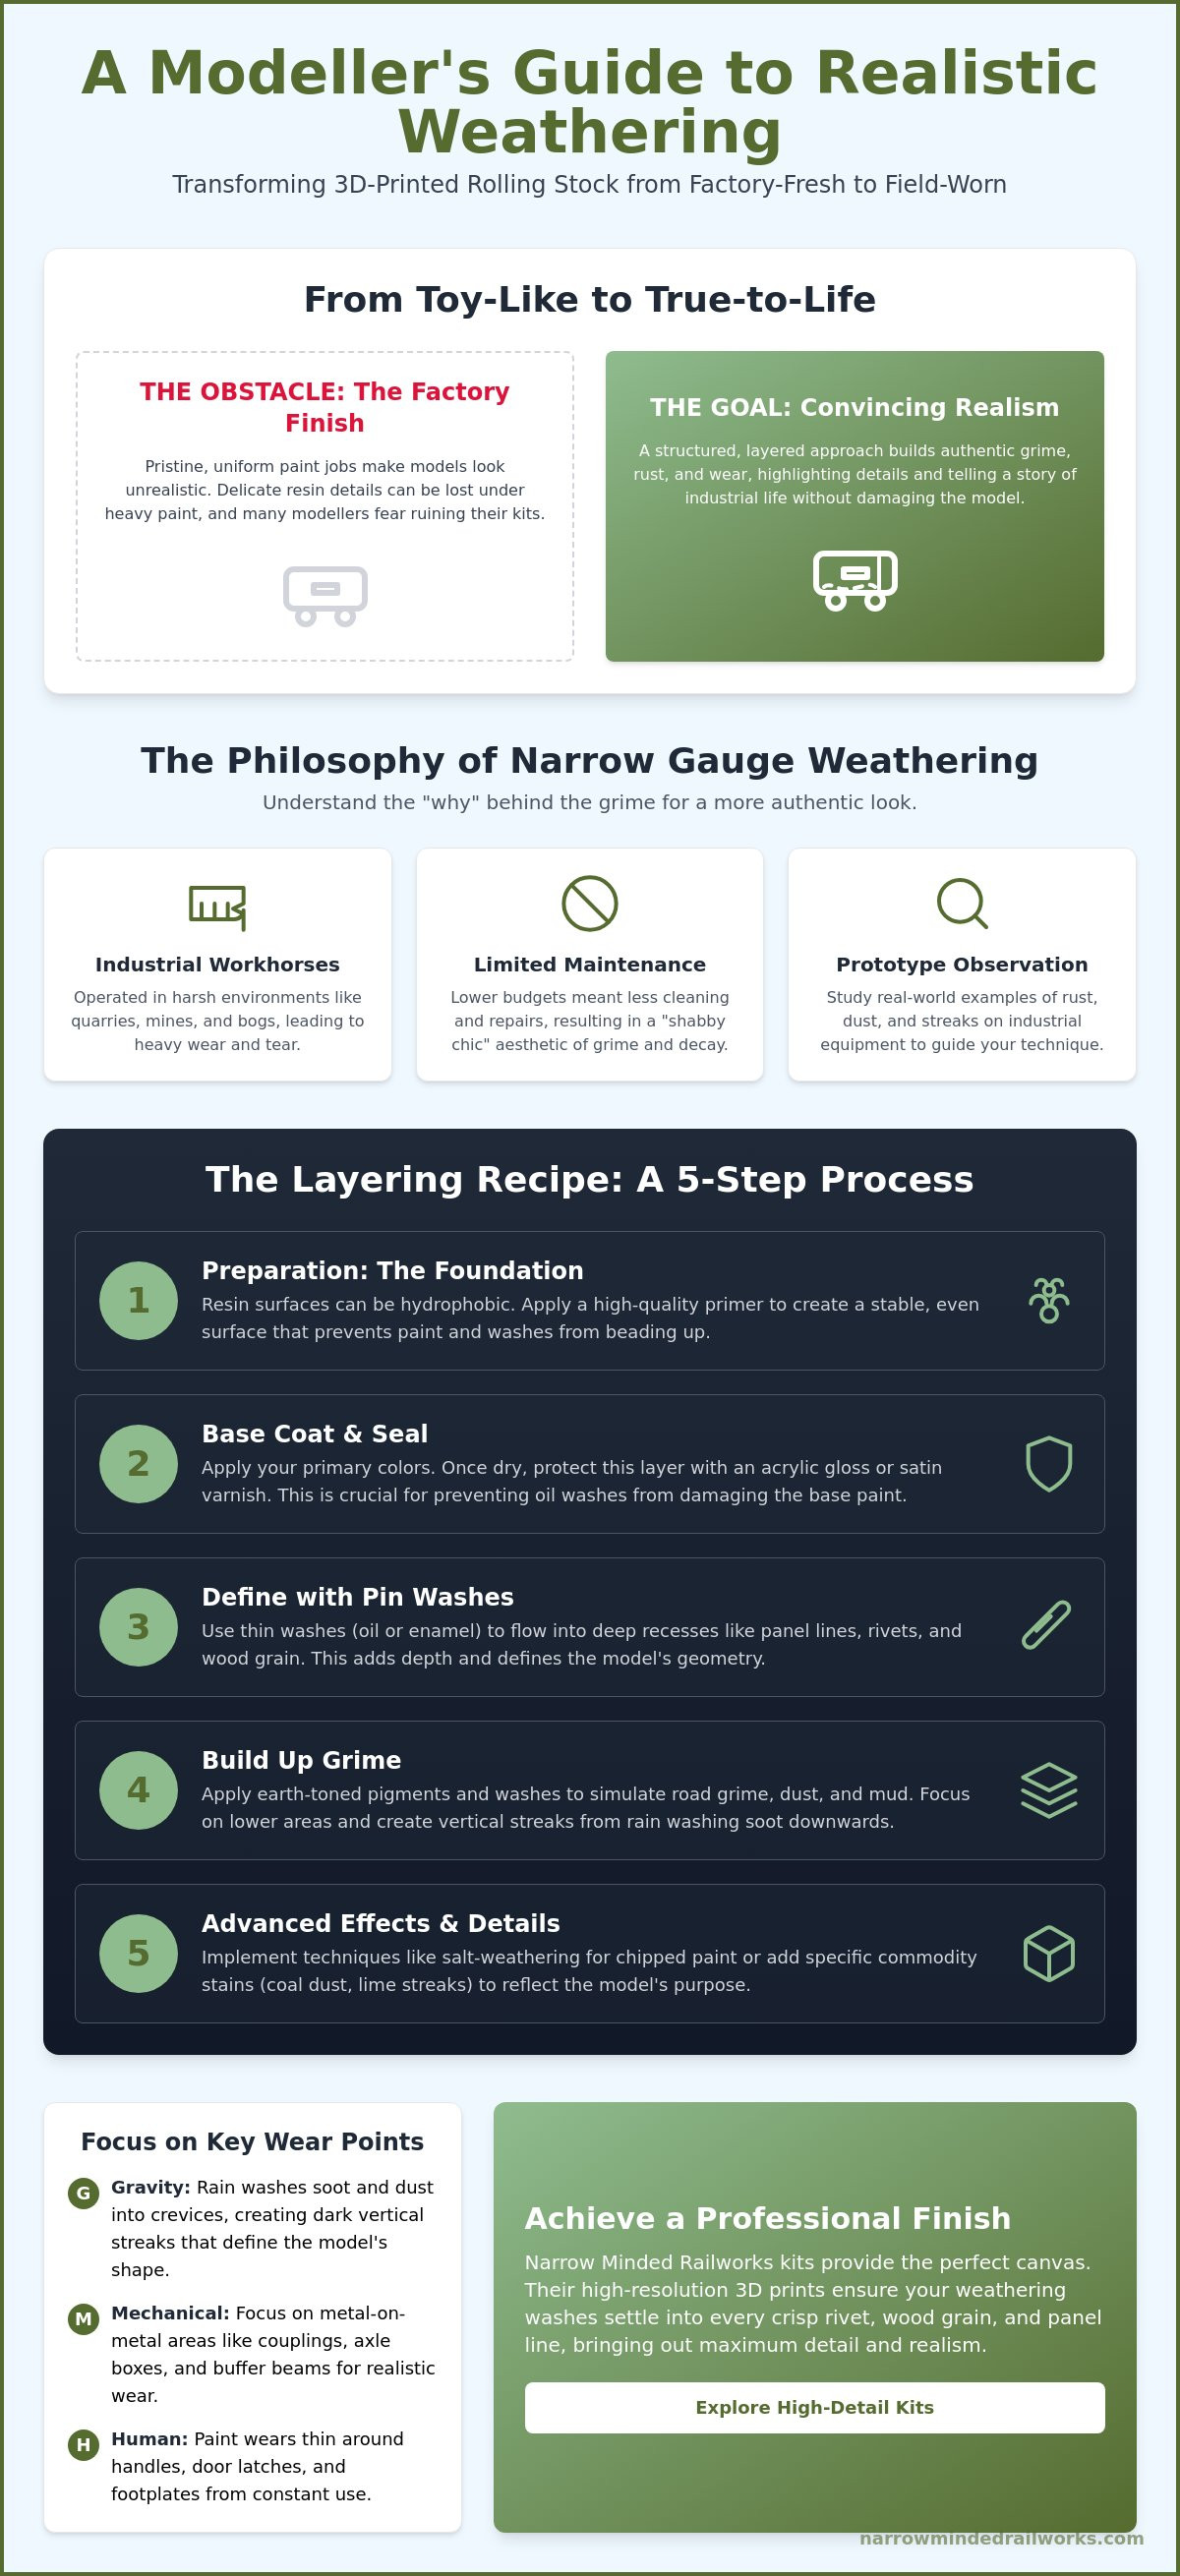
- Understand how industrial environments and lower maintenance budgets dictate the unique, heavy-wear appearance of narrow gauge locomotives and wagons.
- While resin surfaces can cause paint beading, applying a high-quality primer ensures a stable foundation for weathering rolling stock for realism.
- Follow a structured layering recipe that utilizes pin washes to define deep recesses before applying earth tones to simulate realistic road grime.
- Implement advanced methods like salt-weathering and commodity staining to reflect specific industries such as slate, coal, or lime transport.
- Leverage the high-resolution textures of Narrow Minded Railworks kits to ensure your weathering washes highlight every rivet and wood grain detail.
The Philosophy of Narrow Gauge Weathering: Prototype Thinking
Weathering is the technical process of simulating environmental wear and industrial use on a model. While many hobbyists view this as a final decorative step, it's actually an essential part of the construction process that defines the model's character. Narrow gauge railways were typically industrial workhorses, operating in harsh environments like slate quarries, mines, or peat bogs. These lines often functioned with limited maintenance budgets, leading to a level of grime and decay rarely seen on pristine main-line stock. Understanding this "shabby chic" aesthetic is the first step toward weathering rolling stock for realism.
Every wagon or locomotive tells a specific story through its appearance. A skip wagon used for heavy ore transport will show different wear patterns than a rural passenger coach or a timber bogie. Although it's tempting to copy techniques from other modellers, you should prioritize the observation of real-world prototypes. Study the way rust bubbles under paint on old agricultural equipment or how lime dust settles on industrial machinery. This research is vital because the various narrow gauge model railway scales present unique challenges regarding detail visibility and texture application.
To better understand the basic principles of this concept, watch this helpful video:
Identifying Wear Points on Narrow Gauge Stock
While rain and soot can obscure fine details, you can use these environmental factors to highlight the model's geometry. Gravity-fed grime is a major factor, as rainwater washes soot and airborne dust into the crevices of OO9 locomotive bodies. This creates dark, vertical streaks that define the model's shape. Mechanical wear is equally important. Focus on areas where metal meets metal, such as couplings, axle boxes, and buffer beams. Finally, consider human interaction. Paint often wears thin around handles, door latches, and footplates, revealing the underlying material through constant use.
The Role of Scale in Weathering Realism
Precision is required when working with smaller scales because oversized weathering effects can ruin the illusion of weight. Although it's tempting to use heavy textures, you should prioritize subtle layers to maintain the model's scale integrity. Massive rust flakes that look correct on a 1:1 prototype will appear as unsightly clumps on a 1:76 scale model. While deep colours are striking, high colour saturation often overwhelms the base paint. Use "scale colour" techniques by opting for slightly lighter, more muted tones. While thin washes are excellent for defining recessed lines, physical powders provide the necessary texture for weathering rolling stock for realism when simulating heaps of coal dust or dried mud.
Preparing Your 3D-Printed Kits for Weathering
3D-printed resin kits offer a level of fine detail that traditional injection-moulded plastic often struggles to match. However, resin presents unique challenges for weathering rolling stock for realism because the material's surface properties differ significantly from polystyrene. Resin can be somewhat hydrophobic; this means that water-based acrylics or thin oil washes may bead up and pool in undesirable areas rather than flowing into the recesses. To solve this, you must establish a reliable foundation before any pigments or washes touch the model.
A high-quality primer is your most important tool in this phase. It provides a consistent surface tension that prevents weathering media from sliding off the model's flat panels. For those seeking deeper technical background on these initial stages, the NMRA's guide to weathering offers excellent foundational advice on how surface preparation impacts the final result. Once your base colours are applied, you must decide on a barrier layer. If you plan to use oil-based washes, an acrylic gloss or satin varnish is essential. This creates a chemical barrier that prevents the white spirit or turpentine used in the weathering process from attacking your base paint. If you're working with a high-detail OO9 or GN15 kit, ensuring this barrier is thin enough to preserve rivet detail is a priority.
Transfers and decals also require protection. If you've used setting solutions like Micro Sol to conform decals to wood grain or rivets, these areas can be fragile. A quick coat of varnish seals the edges of the transfer, preventing weathering washes from seeping underneath and lifting the film. This step ensures that your industrial markings look like painted-on prototype lettering rather than a modern sticker.
Surface Preparation for Resin Models
Before painting, inspect the kit for support marks or tiny "pips" left over from the 3D-printing process. Weathering tends to highlight these flaws, so careful sanding with a fine-grit stick is necessary. You should also wash the kit in warm, soapy water to remove any residual UV resin or skin oils that might hinder paint adhesion. The 'tooth' of a surface describes the microscopic texture required for weathering powders and pigments to physically adhere to the model's exterior. Without this slight roughness, powders will simply brush away during handling.
The Foundation Layer: Dulling and Fading
Most factory-fresh models have a distinct plastic sheen that looks unrealistic in a miniature setting. Applying a matte varnish is a proactive way to kill this shine and prepare the model for grime. You can also simulate sun-bleaching by adding a small drop of light grey to your base colour and misting it over the roof and upper surfaces. While you focus on the aesthetics, remember to protect the chassis. Use masking tape to keep paint and powders away from the motor and electrical pick-ups, as grit in the gears will quickly ruin the locomotive's performance.
Step-by-Step Weathering: The Layering Recipe
Achieving a convincing finish requires a disciplined, multi-stage approach. While it's tempting to apply all effects at once, weathering rolling stock for realism is most effective when built up in thin, deliberate layers. This repeatable process ensures your narrow gauge models don't just look dirty, but actually appear to have mass and history. By following a structured recipe, you can maintain consistency across a whole fleet of wagons without the fear of ruining a single kit.
- Step 1: The 'Pin Wash'. Use a highly diluted oil or acrylic wash to target deep recesses, panel lines, and rivets. This defines the geometry of the kit and creates natural shadows.
- Step 2: Road Grime. Apply earth tones to the lower frames, axle boxes, and wheels. This simulates the spray of mud and dust kicked up from the trackbed during daily operations.
- Step 3: Dry Brushing. Gently highlight raised edges and bolt heads with a lighter shade of the base colour to simulate paint wear and sun-bleaching.
- Step 4: Weathering Powders. Add pigments to create a dusty or sooty finish. This is particularly effective on the roofs of locomotives or inside the floors of open wagons.
- Step 5: Sealing. Apply a final light mist of matte varnish. Be careful not to oversaturate the model, as too much varnish can 'melt' or disappear the delicate powder effects you've just applied.
Mastering the Wash Technique
The success of a wash depends on capillary action. When you touch a loaded brush to a rivet or a corner, the liquid should naturally pull itself along the detail. If the paint pools in large blobs, your mixture is likely too thick or the surface lacks the necessary gloss. To fix mistakes, use a brush dampened with clean thinner to wick away excess paint or create vertical streaks. Avoid using pure black for shadows. Instead, choose Payne's Grey or Raw Umber, as these shades provide a more natural, atmospheric depth that suits weathering rolling stock for realism in smaller scales.
Dry Brushing for Metal Effects
Dry brushing is a subtractive technique where you remove 95% of the paint from your brush onto a paper towel before touching the model. If you can see wet paint on the bristles, it's still too wet. Use this method sparingly with gunmetal or silver to simulate bare metal on high-traffic areas like door handles or coupling hooks. For those building GN15 wagon kits, dry brushing is also the perfect way to enhance 3D-printed planking. By catching the tops of the wood grain with a light tan or grey, you can make resin parts look like aged, sun-dried timber in seconds.
Advanced Techniques for Narrow Gauge Character
While mainline stock often receives regular maintenance, narrow gauge industrial equipment frequently operates until it fails. This neglect provides the perfect opportunity for weathering rolling stock for realism by pushing effects much further than you would on a standard gauge coach. To achieve this, you must move beyond simple washes and incorporate techniques that simulate physical material changes, such as chipped paint and heavy oxidation.
The hairspray technique is a proactive solution for simulating failing paint. By applying a layer of hairspray over a rust-coloured base coat and then painting your top colour, you can use water and a stiff brush to physically chip away the upper layer. This reveals the "rust" beneath in a way that looks naturally distressed. You can also simulate the "patch repair" look, which was common on cash-strapped lines. Paint a single plank on a wagon in a lighter, unweathered wood tone or add a bright patch of primer to a locomotive tank to show where a recent repair took place. This adds a layer of narrative history to your models.
- Commodity Stains. Tailor your grime to your layout's industry. Use light grey or white powders for slate dust, or heavy black pigments for coal grit.
- Oil and Grease. Apply a small amount of gloss varnish to axle boxes and coupling pins. This simulates fresh lubrication that hasn't yet dried or collected dust.
- Salt Weathering. Similar to the hairspray method, damp salt crystals can be used to mask areas before painting to create deep, pitted textures in the finish.
To begin your next project with a model designed for high-detail finishes, explore our range of OO9 and GN15 locomotive kits.
Rust: From Light Oxidation to Deep Pitting
Effective rust isn't just a single shade of brown. You should follow the three-colour rust rule by layering dark brown for old corrosion, burnt sienna for established rust, and a few dots of bright orange for fresh oxidation. This creates a sense of depth and age. On steel-bodied skips, pay attention to vertical streaking. Rain carries rust particles down the sides of the wagon, creating distinct lines that originate from rivets or top edges. Dabbing a small, torn piece of sponge into a dark brown or metallic paint and lightly tapping it onto the edges of your model creates a convincing, random micro-chipping effect.
Industrial Grime and Spills
Narrow gauge locomotives often have a "wet look" around their water tanks and filler caps. You can simulate this by applying a thin streak of gloss varnish to show where water has spilled and darkened the paint. For steam locomotives, focus heavy soot and cinder applications around the smokebox and chimney, as these areas are constantly exposed to heat and exhaust. Finally, don't be afraid to use natural materials. Adding actual fine sand or sifted quarry dust to the corners of wagon floors provides a physical texture that paint alone cannot replicate, grounding the model in its specific industrial environment.
Achieving the Professional Finish with Narrow Minded Railworks
The success of any weathering project depends heavily on the quality of the underlying model. Narrow Minded Railworks' 3D-printed kits provide an ideal canvas for weathering rolling stock for realism because they're designed with the end-user's process in mind. While some generic prints lack surface definition, our high-resolution manufacturing process ensures that every rivet, hinge, and plank edge is sharp and distinct. These features don't just look better; they physically 'grab' your washes and pigments, making the techniques discussed in this guide much easier to execute.
We recognize that modellers often face frustration when paints fail to adhere to resin surfaces. To address this, we test our kits for compatibility with common hobby primers and weathering media. This proactive approach ensures you can apply oils, acrylics, and powders with confidence, knowing the material will behave predictably under different chemical treatments. By starting with a kit that's engineered for detail, you avoid the uphill struggle of trying to make a flat, lifeless print look like a heavy industrial machine.
Choosing the Right Kit for Weathering Practice
If you're new to the hobby, starting with our OO9 wagon kits is a sensible, low-stakes way to master basic washes. These smaller models allow you to experiment with different grime densities and rust patterns before moving on to more complex projects. Once you've gained confidence, our 3D-printed locomotive bodies offer larger surface areas perfect for practicing advanced vertical streaking and heat-fading effects. You can also utilize our diorama tools and scenery to ensure your trackside environment matches the heavy, industrial look of your stock. This holistic approach creates a cohesive narrative across your entire layout.
The Narrow Minded Community
Modelling is a collaborative pursuit, and we take pride in supporting our customers across over 40 countries. Whether you're seeking advice on a specific paint match or want to showcase your latest weathered masterpiece, the narrow gauge community offers a wealth of shared experience. We maintain a professional and transparent dialogue with our builders to help you overcome technical hurdles and achieve the best possible results. Our commitment to the hobby is reflected in our frequent updates and detailed guides, ensuring you always have the resources needed to succeed.
Browse our latest OO9 and GN15 locomotive kits at Narrow Minded Railworks to find the perfect starting point for your next weathering project.
Transform Your Layout with Authentic Industrial Wear
Transforming a factory-fresh model into a convincing industrial workhorse requires patience and the right techniques. While the fear of over-weathering is common among modellers, utilizing a structured approach to weathering rolling stock for realism ensures your narrow gauge fleet looks heavy and metallic rather than plastic. By focusing on prototype thinking and proper surface preparation, you can confidently apply rust, soot, and grime to tell a unique story for every wagon on your layout. This methodical layering allows you to build character without the risk of ruining your delicate 3D-printed kits.
Narrow Minded Railworks provides specialist 3D-printed narrow gauge designs that are created by modellers, for modellers. Although sourcing high-quality kits can be difficult for some, we offer worldwide shipping to ensure global hobbyists have access to high-detail prints. If you're ready to start your next project, shop our range of OO9 and GN15 kits at Narrow Minded Railworks today. With the right tools and a bit of practice, you'll soon build a realistic, hard-working fleet that captures the true character of narrow gauge railroading.
Frequently Asked Questions
What is the best type of paint for weathering 3D-printed resin kits?
Acrylics and oil paints are the most effective choices for resin models. While resin surfaces can be hydrophobic, applying a high-quality primer first creates a stable foundation for these paints to bond with. Acrylics are ideal for quick-drying base layers, while oils offer the extended working time required for complex blending and streaking effects.
Do I need an airbrush to achieve realistic weathering on my rolling stock?
You don't need an airbrush to produce high-quality results on narrow gauge models. While airbrushes excel at creating soft gradients, much of the process for weathering rolling stock for realism relies on traditional brushes and powders to simulate industrial grime. Hand-applying washes and dry brushing often provide superior control over the fine details found on 3D-printed kits.
How do I fix a weathering mistake without stripping the entire model?
Mistakes can be corrected by using a clean brush lightly dampened with the appropriate thinner for your weathering medium. If you've applied an acrylic varnish over your base coat, you can use white spirit to lift oil-based washes without affecting the paint underneath. It's best to act while the weathering is still tacky to ensure the surface remains clean.
Is it necessary to varnish a model before starting the weathering process?
Applying a varnish layer is a proactive way to protect your base paint from the harsh solvents used in weathering. While it adds a step to your build, it creates a chemical barrier that allows you to manipulate washes freely. A gloss or satin varnish is particularly helpful as it encourages washes to flow naturally into rivets and recesses.
Can I use real dirt or rust for weathering my narrow gauge trains?
Real dirt and rust are usable provided they are finely sifted and sterilized to remove organic matter. While these materials offer unmatched texture, they can be abrasive if they get into locomotive gears or bearings. A safer solution is to use them sparingly in static areas, such as the floors of open wagons or on trackside scenery.
How do I protect the delicate 3D-printed details while applying heavy weathering?
Protecting fine details requires using soft, natural-hair brushes rather than stiff synthetic ones. While resin is durable, thin parts like handrails or brake levers can snap under heavy pressure. Apply your weathering in multiple thin stages; this avoids the need for aggressive scrubbing and preserves the integrity of the high-resolution 3D print.
What are weathering powders and how do they differ from normal chalks?
Weathering powders are specialized pigments with a much finer particle size than standard artist chalks. While you can grind down chalks, they often lack the specialized binders that help hobby pigments adhere to a model. Utilizing dedicated powders ensures a consistent matte finish that captures the dusty look of a slate quarry or coal mine more effectively.
How do I make my weathered wheels still pick up electricity from the track?
Maintain electrical conductivity by cleaning the wheel treads immediately after weathering rolling stock for realism. While painting the wheel faces adds to the aesthetic, any pigment or paint on the contact surface will interrupt power flow. Use a cotton bud dipped in a small amount of thinner to wipe the treads clean, ensuring a reliable connection for your locomotives.