

The secret to a museum-quality 3D printed locomotive isn't found in the paint jar, but in the systematic transition from chemical cleaning to precision airbrushing. While raw resin provides an incredible level of detail for OO9 or GN15 scales, it also presents unique challenges that can ruin a project. You might worry that visible layer lines will spoil the scale effect or that thick primer will bury those delicate boiler bands. We recognise that these surfaces can be temperamental, so we've developed a workflow that prioritises surface integrity. Learning how to paint 3d printed locomotive kits doesn't have to be a process of trial and error.
In this guide, you'll master the art of finishing narrow gauge kits with professional airbrushing and detailing techniques. It's common to feel hesitant about using an airbrush for the first time, especially when working on a bespoke resin body. Although resin requires specific preparation to prevent paint peeling, a structured approach to degreasing and thin-layer application ensures a smooth, factory-like finish. We'll walk you through everything from initial UV curing to final weather-sealing, giving you the confidence to produce a professional engine for your layout.
Key Takeaways
- Learn the essential steps for degreasing resin and removing support marks to ensure your paint adheres perfectly without peeling.
- Master how to paint 3d printed locomotive kits by using hobby-grade primers in thin mist coats, which preserves fine rivet details while hiding layer lines.
- Discover why airbrushing is the most effective method for achieving a smooth, factory-quality finish on 3D printed surfaces compared to traditional hand-brushing.
- Gain confidence in masking multi-colour liveries and preparing gloss surfaces for water-slide decals to achieve professional-standard results.
- Explore weathering techniques that transform a clean model into a work-worn narrow gauge engine using subtle airbrushed soot and grime effects.
Preparing Your 3D Printed Locomotive Kit for Paint
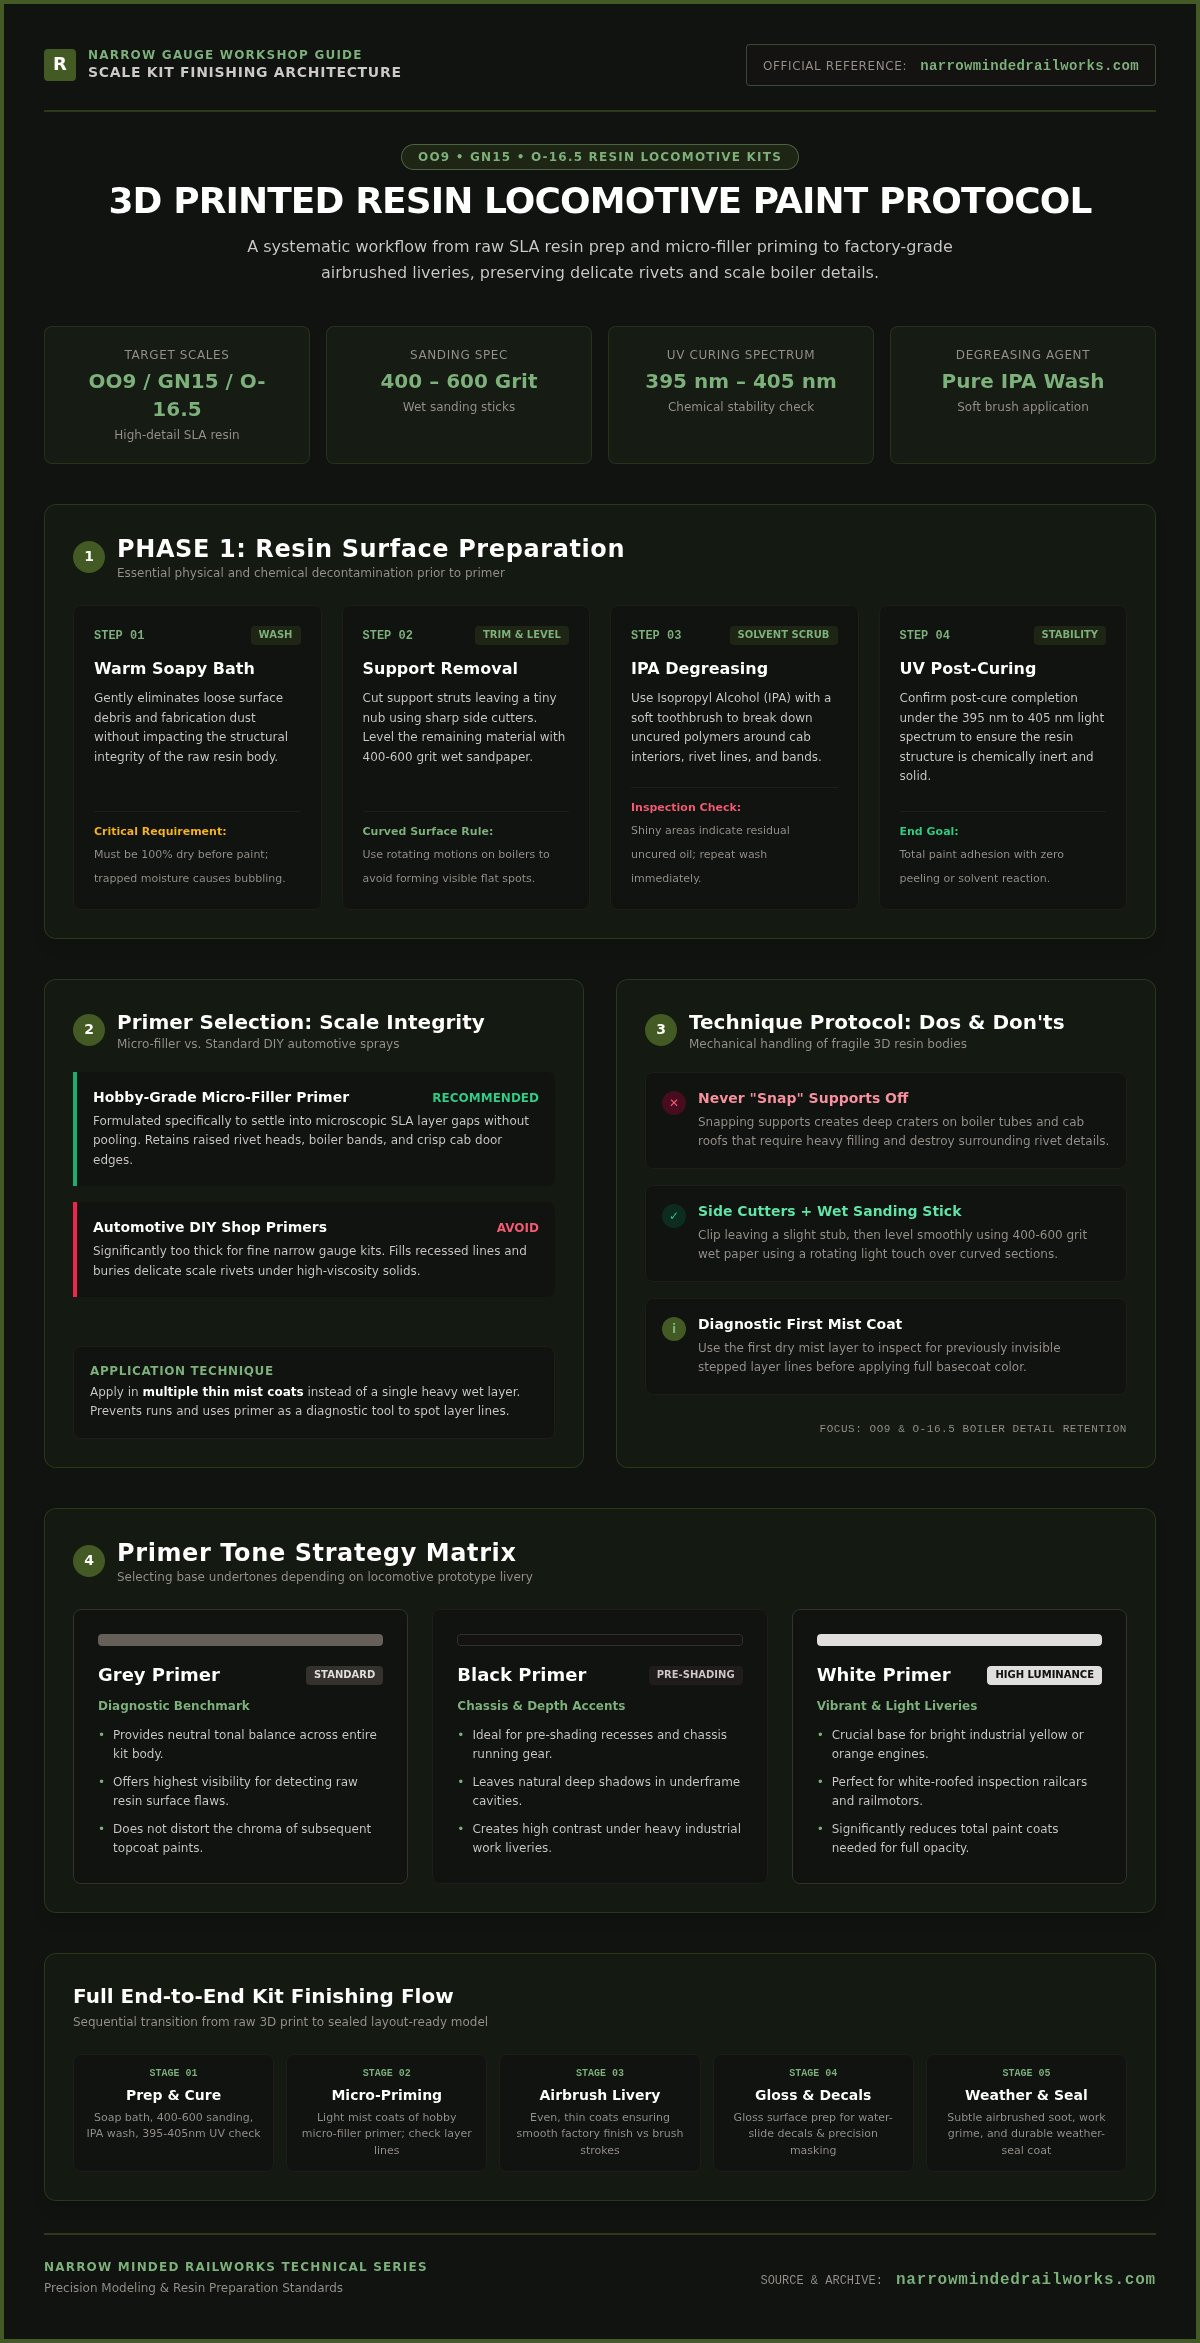
Before you learn how to paint 3d printed locomotive kits, you must address the raw surface of the model. Resin bodies for OO9 or O-16.5 scales offer incredible detail, but they arrive with specific needs that differ from traditional plastic kits. You might notice tiny support nubs or a slight tackiness on the surface. These are normal byproducts of the SLA printing process. While these imperfections can seem daunting, a systematic cleaning routine ensures your locomotive is ready for a professional finish.
A warm soapy water bath is the safest starting point for any hobbyist kit. It removes loose debris and dust without affecting the resin's integrity. However, water alone isn't enough to remove all residual photoinitiators or oils. You need to ensure the model is 100% dry before any chemical layer, such as primer, touches the surface. Trapped moisture under paint leads to bubbling and peeling, which can ruin hours of work on a unique narrow gauge prototype.
To better understand how professional modellers approach these initial steps, watch this helpful video:
Removing Support Marks Safely
Resin kits are often attached to a forest of supports during the printing phase. You should never "snap" these supports off the locomotive boiler or cab roof. Doing so creates deep pits that are difficult to fill. Instead, use sharp side cutters to leave a small nub, then refine the surface with high-grit sanding sticks. We recommend starting with 400 to 600 grit wet sandpaper to level the marks. When working on curved surfaces like a boiler, use a light, rotating motion. This prevents the creation of flat spots that would be visible once you apply a gloss coat or livery.
Chemical Degreasing and Surface Prep
Once the physical sanding is complete, the model requires a chemical clean. Isopropyl Alcohol (IPA) plays a vital role in preparing resin for primer by breaking down any remaining uncured polymers. Use a soft toothbrush to gently scrub the cab interior, rivet lines, and boiler bands. These areas often trap residual resin that can obscure fine details. Look closely for any "shiny" spots on the model. These indicate areas where oils or uncured resin remain. If you find them, repeat the IPA wash. Professional modellers often check that the resin has been post-cured within the 395 nm to 405 nm spectrum, as this ensures the model is chemically stable before you begin the livery application.
Priming and Surface Refinement Techniques
Choosing the correct primer is the most influential decision you'll make when learning how to paint 3d printed locomotive kits. While it's tempting to use standard automotive primers from a local DIY shop, these products are often too thick. They can easily bury the delicate rivets and boiler bands found on high-quality narrow gauge locomotive kits. Instead, opt for hobby-specific micro-filler primers. These are designed to settle into the microscopic gaps between 3D print layers without obscuring the fine details that give your model its character.
Apply your primer in multiple thin mist coats rather than a single heavy layer. This approach builds up the surface gradually and prevents runs or "pooling" around cab doors and window frames. Primer also serves as a critical diagnostic tool. Once the first light coat is dry, you'll likely see faint "stepped" layer lines that were invisible on the raw resin. This is the perfect moment to identify areas that require further refinement before you commit to the final livery.
Selecting the Right Primer Color
Grey primer is the industry standard for a reason. Its neutral tone provides the best visibility for surface flaws and doesn't distort the final colour of your topcoat. However, you can use other colours to your advantage. Black primer is excellent for "pre-shading," where you leave the dark base in the deep recesses of the chassis to create natural shadows. If you're planning a light livery, such as a vibrant industrial yellow or a white-roofed inspection railcar, a white primer is essential. It ensures the topcoat remains bright and reduces the number of paint layers needed to achieve full opacity.
Laying the Foundation for a Smooth Finish
Success in priming relies on respecting the flash-off time, which is the short period required for solvents to evaporate from the paint surface before you apply the next layer. If you notice the primer beading or "silvering," it suggests surface tension issues caused by residual oils, indicating you may need to revisit the cleaning steps discussed earlier. If the surface is sound, you can proceed to wet sanding to achieve a glass-smooth boiler finish. This technique involves using 800 to 1200 grit sandpaper dipped in water to gently polish the flat surfaces of the cab and tank sides.
- Step 1: Soak your high-grit sanding sticks or paper in clean water for five minutes.
- Step 2: Use light, circular motions on flat panels, avoiding the edges of raised details like rivets.
- Step 3: Rinse the model frequently to remove the "slurry" created by the sanding process.
- Step 4: Once dry, apply a final thin primer layer to verify the surface is perfectly level.
Airbrushing vs. Hand-Brushing: Choosing Your Method
Choosing between a traditional brush and an airbrush is a pivotal decision for any modeller. While hand-brushing is accessible for beginners, it often struggles with the unique topography of resin prints. Learning how to paint 3d printed locomotive kits effectively requires a tool that can apply colour without filling in the microscopic gaps between layer lines. Hand-brushing tends to deposit thick layers of pigment that can obscure rivet detail or create unsightly textures on flat cab sides. An airbrush, by contrast, atomises the paint into a fine mist that settles evenly over the model's surface, preserving the crispness of the original 3D design.
You might find that the initial cost of an airbrush setup feels like a significant hurdle. However, this investment pays dividends when finishing niche narrow gauge prototypes where scale-appropriate paint thickness is vital. A hand-brushed finish often looks "heavy" in OO9 or GN15 scales, making the model look like a toy rather than a professional miniature. By using an airbrush, you can thin your paints significantly, allowing the underlying detail to remain sharp while achieving full colour depth through multiple translucent passes.
How to Use an Airbrush for Model Kits
Success with an airbrush begins with your compressor settings. For thin-walled 3D printed locomotive bodies, you should operate at a pressure of 15 to 25 PSI using a 0.3 mm to 0.5 mm nozzle. This range provides enough power to atomise the paint without causing it to bounce off the surface or create "orange peel" textures. You must also master the "Milk Consistency" rule. Whether you use acrylics or enamels, your paint should have the viscosity of semi-skimmed milk to flow smoothly through the needle. When spraying, always follow the "Air-Paint-Air" trigger sequence: start the airflow before pulling back for paint, and keep the air running after you've closed the paint flow to prevent clogs.
Maintenance and Troubleshooting
Even with perfect technique, you may encounter common airbrush problems like "dry tip," where paint dries on the needle and causes speckling. To solve this, keep a cotton bud soaked in thinner nearby to gently clean the needle tip between passes. If you notice spider-webbing, your paint is likely too thin or your PSI is too high. Proper maintenance is non-negotiable; you must perform a thorough flush with a dedicated cleaner between every colour change to prevent internal clogs. Finally, it's essential to use a dedicated spray booth. This not only protects your health from fumes but also prevents airborne dust from settling on your wet livery, which is a common cause of surface imperfections in home workshops.
Applying Livery, Decals, and Fine Details
Once the base coat is dry, the real character of your locomotive emerges through the livery. Understanding how to paint 3d printed locomotive kits requires a shift from broad coverage to precision detailing. Multi-colour schemes, such as the classic combination of a black boiler with red frames, demand careful planning to ensure crisp colour separation. While the textured surface of a 3D print can make masking difficult, following a disciplined approach prevents paint bleed and ensures your narrow gauge engine looks the part.
Before you apply the final touches, consider the "finer bits" that define a professional model. Hand-painting handrails, brass whistles, and cab controls requires a steady hand and a high-quality, fine-tipped brush. For these details, use slightly thicker paint than you would for airbrushing to ensure one-coat coverage. If you're looking for a new canvas to test these techniques, you can start your next project with a Narrow Minded Railworks kit today.
Precision Masking for Locomotives
Standard masking tape often fails on 3D prints because the microscopic layer lines allow paint to "wick" underneath. To solve this, use a high-quality modelling tape like Tamiya tape and employ the "burnishing" trick. After laying the tape, use a soft cocktail stick or a silicone shaper to firmly press the edges into the print lines and around rivet heads. While complex curves on a boiler are challenging, using a liquid mask provides a flexible solution for shielding intricate narrow gauge shapes that tape cannot easily cover. Always remove your masking tape while the paint is slightly tacky to achieve the sharpest possible line.
Perfect Decal Application
Applying water-slide transfers to a 3D printed surface is a two-stage process. You must first apply a gloss clear coat to the area where the decal will sit. Resin prints often have a microscopic matte texture that traps air bubbles under the film, causing a silvering effect that ruins the realism. A smooth gloss base eliminates this risk. When working with curved surfaces or deep grooves, you'll need specialised chemistry to help the film conform to the model's shape. You can read our full guide on How to Use Micro Sol for Perfect Decals to master this technique. This solution softens the decal, allowing it to settle into deep panel lines and around boiler bands as if it were painted on. Once the decal is dry, seal it with another layer of clear coat to protect it from handling and weathering.
Weathering and Sealing Your Narrow Gauge Loco
Narrow gauge locomotives rarely remained in pristine condition. Whether they served slate quarries, peat bogs, or rural agricultural lines, these engines quickly developed a "work-worn" aesthetic that defined their character. When learning how to paint 3d printed locomotive kits, you shouldn't stop at the factory livery. Subtle weathering transforms a clean resin model into a heavy industrial machine. Using an airbrush at low pressure, typically between 15 and 20 PSI, allows you to apply translucent layers of soot and grime to the roof and smokebox without obscuring the fine 3D details you worked hard to preserve.
Final assembly is the ultimate test of your finishing work. Most 3D printed bodies are designed to fit precisely over commercial mechanisms, such as the Kato 11-109 motorized chassis. While these kits are designed for a friction-fit, you must ensure that no thick paint or varnish remains on the internal mounting tabs. Excessive buildup inside the shell can prevent the motorized unit from seating correctly or cause mechanical binding during operation.
Scale Weathering Techniques
In smaller scales like OO9 or GN15, aggressive weathering can easily look muddy or oversized. Instead of heavy pigments, use enamel-based pin washes to highlight 3D printed vents, louvres, and panel lines. This technique relies on capillary action to pull dark pigments into the recesses, adding artificial depth to the model. You can then use dry-brushing with a lighter shade of your base livery to simulate paint wear on high-traffic areas like cab handles and footplates. For those wanting to expand these skills to their rolling stock, our Beginner’s Guide to Weathering Wagons provides complementary techniques for a cohesive layout appearance.
The Final Protective Coat
Your choice of varnish dictates the final realism of the engine. A satin finish is often appropriate for the boiler to simulate oily steel, while a dead-matte coat is essential for the chassis and roof to represent sun-bleached paint and soot. While aerosol cans are convenient for large projects, airbrushing your clear coats offers greater control over the thickness of the layer, ensuring you don't fill in microscopic rivets.
Frosting or "blooming" is a common risk when applying matte clear coats, usually caused by moisture trapped in the paint layer. To prevent this, avoid spraying when ambient relative humidity exceeds 60%, a threshold where lacquer-based flat coats exhibit a high failure rate. If you encounter a white, cloudy finish, a light mist of gloss varnish can sometimes "wet out" the frosting before you re-apply the matte coat in drier conditions. Once your engine is sealed and mounted, it's ready for service on your layout. If you're ready to start your next project, explore our latest OO9 and GN15 locomotive kits to find your next challenge.
Bringing Your Narrow Gauge Layout to Life
Finishing a resin locomotive is the stage where a kit truly becomes your own. While resin finishing requires patience, following a structured workflow ensures a professional result that stands up to close inspection. By mastering how to paint 3d printed locomotive kits, you move beyond the raw surface to create a piece that looks at home on any museum-quality layout. We've explored the importance of thorough degreasing, the precision of airbrushing, and the subtle art of weathering to simulate a work-worn life. These steps ensure that the fine rivet detail and unique lines of narrow gauge prototypes remain sharp and visible.
Narrow Minded Railworks provides hand-crafted designs for OO9, GN15, and O-16.5 scales. Our kits are designed specifically to fit reliable commercial chassis, ensuring your finished model runs as well as it looks. If you need expert support during your build, we're here to help you achieve the best possible finish. You can Browse Our Range of 3D Printed Narrow Gauge Kits to find the perfect canvas for your next project. It's time to turn that raw print into a centerpiece for your railway.
Frequently Asked Questions
Do I need to sand my 3D printed locomotive kit before painting?
You should sand your kit to remove support nubs and level any stepped layer lines. While modern resin prints are highly detailed, small imperfections are a natural part of the 3D printing process. Use 400 to 600 grit sanding sticks for initial smoothing and move to 1000 grit for a polished finish. This preparation is essential for achieving a professional look on narrow gauge subjects like OO9 or O-16.5 models.
What is the best type of paint for 3D printed resin models?
Hobby-specific acrylics and enamels are the most effective options for resin. Water-based acrylics offer easy cleanup, while solvent-based acrylics provide superior adhesion. Regardless of the brand, ensure the paint is thinned to a milk-like consistency. This prevents the pigment from filling in fine rivet details and boiler bands, which is a common risk when you learn how to paint 3d printed locomotive kits.
How do I prevent my paint from peeling off the resin?
Adhesion issues are usually caused by residual oils or incomplete curing. You must wash the body in 99% Isopropyl Alcohol (IPA) and ensure it has been post-cured under UV light within the 395 nm to 405 nm range. Applying a dedicated resin primer provides the tooth needed for the topcoat to grip. Avoid using standard automotive primers, as these are often too thick and can cause the resin to become brittle.
Can I use an airbrush for small scales like OO9?
Airbrushing is the preferred method for small scales like OO9 and GN15. It allows you to apply incredibly thin layers that don't obscure microscopic details. Set your compressor between 15 and 25 PSI for the best results. This technique provides a much smoother finish than hand-brushing, which often leaves visible brush strokes and uneven paint thickness on the flat surfaces of a locomotive cab or tank side.
How do I hide the layer lines on a 3D printed model?
Hiding layer lines requires a combination of high-fill primer and wet sanding. Apply a light diagnostic coat of grey primer to make the lines visible, then use 800 to 1200 grit wet sandpaper to gently level the surface. Repeat this process until the lines disappear. This systematic approach ensures a glass-smooth finish on your boiler and tanks, making it impossible to tell the model was originally 3D printed.
What should I do if I lose detail while priming?
If you notice that rivets or vents are disappearing under thick paint, you must strip the model and start again. Soak the resin body in Isopropyl Alcohol (IPA) to dissolve the primer without damaging the kit. Once clean, re-apply the primer using multiple mist coats rather than one heavy pass. This controlled application is a fundamental part of how to paint 3d printed locomotive kits while maintaining museum-quality precision.
Is it better to paint the locomotive body before or after fitting the chassis?
You should always paint and weather the locomotive body before final assembly with the chassis. Narrow Minded Railworks kits are designed to fit commercial mechanisms like the Kato 11-109, and these fits are often very tight. Mask off the internal mounting tabs and the inside of the cab to prevent paint buildup. If paint gets onto these surfaces, the motorized chassis may not seat correctly or could suffer mechanical binding.
How long should I wait for paint to cure on a 3D print?
You should wait at least 24 hours for acrylic paints to fully cure before handling or masking. Enamel paints or lacquer-based clear coats may require 48 to 72 hours, especially in humid conditions. Resin can be less porous than traditional plastic, so the outgassing process takes longer. Rushing this stage can lead to fingerprints in the paintwork or cause masking tape to pull the finish away from the resin surface.