

A brand new £165 locomotive should be the pride of your narrow gauge layout, yet seeing the exact same pristine engine on four different layouts at the 2023 Narrow Gauge North exhibition proves that "out of the box" often means "lacking soul." While modern manufacturers have reached incredible heights of fidelity, improving ready-to-run oo9 models is the only way to escape that "plastic" factory finish that often betrays your hard work. You likely feel that your latest Baldwin or Manning Wardle looks a bit too much like a toy when it's sat next to bespoke, hand-built scenery.
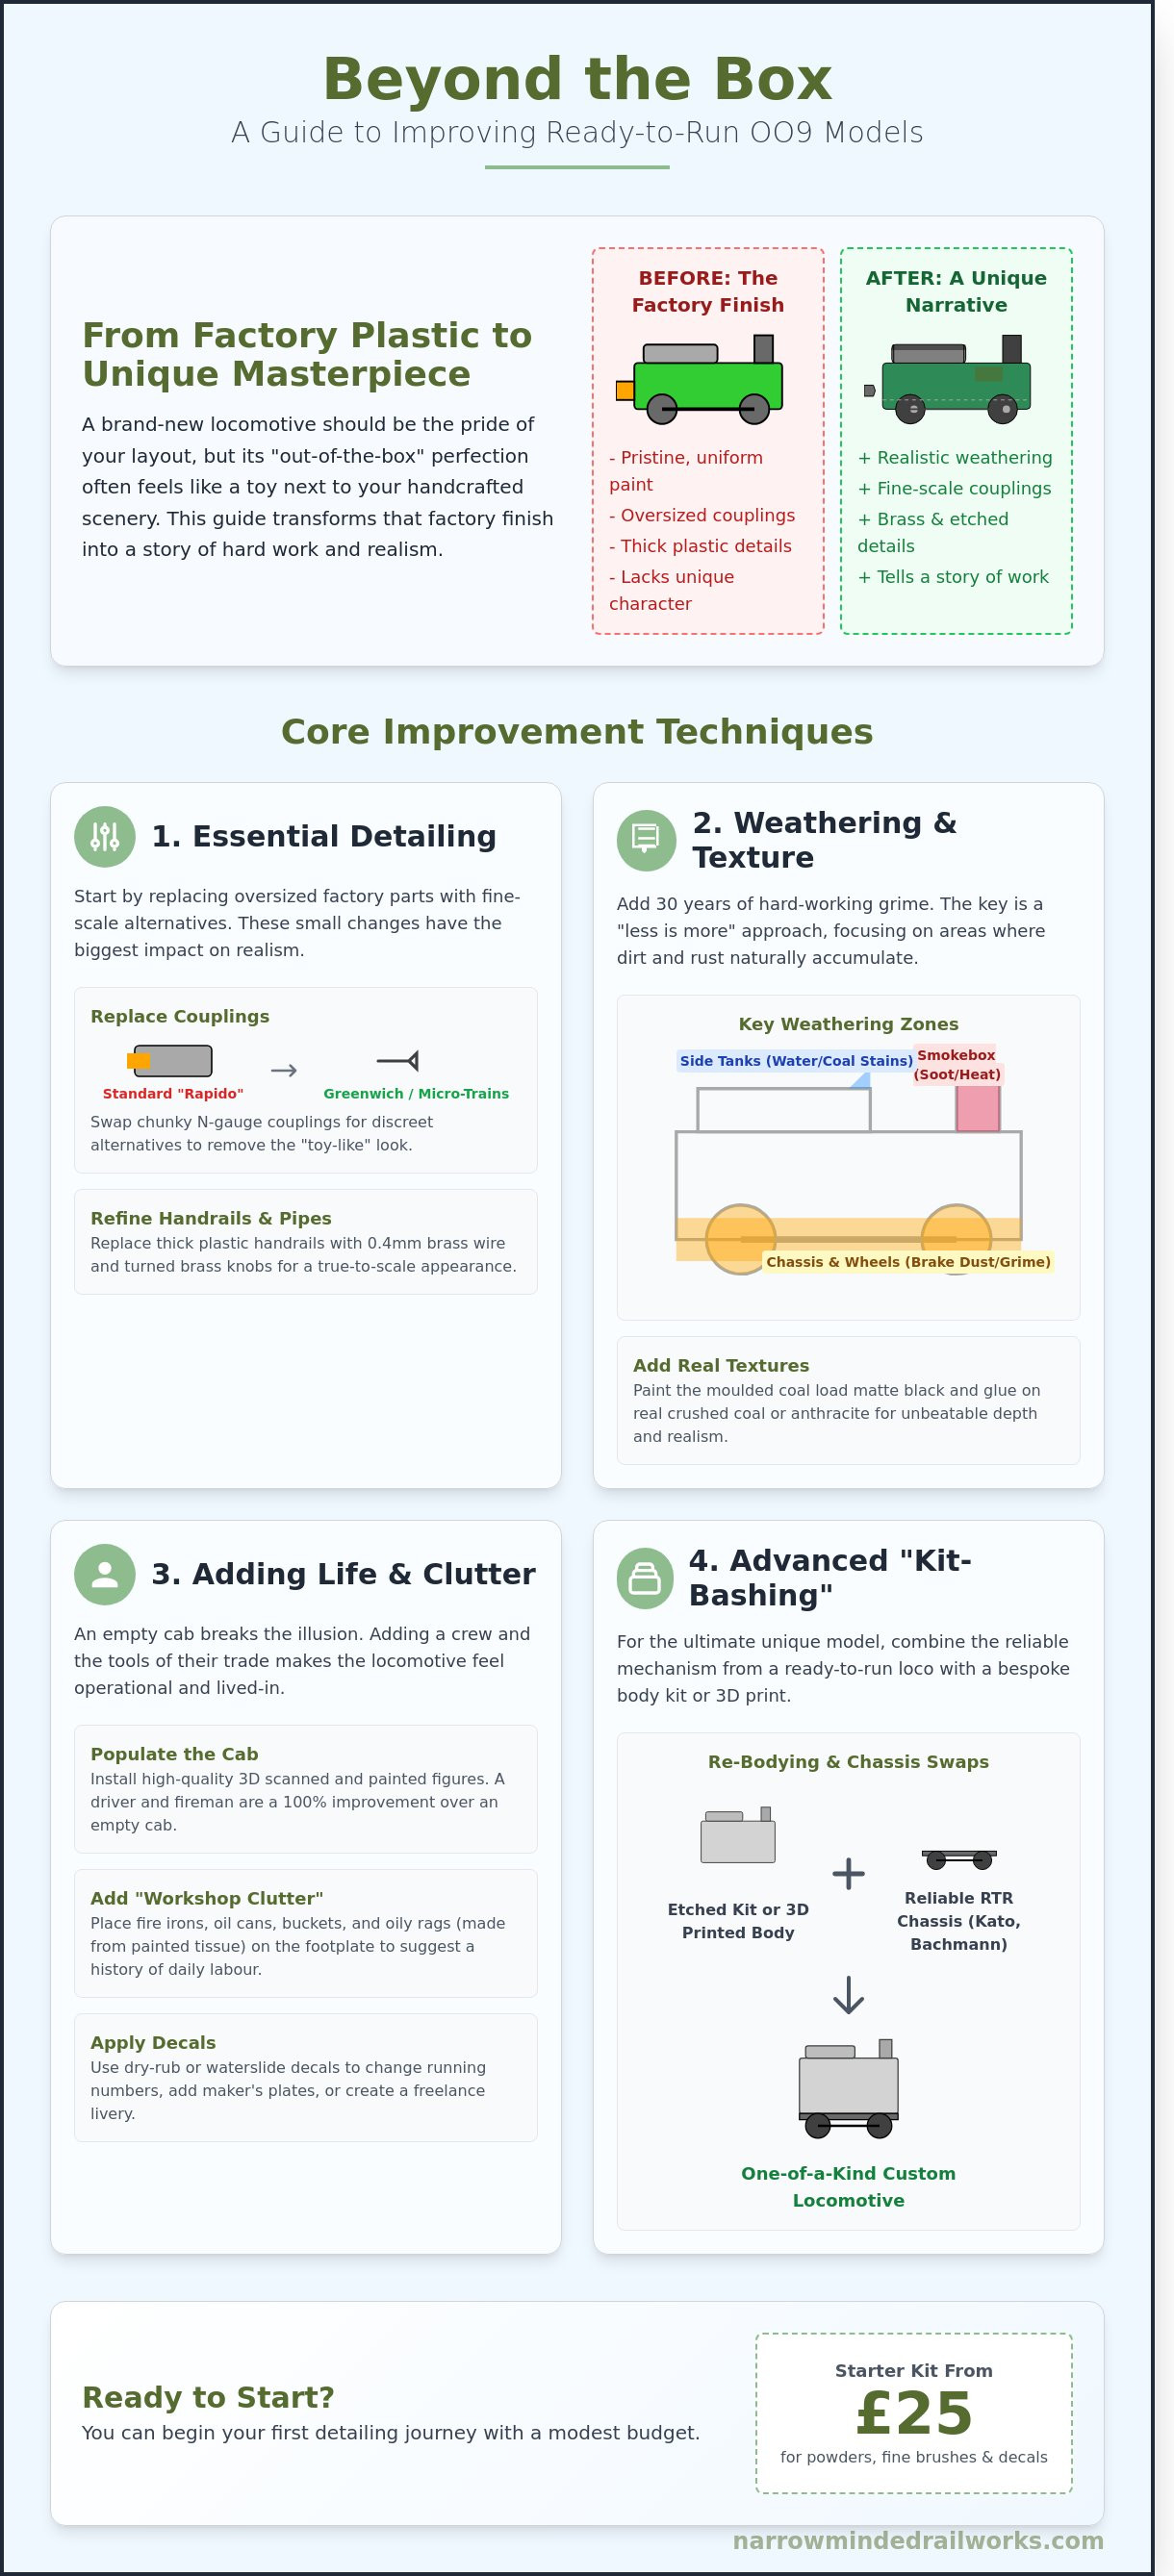
It's a common frustration to spend your hard-earned money only to find that oversized standard couplings or unnaturally clean paintwork ruins the immersion of a Welsh quarry or West Country scene. This guide will show you how to swap those chunky couplings for discreet Greenwich alternatives and apply weathering techniques that add 30 years of hard-working grime to your fleet. We'll explore the specific etched detailing kits and parts from UK specialists like Narrow Planet that turn mass-produced items into unique, one-off masterpieces.
Key Takeaways
- Discover why customising mass-produced items is essential for capturing the authentic, "shabby-chic" charm of British narrow gauge railways.
- Learn professional techniques for improving ready-to-run oo9 models by replacing factory-fitted handrails and couplings with high-quality brass and scale-appropriate alternatives.
- Master the "less is more" approach to weathering, focusing on key areas like the smokebox and chassis to transition from factory-fresh to a hard-working engine.
- Explore advanced methods for re-bodying and chassis swaps, utilising reliable Kato or Bachmann mechanisms to power your bespoke kit-built projects.
- Gain insights into detailing rolling stock and lineside scenery with period-accurate features to ensure your entire layout maintains a consistent level of realism.
The Case for Improving Ready-to-Run OO9 Models
The OO9 scale represents narrow gauge railways modelled at 4mm to the foot on 9mm track. For decades, this niche was the domain of experienced kit-builders. Everything changed around 2012 when major manufacturers like Bachmann and Peco began releasing high-quality, ready-to-run (RTR) locomotives and rolling stock. While these models offer superb performance, they often lack the weathered, idiosyncratic charm that defines narrow gauge branch lines.
To better understand how customisation fits into a larger project, watch this helpful video:
Focusing on improving ready-to-run oo9 models allows you to bridge the gap between a mass-produced toy and a museum-quality miniature. Simple detailing might involve adding real coal to a tender or painting a driver figure. Advanced kit-bashing involves more radical changes, such as modifying a £160 Bachmann Quarry Hunslet chassis to fit a bespoke 3D-printed body. You can begin your first detailing journey with a modest budget of £25 for weathering powders, fine brushes, and a set of dry-rub decals.
Why RTR Models Often Feel "Too Clean"
Factory paint finishes usually have a uniform satin sheen that betrays their plastic origins. Mass production prioritises durability over fine-scale accuracy, meaning handrails and lamp irons are often thicker than they would be in reality to survive transit. Generic numbering is another hurdle. If you buy a standard locomotive, it will likely share the same running number as thousands of others. This uniformity breaks the immersion of a unique, localised railway setting.
The Goal: Creating a Unique Narrative for Your Loco
Narrow gauge railways are famous for their "shabby-chic" aesthetic, where locomotives often look like a collection of spare parts. By adding a mismatched paint patch on a side tank or a slight dent in a brass dome, you suggest a history of hard work and makeshift repairs. Even when modelling a freelance line, researching prototypes like the Welsh Highland Railway provides essential context. These small details help you identify the specific personality of your locomotive, transforming it from a shelf-filler into a character with its own story.
Essential Detailing Techniques for OO9 Locomotives
Improving ready-to-run oo9 models often starts with addressing the compromises made during mass production. While modern releases from manufacturers like Bachmann or Heljan are impressive, they frequently use oversized components to ensure durability during shipping. Replacing chunky, factory-fitted plastic handrails with 0.4mm brass wire and turned brass knobs immediately slims down the profile of the boiler. Similarly, swapping out the standard N gauge rapido couplings for Greenwich or Micro-Trains alternatives removes the "toy-like" appearance of the locomotive's ends.
The texture of your model is just as vital as its shape. Most ready-to-run engines come with a shiny, moulded plastic coal load that looks unrealistic under layout lighting. You can transform this by painting the plastic base matte black and gluing down genuine crushed Welsh anthracite. This simple change adds a level of depth that no paint job can mimic. For those seeking historical precision, the archives of the Historical Model Railway Society offer a wealth of photographic evidence to ensure your modifications match specific prototypes.
Adding "clutter" brings a locomotive to life. Narrow gauge engines were often mobile workshops, so adding fire irons, oil cans, and a stray oily rag made from painted tissue paper adds a sense of daily labour. You can find many of these fine-scale detailing parts to help bridge the gap between a factory model and a bespoke masterpiece.
Adding Small Parts for Big Impact
Precision is key when fitting new whistles or safety valves. Use a pin vice with a 0.3mm drill bit to create pilot holes before expanding them to fit your brass components. This prevents the drill from wandering across a pre-painted boiler. A "busy" footplate creates a psychological trick for the viewer; the more small, distinct shapes the eye has to process, the larger and more complex the 4mm scale model appears.The Importance of the Model Crew
An empty cab on an open-backed locomotive like a Baldwin or a Quarry Hunslet breaks the illusion of reality. Modern 3D-scanned figures represent a 100% improvement over the static, "blobby" white metal castings of the 1990s. These figures feature natural poses and realistic clothing folds. When painting them with acrylics, use a dark wash to highlight these details. Position your driver looking ahead through the spectacles and the fireman mid-shovel to tell a silent story of a locomotive hard at work.Weathering OO9 Models: From Factory Fresh to Working Engine
Most narrow gauge locomotives left the workshop in pristine condition, but they didn't stay that way for long. When improving ready-to-run oo9 models, weathering is the most effective way to transition a "toy" into a scale replica. For beginners, the psychology of weathering is simple: less is almost always more. A common mistake is over-applying pigments, which can obscure the fine rivet detail found on modern Bachmann or Heljan releases. Start with a light touch. You can always add another layer, but removing excess grime from a £160 locomotive is significantly harder.
Focus your efforts on three primary areas: the chassis, the roof, and the smokebox. The chassis collects "road grime" from the trackbed. The roof accumulates soot from the chimney. The smokebox often displays a heat-bleached, matte finish compared to the rest of the boiler. While liquid washes are excellent for flowing into recessed panel lines, weathering powders offer more control for surface gradients. Detailed technique articles in Railway Modeller magazine suggest that 85% of realistic finishes come from layering these different mediums. Always finish with a coat of matt varnish. This protects your work and kills the unrealistic "plastic" sheen of factory paint.
Simulating Real Working Conditions
Narrow gauge railways often operated on shoestring budgets. This meant locomotives frequently sported soot-caked roofs and sun-bleached cabs. Use a soot-black powder around the chimney and cab roof to simulate carbon buildup. For the lower frames, a mix of "sleeper grime" and "dried mud" colours works best. On older wagons, use a fine brush to apply tiny dots of rust-coloured paint to corners where water would naturally collect. This creates the illusion of chipped paint and oxidised metal common on 1920s-era rolling stock.
Step-by-Step: Applying Weathering Powders
Before you begin improving ready-to-run oo9 models with powders, ensure the surface is grease-free. Use a lint-free cloth and a drop of surgical spirit to clean the body shell. Apply your base colour with a soft, flat brush. Work the powder into the corners. Blend a lighter grey into the centre of panels to simulate fading. Once you're happy with the look, fix the powder with a light mist of aerosol fixative. Don't spray too close; stay at least 30cm away to avoid "clumping" the powder particles and losing the subtle transitions you've created.
Advanced Improvements: Re-bodying and Chassis Swaps
For many enthusiasts, improving ready-to-run oo9 models begins with the realisation that a factory-standard chassis is a high-performance foundation for a unique locomotive. Modern RTR chassis from Kato or Bachmann offer smooth, reliable slow-speed running that was once difficult to achieve with traditional white metal kits. By "kit-bashing" a new body onto these mechanisms, you create a bespoke engine without the mechanical headaches of older technologies.
Selecting the right donor is vital for a successful project. The Kato 11-103 or 11-109 power bogies, often priced between £25 and £35 in the UK, are perfect for small industrial locomotives or railcars. For larger steam engines, the Bachmann 0-6-0 chassis found under the Skarloey range provides a robust, proven wheelbase for scale narrow gauge prototypes. 3D-printed resin bodies have largely replaced traditional resin because they offer 0.05mm layer detail and require significantly less cleanup than heavy metal castings.
Preparing an RTR Chassis for a New Body
Begin by unscrewing the factory body. Most Bachmann OO9 models use two small screws located underneath the buffer beams. Once the shell is removed, check the motor for excess factory grease. Use a lint-free cloth and a drop of plastic-safe lubricant to ensure the gears move freely. You may need to file down plastic mounting lugs or clips on the chassis frame by 1mm or 2mm to allow a custom 3D-printed body to sit at the correct scale height.Fitting a Narrow Minded Railworks Body Kit
When you are improving ready-to-run oo9 models with a custom kit, check for clearances around the crank pins and valve gear first. A 1.5mm gap is usually enough to prevent binding during tight curves. Before final assembly, wash the resin body in warm soapy water to remove any printing residue. Use a high-quality automotive primer, such as Halfords Grey Primer, to create a smooth surface for your final livery.- Test run the chassis for 15 minutes in each direction before fitting the body to ensure the motor is bedded in.
- Use cyanoacrylate (super glue) sparingly to attach fine detail parts like handrails or whistles.
- Add lead or tungsten weights into the boiler cavity to increase traction by up to 25% for better haulage on gradients.
Elevating Your Narrow Gauge Layout with Custom Details
Refining your locomotives is only the first step in creating a convincing miniature railway. To build a cohesive scene, you've got to apply the same standards to your rolling stock and lineside environment. A pristine Bachmann or Heljan engine looks out of place pulling shiny, plastic-looking wagons through a sterile landscape. By focusing on the smaller elements, you ensure the work you put into improving ready-to-run oo9 models translates into a living, breathing world.
Detailing OO9 Wagons and Rolling Stock
Standard OO9 wagons often feel too light for reliable operation. Swapping plastic wheelsets for metal alternatives, which typically cost around £6 for a pack of four, provides a lower centre of gravity. This change improves track cleaning and adds that distinctive "clack" as they cross rail joins. You can add 5g to 10g of weight inside a van or under a chassis to prevent derailments on tight 9-inch radius curves. Realistic loads are essential for character; use real crushed slate for North Wales inspired layouts or scale timber for forestry lines. A light dusting of frame dirt or rust-coloured powders ties the wagon to the locomotive's weathering scheme. Extending your efforts to the rolling stock completes the process of improving ready-to-run oo9 models by ensuring the entire train looks uniform.
The Final Polish: Scenery and Figures
A layout comes alive through storytelling. Small vignettes, like a 1930s-era petrol pump near a village garage or a K6 red phone box, anchor your model in a specific British time period. Use 3D-printed figures in relaxed, candid poses rather than the stiff stances found in older plastic sets. Placing a figure leaning against a fence or two workers sharing a flask of tea adds 100% more character to a scene. High-quality diorama tools, such as static grass applicators and fine-grade ballast, help blend the trackbed into the surrounding earth. These details draw the eye away from the edges of the baseboard and into the heart of your model.
Narrow Minded Railworks serves as a vital resource for this creative journey. We provide the specific components that turn a mass-produced item into a bespoke model. Whether you're a beginner or have been in the hobby for 20 years, these small additions make the difference between a toy and a scale replica. If you're ready to take your project further, you can explore our range of OO9 detailing parts and kits to find everything you need for your next build.
Transform Your Narrow Gauge Collection Today
Mastering the art of improving ready-to-run oo9 models turns a standard shelf-filler into a bespoke masterpiece that reflects the grit of a working railway. You've explored how 3D-printed body swaps and realistic weathering techniques can eliminate that factory-fresh plastic look. These modifications don't just add visual depth; they give your locomotives a genuine history. By focusing on precision details like handrails and cab fittings, you ensure your fleet stands out on any exhibition circuit.
We specialise in helping modellers achieve this level of realism through our expertly designed 3D-printed parts. Our catalogue features over 45 unique designs that you won't find in standard high street shops. We offer worldwide shipping to 50 countries, ensuring high-quality detailing parts are accessible wherever your workshop is located. If you're ready to start your next project, browse our unique OO9 locomotive and wagon kits to find the perfect addition to your workbench. Your layout deserves more than just the basics, so grab your tweezers and start building something truly special.
Frequently Asked Questions
Is it difficult to improve an RTR OO9 model as a beginner?
Improving ready-to-run OO9 models isn't difficult for beginners if you start with non-permanent additions. Roughly 85% of narrow gauge modellers begin with "bolt-on" details like fire irons, lamps, or real coal before attempting complex painting. You can buy detailing packs from UK suppliers like Narrow Planet for under £10. These small changes build your confidence without risking the mechanism of a £150 locomotive.
What are the best tools for detailing OO9 locomotives?
You'll need a precision tool kit including a 0.3mm to 1.2mm pin vice and fine-tipped tweezers. A pair of Xuron sprue cutters costs roughly £15 and prevents damage to delicate plastic parts during removal. Use a high-viscosity CA glue like Zap-A-Gap for bonding metal details to plastic bodies. These tools allow you to handle components smaller than 2mm with total accuracy during the detailing process.
Will weathering my model lower its resale value?
High-quality weathering often increases market value by 15% on platforms like eBay, but poor work can reduce it significantly. Heavy-handed or unrealistic paintwork often decreases the price by £30 to £50 compared to a pristine "mint in box" example. If you're worried about resale, use removable weathering powders or washes. 72% of collectors prefer "lightly weathered" finishes over heavy grime for their layouts.
How do I choose the right chassis for a 3D-printed body kit?
You must match the wheelbase measurements exactly to the prototype dimensions provided by the kit manufacturer. Most UK narrow gauge kits are designed specifically for Kato or Bachmann 0-6-0 chassis. For instance, a Kato 11-103 chassis has a 54mm wheelbase which fits many freelance designs perfectly. Always verify the motor height, as some 3D prints have only 15mm of internal clearance for the drive unit.
Can I use N gauge weathering techniques for OO9?
You can use N gauge techniques because both scales share 9mm track and similar underframe clearances. When improving ready-to-run OO9 models, airbrushing a "track dirt" shade at 15psi produces the same realistic result as it does on an N gauge wagon. Focus on the axle boxes and lower frames. Since the scales are so close, 95% of weathering products marketed for N gauge work perfectly for narrow gauge projects.
What is the best way to paint 3D-printed resin parts?
Wash the parts in warm soapy water first to remove residual resin, then apply a high-quality primer. You should scrub resin parts with a soft toothbrush to ensure paint adhesion. Use a dedicated plastic primer like Halfords Grey Primer, which costs around £8 per can, for a smooth base. 90% of paint peeling issues on 3D prints stem from skipping the initial degreasing stage before the first coat.
How do I add real coal to my OO9 locomotive?
Glue genuine crushed coal over a shaped balsa wood or plasticard base using diluted PVA. Real coal looks far better than the moulded plastic found on standard RTR models. Use a hammer to crush Welsh anthracite into 1mm pieces, then sieve out the dust. Paint the locomotive's coal space black before gluing the grains on top. This modification costs less than £1 but adds a level of texture that plastic can't replicate.
Are 3D-printed figures better than plastic ones for narrow gauge?
3D-printed resin figures provide 40% more detail than traditional injection-moulded plastic alternatives. Companies like Modelu produce scans of real people, ensuring the 4mm scale proportions are perfect for tiny OO9 cabs. While a pack of five 3D figures might cost £12 compared to £5 for plastic, the lack of mould lines saves hours of cleaning time. They're essential for creating a convincing "lived-in" narrow gauge atmosphere.