

When choosing 3d printed trackside huts, start with the space and railway scene you have in mind. A finely detailed model can still look out of place if its scale, footprint or setting doesn’t match the track and surrounding buildings.
Scale labels don’t always make it easy to judge how a model will sit in your available space, and product photographs can make print texture or small details difficult to assess.
This guide covers the features worth comparing before you choose: scale and dimensions, the hut’s apparent railway role, architectural details and visible finish. You’ll also find practical pointers for painting, weathering and positioning it within the scenery.
Whether you’re building an OO9, GN15 or 7mm narrow-gauge scene, matching the hut to the character of the railway matters as much as checking its measurements. A few careful checks can help you choose a model that fits both the layout and the story you want it to tell.
Key Takeaways
- Identify the hut’s apparent railway role first, so its design supports the activity and character of the scene.
- Compare the stated scale and dimensions with nearby buildings and the space available beside the track.
- Use photographs and product details to assess doors, windows, roof edges and wall texture.
- Consider the layout’s usual viewing angle and the preparation needed to paint and weather the model.
- Test the hut in position beside the track, paths and boundaries before fixing it into the scenery.
Why a 3D-Printed Trackside Hut Can Make a Layout Feel Complete
A small building beside the rails can give a scene a sense of purpose. A trackside hut might suggest storage, signalling or housing for lineside equipment, but its appearance alone doesn’t establish a specific use. Let the surrounding track, access and railway activity provide the clues rather than assigning the model a function it may not represent.
A trackside hut is a small railway-side structure chosen to suit its role, scale and setting. These three considerations help you judge whether it belongs in the scene, not just whether it fits on the baseboard. On a narrow-gauge layout, where buildings and trackside details often sit close together, a well-matched hut can add a useful scale cue without overwhelming the railway.
What does a trackside hut add to a model railway?
An empty patch beside the track can look unfinished; a hut can make it feel purposeful. Its position may imply that railway staff need access to equipment or storage, especially if a path leads to the door or nearby tools and materials support that impression. Keep the story plausible: a building placed only to fill a gap can compete with the track or scenery instead of strengthening them.
Consider how the hut relates to what is already there. A clear route from a platform, work area or boundary gives it context. Leave enough space around the structure for it to read as part of the railway rather than an isolated ornament.
Which railway setting should the hut suggest?
Look at the surroundings before settling on a style. A rural scene might call for a simple building beside open ground, while an industrial area may suit a more utilitarian appearance. Near a station, the hut should make sense alongside paths and railway facilities. In a narrow-gauge setting, compact proportions and close relationships between track and scenery can help maintain the scene’s character.
Roof shape, wall finish and the size or placement of doors and windows all affect the impression. Match these features to the layout’s period and atmosphere, then check that the hut’s apparent age and condition don’t clash with nearby structures. No single style suits every railway.
Treat 3d printed trackside huts as considered scenery, not automatic gap-fillers. A building’s final effect depends on how it relates to the surrounding track and structures. Decide what the hut should suggest, check that its visual character fits, and place it where it makes sense in the railway’s story. Narrow Minded Railworks offers 3D-printed scenery and accessories for model-making projects, alongside narrow-gauge locomotive and wagon kits.
Match a 3D-Printed Trackside Hut to Scale, Gauge and Available Space
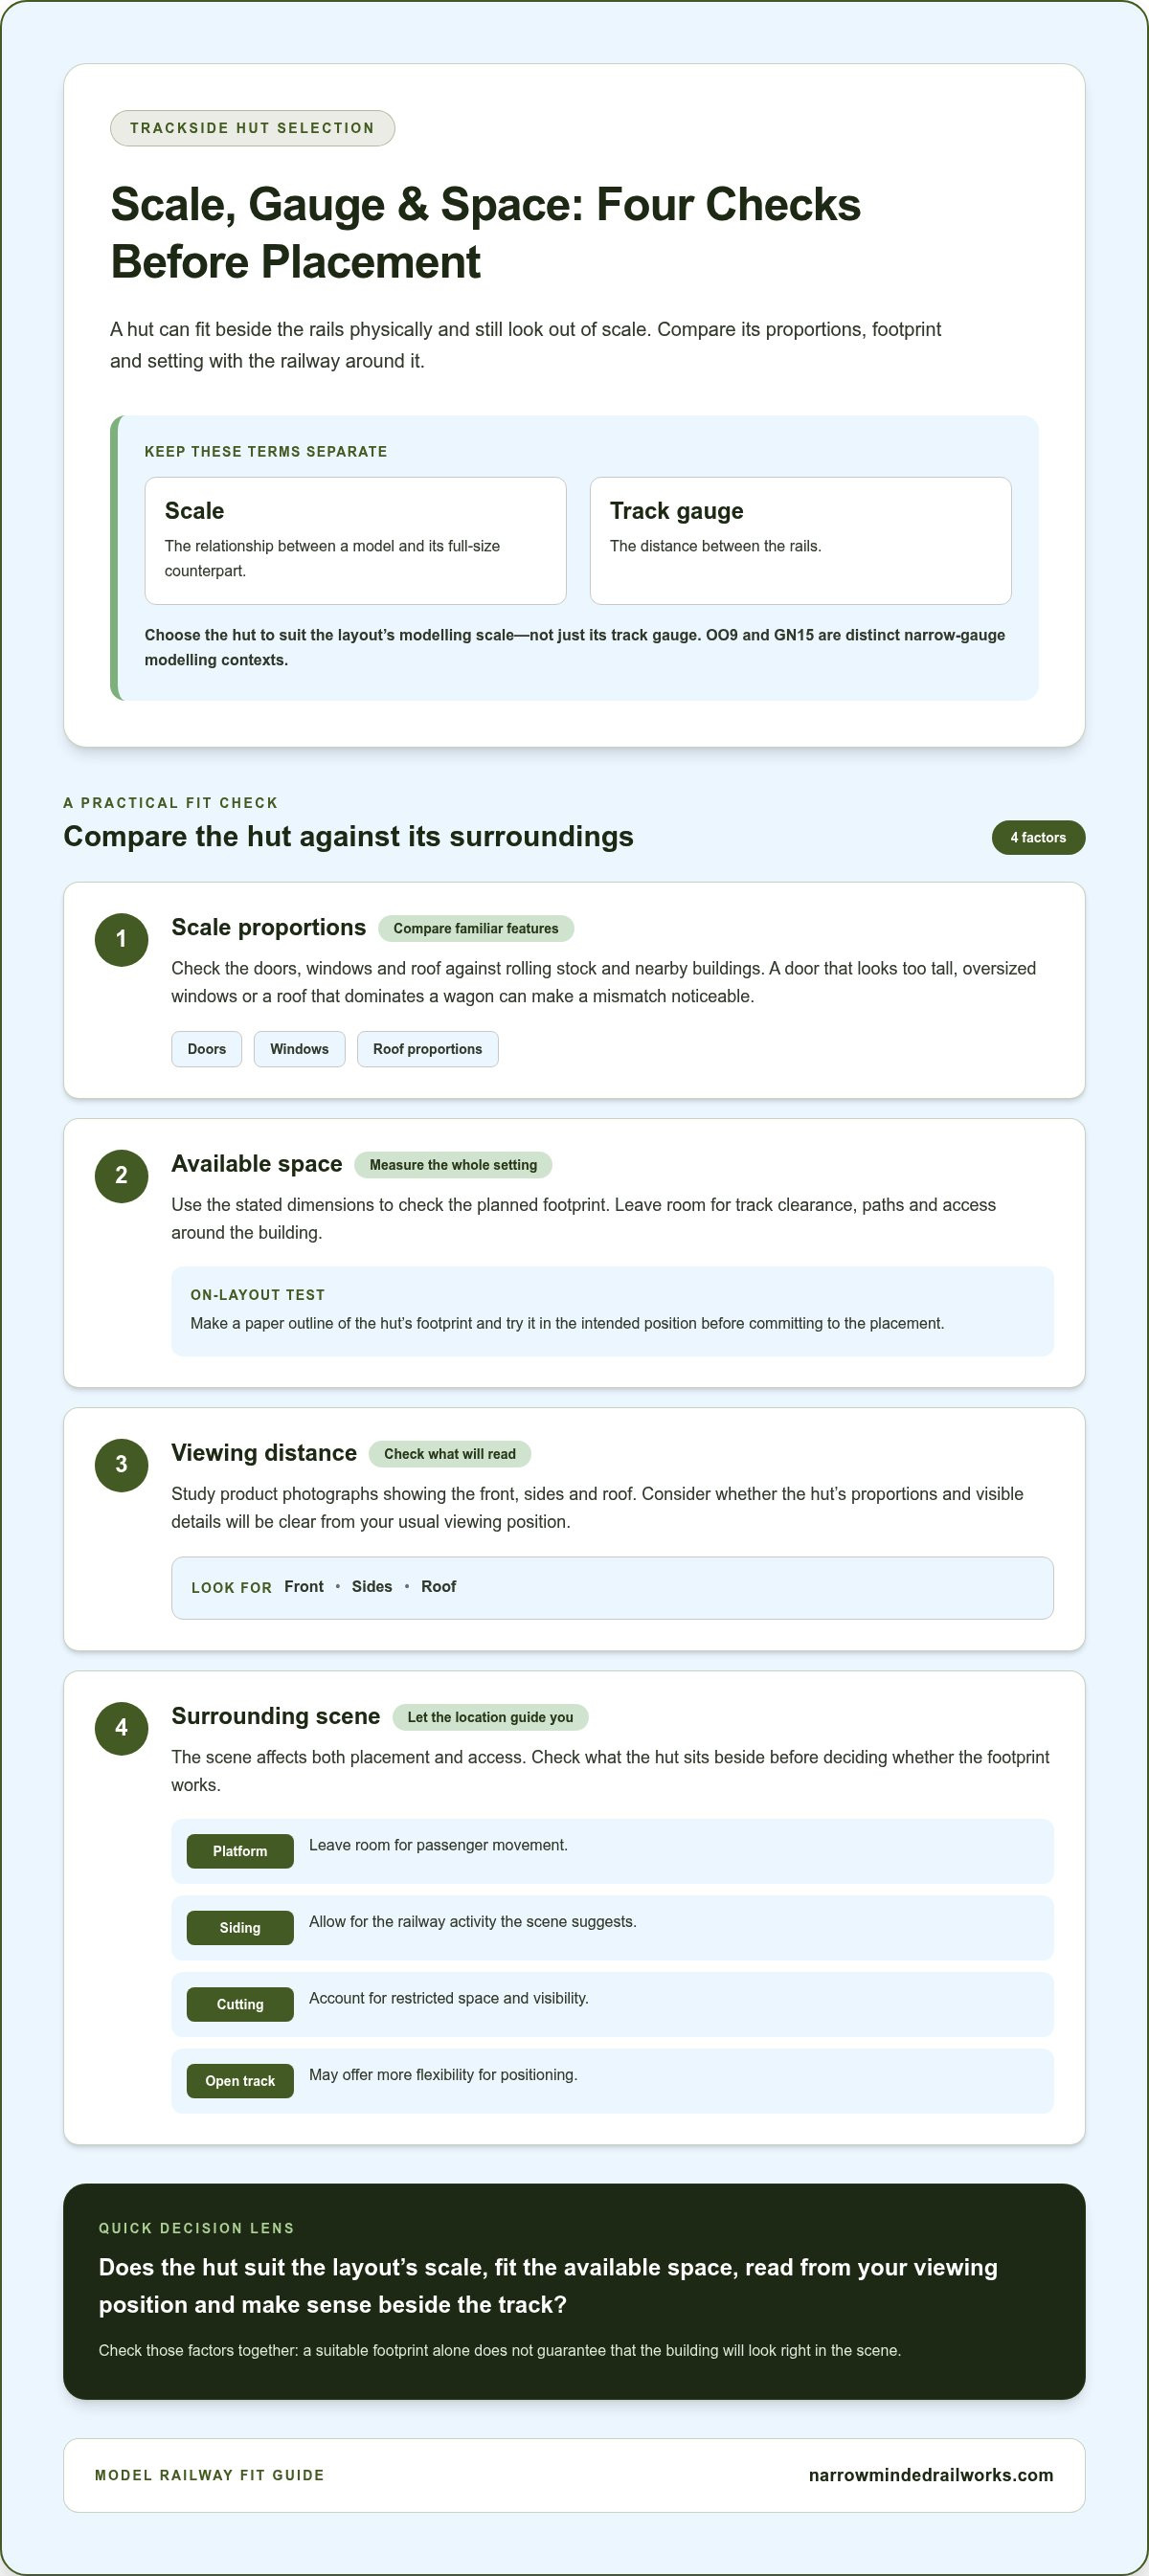
A hut can fit beside the rails physically yet still look too large or small next to a locomotive, wagon or nearby building. Check its stated scale and dimensions, then compare them with the objects and space around its intended position.
How do scale and gauge affect hut selection?
Scale describes the relationship between a model and its full-size counterpart; track gauge is the distance between the rails. They’re related in a model railway, but they aren’t interchangeable. Choose a building to suit the layout’s modelling scale, not just its track gauge. OO9 and GN15 are distinct narrow-gauge modelling contexts, so don’t assume a hut suited to one will look right in the other. For more background, read this narrow-gauge railway modelling guide.
Compare familiar features with rolling stock. A door that appears too tall, oversized windows or a roof that dominates a wagon can make a scale mismatch obvious, even if the hut’s footprint seems suitable. For context on the technology behind printed scenery, Autodesk’s overview traces the history of 3D printing technology.
How can you check whether a hut will fit?
Measure the planned footprint and allow for track clearance, paths and access around the building. A hut beside a platform should leave room for passenger movement; beside a siding, it should allow for the railway activity the scene suggests. An open-track location may offer more flexibility, while a cutting can restrict space and visibility.
Use stated dimensions where available, and study product photographs showing the front, sides and roof. Compare the model’s footprint with a paper outline on the layout before committing to a position. The photographs can also help you judge proportions and whether details will be visible from your usual viewing position.
| What to compare | Practical check |
|---|---|
| Scale | Compare doors, windows and roof proportions with rolling stock and nearby buildings. |
| Available space | Measure the footprint, track clearance and room for paths or access. |
| Viewing distance | Check whether the visible details will read from the normal viewing position. |
| Surrounding scene | Consider whether a platform, siding, cutting or open track affects placement. |
Use these checks before choosing 3d printed trackside huts, especially when a compact narrow-gauge scene leaves little room to disguise a poor fit. Browse narrow-gauge railway scenery and modelling products as you plan a coherent layout.
Compare 3D-Printed Trackside Huts by Detail, Construction and Finish
A hut’s overall shape may suit your layout, but small features influence how convincing it looks up close. Product photographs show visible surfaces, descriptions explain construction or supplied parts, and stated dimensions help you judge proportions. Don’t assume every printed model uses the same process, material or preparation method.
Which details make a printed hut convincing?
Inspect the roof edges, door and window openings, wall texture and definition around the base. Look for consistent outlines and details that remain clear in photographs, while remembering that lighting and camera angle affect how a surface appears. Consider the normal viewing distance on your layout: a feature that looks crisp in a close-up may be difficult to see from across the room.
Before choosing, inspect the roof edges, doors, windows, wall texture and base definition, then judge whether each detail suits the hut’s role and viewing distance. A simple lineside building may look more believable with restrained detailing than with extras that draw attention away from the railway. For 3d printed trackside huts, clear, consistent features are often more useful than a high quantity of detail.
What should you expect from preparation and painting?
Preparation varies by model, so follow its product-specific guidance rather than assuming one print needs the same treatment as another. Check what, if anything, needs removing or tidying before painting, and whether the instructions recommend a particular surface preparation. Product information can help you understand the model’s construction and plan the finish.
Once prepared, use a primer and base colours that suit the hut’s intended setting. A rural structure might call for a different treatment from one beside an industrial siding. Restrained weathering can help either blend into its surroundings. Avoid heavy paint layers that could obscure fine relief. For broader finishing steps, see this 3D-printed model painting guide.
- Roof: Check edge definition and whether the profile suits the building.
- Openings: Compare door and window proportions, placement and clarity.
- Walls and base: Look for consistent texture and a clear boundary where the hut meets the ground.
- Finish: Read preparation guidance, then plan paint and weathering to suit the scene.
Use these checks together rather than judging from a single attractive angle. A clear description, useful photographs and dimensions give you a more balanced picture of the model. Preparation guidance also helps you plan the work needed to bring it into the wider railway scene.
Use This Trackside Hut Buying Checklist Before You Choose
Start with the scene, not the product photograph. Work through these checks in order to compare a hut’s appearance with its footprint and the preparation it will need.
Five checks to make before selecting a hut
- Set the layout context. Decide what kind of railway scene the hut belongs in, what it might plausibly support and which period or atmosphere it should suggest. Use its apparent function to guide placement, not as a confirmed specification.
- Match the modelling scale. Check the stated scale against your layout and compare the hut with nearby buildings and rolling stock. Track gauge and modelling scale describe different things, so don’t rely on gauge alone to judge the building’s proportions.
- Measure the available space. Compare the model’s stated dimensions with the intended footprint. Allow room for track clearance, paths and access, and consider whether the hut will sit beside a platform, siding, cutting or open track.
- Assess detail and viewing angle. Review product information and available photographs for the visible sides, roof, doors, windows, wall texture and base. Ask whether those details will read clearly from your normal viewing distance, not just in a close-up.
- Plan preparation and placement. Read the model-specific preparation guidance and consider whether the finishing work suits your time and skills. Decide how primer, paint and weathering will fit the scene, then test the footprint in position before fixing the hut in place.
How to decide between similar hut designs
If two designs appear equally suitable, favour the one whose proportions and surroundings best support your layout’s story. Clear details that remain visible at normal viewing distance can contribute more than extra features that disappear once the model is installed. Balance those strengths against the available space and the preparation each model needs; the most elaborate option isn’t automatically the best fit.
Use this checklist to compare 3d printed trackside huts consistently, whether you’re planning a narrow-gauge scene or adding a structure to an established layout. Measuring, reviewing the visible detail and planning the finish can help prevent a hut from feeling crowded or disconnected from the railway.
Ready to explore scenery for your layout? Browse narrow-gauge railway scenery and consider how each structure will work with the rest of the scene.
Finish and Place a 3D-Printed Trackside Hut for a Believable Scene
A well-chosen hut can still feel disconnected if it sits awkwardly in the landscape. Placement, ground cover and paint help connect the building to the railway, so treat it as part of the scene rather than an object to fix wherever space remains.
Where should a hut sit beside the track?
Position the hut where its apparent purpose makes sense and leave a plausible route to its entrance. A path might lead from a platform or work area; a hut near a boundary could sit alongside a fence or hedge. Keep suitable clearance from the rails and avoid blocking a route that railway staff or passengers would need to use.
Before securing it, place the model temporarily and view it from the angles you normally use to look at the layout. Check that the building doesn’t hide an important track feature or disappear behind scenery. See how it reads beside nearby structures, too. A small adjustment can improve the composition without changing the rest of the scene.
How can scenery make the hut feel part of the railway?
Blend the base into the surrounding ground with materials and colours that suit the location, while keeping the hut’s outline distinct. Grass, gravel or a worn path can connect it to the trackside, but use details that make sense for the setting. Too much ground cover can obscure the base or make the hut look buried.
Paint and weathering should suggest the building’s place in the layout’s history. Choose colours that sit naturally with nearby structures, then weather with restraint: a modest change in tone can suggest use and exposure without obscuring details. Avoid adding tools, signs or other accessories simply to fill the space. Each should support the scene rather than compete with the hut.
- Dry-fit first: Check footprint, access and clearances before fixing the model.
- Review sightlines: Look from the layout’s usual viewing positions.
- Blend the base: Match ground cover to the setting while preserving a clear edge.
- Finish with purpose: Use paint and weathering to support the hut’s surroundings, not overwhelm its details.
These final checks bring 3d printed trackside huts into the wider railway scene, where paths, boundaries and nearby activity make their placement feel intentional. Narrow Minded Railworks sells 3D-printed model railway products, including scenery and diorama tools for model-making projects. Explore Narrow Minded Railworks model railway scenery for ideas to develop a cohesive layout.
Choose a Hut That Completes Your Railway Scene
The right hut should feel connected to the railway around it, not simply occupy an empty patch. Match its scale and dimensions to the layout, check that the visible details suit your viewing distance, and consider the preparation needed to finish it. These checks help 3d printed trackside huts sit naturally beside the track and contribute to a coherent scene.
Narrow Minded Railworks sells 3D-printed model railway products and scenery for enthusiasts modelling narrow-gauge and other scales. Its range includes OO9 and GN15 kits, 7mm scale kits, and scenery and accessories. Whether you’re developing a compact OO9 setting or shaping a different railway environment, thoughtful scenery choices can help give the layout a distinctive character.
Explore Narrow Minded Railworks model railway scenery and find inspiration for your next layout project. With a well-matched structure and considered placement, even a small trackside detail can make the whole railway feel more complete.
Frequently Asked Questions
What is a 3D-printed trackside hut?
A 3D-printed trackside hut is a small model railway building made using additive manufacturing and designed to sit beside the rails. It might represent storage, signalling or lineside equipment, depending on its design and the scene around it. The best 3d printed trackside huts suit the layout’s scale, railway setting and available space, adding context without looking oversized or out of place.
How do I choose the right scale for a trackside hut?
Choose a hut whose stated modelling scale matches the rest of your layout. Scale and track gauge are different measurements, so a gauge label alone won’t tell you whether the building’s proportions will look right. Compare its dimensions with nearby rolling stock, doors and buildings. If you model OO9 or GN15, assess each hut against that specific modelling context rather than assuming the scales are interchangeable.
Do 3D-printed model railway huts need painting?
Painting can help a model railway hut fit its scene, but preparation depends on the particular model and its material. Follow the product-specific guidance before applying primer or paint, and remove or tidy any supports only as directed. A suitable base colour helps establish the hut’s character, while restrained weathering can connect it to the layout. Avoid heavy paint layers that might soften small details or cover surface texture.
What should I check before buying a 3D-printed hut?
Check the stated scale, dimensions, visible details and preparation guidance before choosing a hut. Compare its footprint with the space beside your track, allowing room for access paths and nearby structures. Review photographs from different angles to assess roof edges, doors, windows and the base, and consider whether those details will be visible from your usual viewing position. Finally, weigh the model’s appearance against the work needed to finish it.
Can I use a trackside hut on a narrow-gauge model railway?
Yes, a trackside hut can suit a narrow-gauge railway if its scale, proportions and setting match the layout. Narrow gauge describes the track arrangement, not a single modelling scale. Compare the building with your chosen scale and adjacent locomotives, wagons and scenery. A compact hut can support a convincing lineside scene, but its position and apparent role should make sense alongside the railway activity.
How do I make a model railway hut look realistic?
Make a hut look realistic by matching its finish and placement to the surrounding railway scene. Choose paint colours that fit the layout’s period and atmosphere, then apply weathering lightly so it suggests use without hiding the details. Blend the base into nearby ground cover, and add a path, boundary or equipment only if it supports the scene. Check the result from normal viewing angles before settling the placement.
How should I attach a 3D-printed hut to a model railway layout?
Test-fit the hut before attaching it, checking track clearance, access and sightlines from the layout’s usual viewing positions. Prepare the contact area as directed for the model, then use an adhesive suitable for both the hut’s material and the layout surface. Apply it sparingly to the base, keeping glue away from visible details, and hold the structure steady as the adhesive sets according to its instructions.