

Could a finely detailed locomotive body still be the wrong choice for your railway? With 3d printed narrow gauge rolling stock, the printed parts are only one part of the decision. Scale, track gauge and chassis compatibility all affect whether a kit will suit your layout.
It’s easy to assume a kit contains everything needed to build a working model, but requirements vary. A 3D printed kit can offer access to distinctive locomotives, wagons and other narrow-gauge subjects, while leaving assembly, finishing and, where needed, sourcing a compatible chassis to the modeller. Before choosing, check what the scale and gauge tell you, what parts are included and what the kit is designed to fit.
This guide explains what 3D printing brings to narrow-gauge modelling, how kit requirements can differ, and what to consider before building. You’ll also see how OO9, GN15 and O-16.5 / 7mm scale options relate to different modelling projects, so you can compare your layout, experience and available components with the kit you’re considering.
Key Takeaways
- Learn what 3d printed narrow gauge rolling stock describes, and why the printing method alone doesn’t tell you a kit’s scale or contents.
- Compare OO9, GN15 and O-16.5 / 7mm scale to narrow down options for your layout and modelling project.
- Use a practical checklist to assess kit descriptions, chassis fit, instructions and finishing needs before you begin.
- Discover how Narrow Minded Railworks’ locomotive, wagon and scenery kit categories relate to different narrow-gauge projects.
What Is 3D Printed Narrow Gauge Rolling Stock?
On a model railway, rolling stock means the locomotives and wagons that run along the track. Narrow gauge describes the track and railway being represented, while 3D printed tells you how some model parts were made. The phrase 3d printed narrow gauge rolling stock doesn’t, by itself, tell you the model’s scale, whether it’s a complete working vehicle or what else you’ll need to build it.
A 3D printed rolling-stock kit is a set of printed model parts for a locomotive or wagon, not necessarily a complete, ready-to-run vehicle. Depending on the kit, the modeller may need to assemble and finish the parts, then source compatible components such as a chassis, wheels or couplings before the model can operate. Kit contents and requirements differ, so use the individual product information to plan the build.
A short video offers a look at how 3D printing can be used to create custom rolling stock:
What does 3D printing change for narrow-gauge models?
Digital design gives a maker a way to create and reproduce shapes for a particular prototype or modelling idea. That can be useful for narrow-gauge layouts, where the subject might be a distinctive locomotive body or wagon rather than a widely produced mainstream model. It broadens the kinds of forms and specialist subjects that can be represented, but it doesn’t guarantee a particular level of detail, durability or running performance.
Printing describes the production method, not the whole building process. You still need to understand how the parts fit together, prepare and finish them as directed, and consider what components will make the finished model work. Some kits are designed to fit commercially available chassis, but compatibility depends on the individual design. Treat the printed parts as the start of a project, then use the kit information to plan the remaining work.
What counts as rolling stock in a narrow-gauge layout?
A locomotive provides the motive power, while wagons carry loads behind it. For example, a layout might feature a small locomotive hauling wagons that represent the goods or materials moved by a narrow-gauge railway. Both are rolling stock; scenery, buildings and track form other parts of the layout.
Narrow-gauge modelling includes different combinations of model scale and track gauge. Scale describes how large the model is relative to its real-life subject; gauge is the distance between the rails. As a result, two models representing narrow-gauge railways can have different proportions and run on different track arrangements. Don’t assume that the words “narrow gauge” alone establish whether a model will suit your existing track or equipment.
If you’re new to the subject, this introduction to narrow gauge railways explains the hobby fundamentals. Keeping scale, gauge and the kit’s intended components distinct makes it easier to understand what you’re buying and what the build may involve.
How 3D Printed Narrow Gauge Kits Work: Parts, Chassis, and Assembly
A kit build involves a sequence of checks and decisions, not simply taking parts from a box and putting them together. Start with the individual product information: it explains what the kit is intended to represent, which parts are supplied, and whether additional components are needed. Contents and assembly steps vary between kits, so don’t rely on assumptions from another model you’ve built.
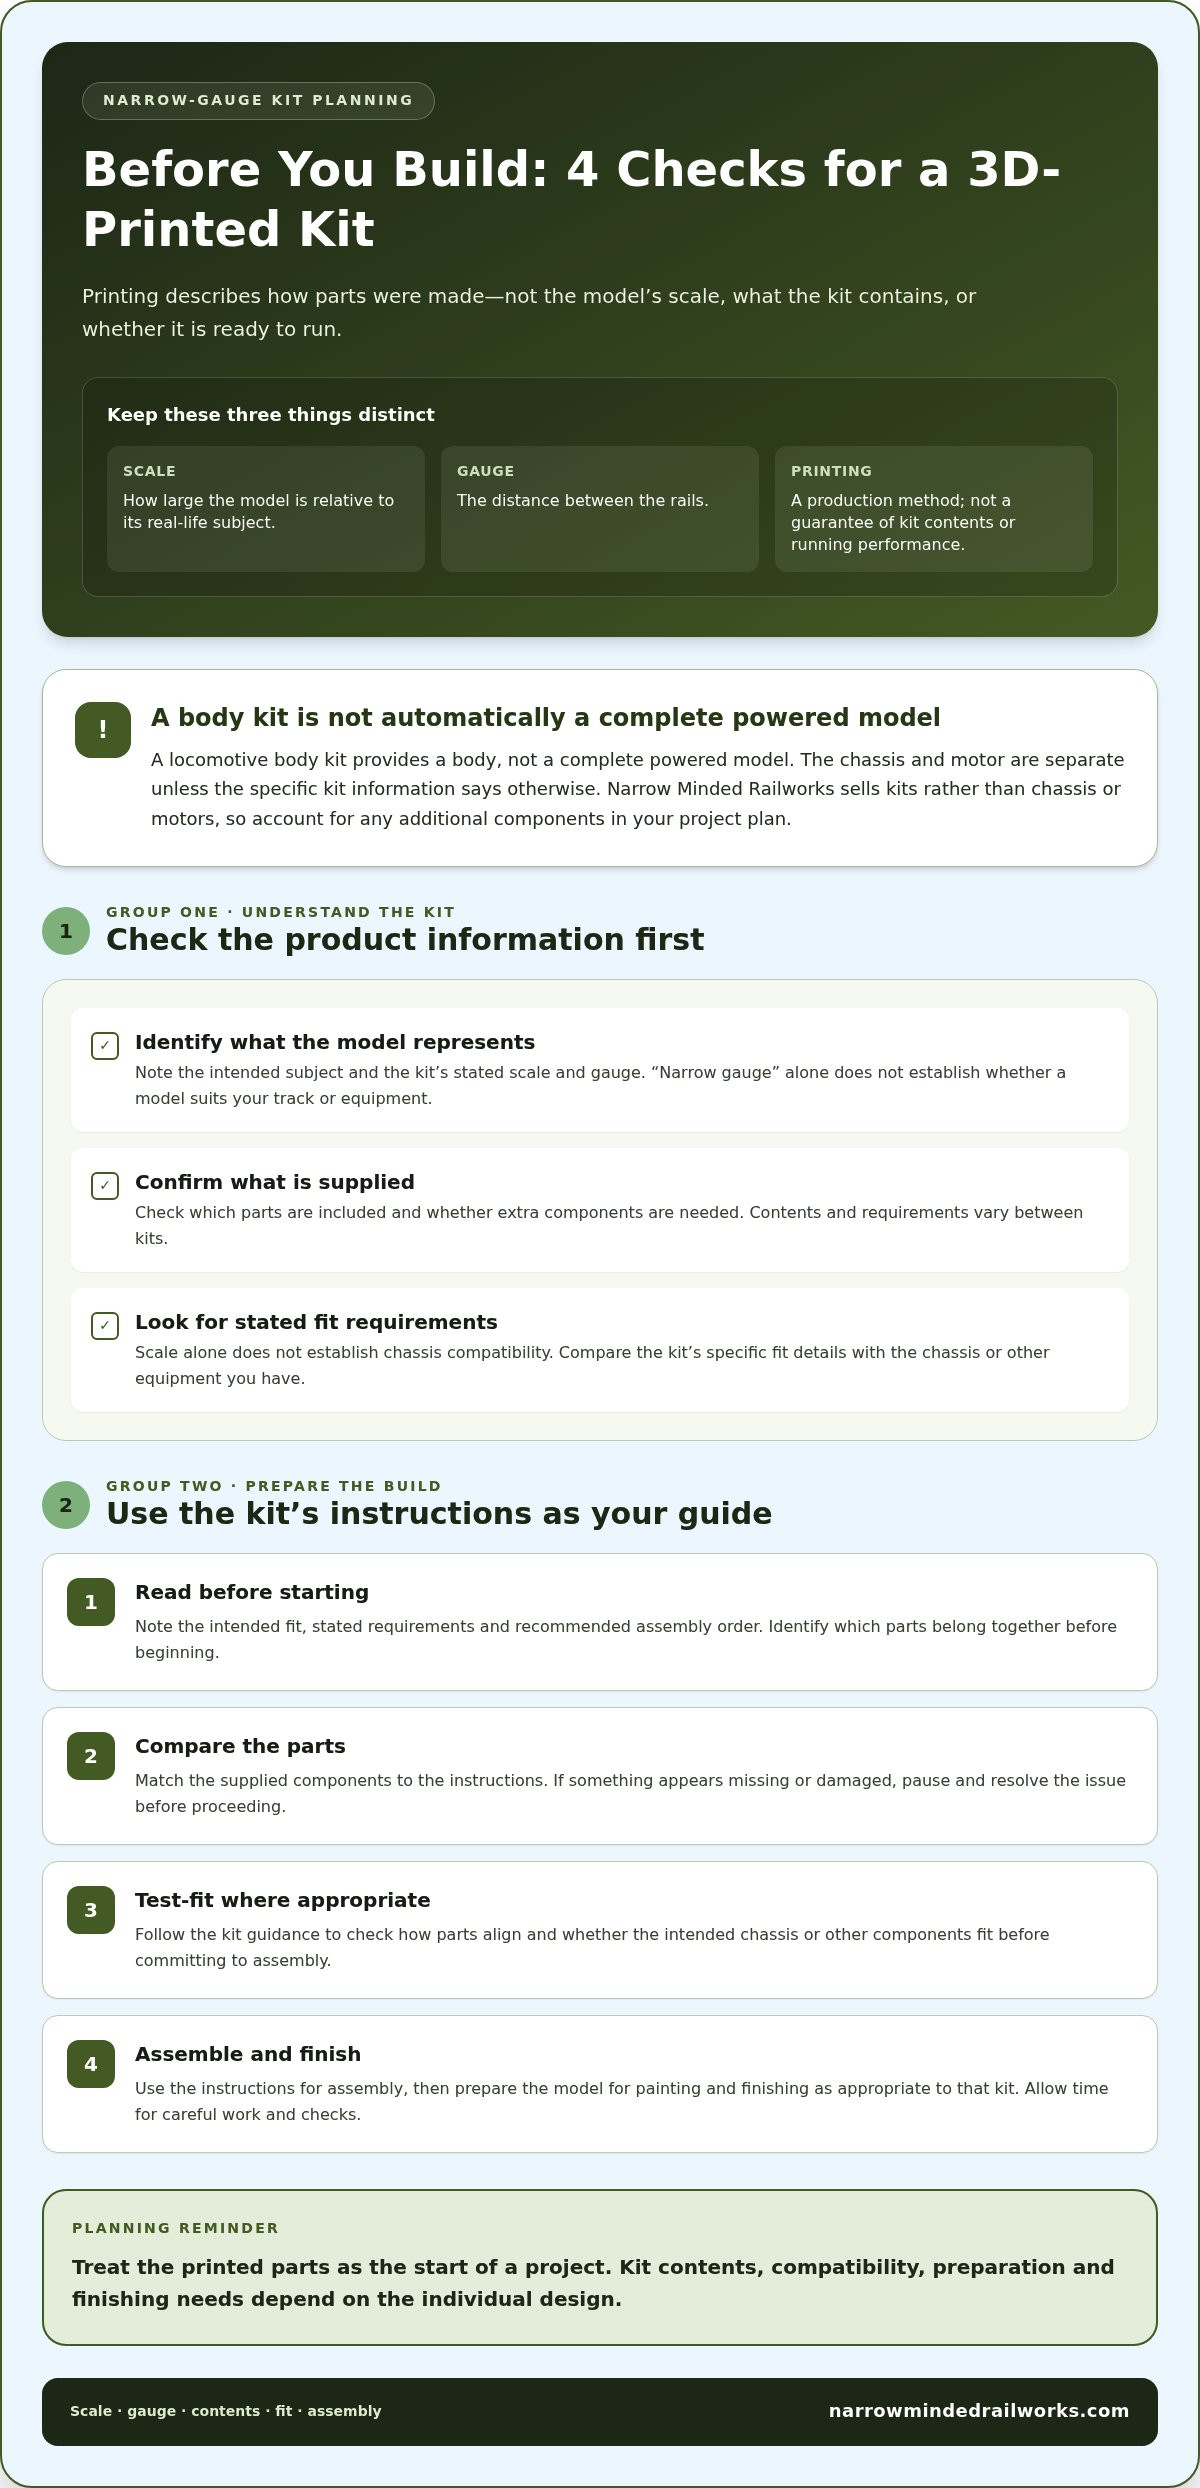
A locomotive body kit provides a body, not a complete powered model. The chassis and motor are separate components unless the specific kit information states otherwise. Narrow Minded Railworks sells kits rather than chassis or motors, so include any additional components in your project plan.
3D printing is one part of a broader manufacturing field. America Makes - National Additive Manufacturing Institute provides information about additive manufacturing beyond model railways. For your model, follow the kit instructions when assembling and finishing the parts.
- Read before starting. Note the intended fit, stated requirements and recommended assembly order. Identify which parts belong together before beginning.
- Compare the parts. Match the supplied components to the instructions. If a component appears to be missing or a part is damaged, pause and resolve the issue before proceeding.
- Test-fit where appropriate. Follow the kit guidance to check how parts align and whether the intended chassis or other components fit before committing to assembly.
- Assemble and finish. Use the instructions to guide assembly, then prepare the model for painting and finishing as appropriate to that kit. Allow time for careful work and checks.
How to plan chassis compatibility before building
Scale alone doesn’t establish whether a locomotive body will fit a chassis. Models in the same scale can have different body shapes and mounting arrangements, and a chassis must suit the particular design. Read the kit description for stated fit requirements, then compare those details with the equipment you own. Some Narrow Minded Railworks kits are designed for commercially available chassis, but compatibility is kit-specific.
What should a modeller expect from assembly and finishing?
Assembly and finishing are part of the modelling project, but the work required depends on the individual kit. Don’t assume every kit uses the same material, needs the same preparation or includes the same accessories. Follow the product instructions for its parts and process, and plan your build around those requirements. For practical advice beyond the kit-specific steps, use this guide to building and finishing 3D printed kits.
Preparation can prevent avoidable fit problems later. If you’re choosing a project, browse the narrow-gauge locomotive and wagon kits and compare each description with your layout, existing components and preferred level of hands-on building.
Compare 3D Printed Narrow Gauge Rolling Stock by Scale and Project
Scale and track gauge describe different things, so compare both with your layout before choosing a kit. Scale is the model’s proportion to its real-life subject; track gauge is the distance between the rails. A familiar track width doesn’t mean two models share the same scale, proportions or chassis requirements. The table is a starting point, not a guarantee that equipment will fit across categories.
| Scale | Layout context | Project it may suit |
|---|---|---|
| OO9 | OO-scale narrow-gauge modelling using 9mm track | Compact layouts and projects centred on smaller locomotives or wagons |
| GN15 | Larger-looking narrow-gauge models running on 16.5mm track | A more prominent, hands-on railway or a locomotive-and-scenery project |
| O-16.5 / 7mm scale | 7mm-scale narrow-gauge modelling using 16.5mm track | Projects where larger model proportions and visible individual details are a priority |
How do OO9, GN15, and O-16.5 projects differ?
OO9 suits modellers planning around a smaller footprint, while GN15 and O-16.5 / 7mm scale give a larger modelling presence. These are useful layout-level distinctions, not universal rules about what every project must look like. Narrow Minded Railworks offers OO9 locomotive and wagon kits, GN15 locomotive and scenery kits, and O-16.5 / 7mm scale kits. If you’re starting with OO9, a first OO9 locomotive kit guide can help you think through the choice.
Track gauge alone doesn’t settle the question. GN15 and O-16.5 both relate to 16.5mm track, but their model proportions and project context differ. Nor does a scale label establish that a particular chassis will fit a locomotive body. Check each kit’s description for its stated requirements, then compare those with your track, existing stock and any components you plan to use.
Which kit format suits your layout and modelling aims?
Choose the type of project as carefully as the scale. A locomotive body project centres on the engine and may involve planning a compatible chassis separately. A wagon project can add variety to existing motive power, while scenery kits help develop the setting around the railway. Each format offers a different kind of building task, so consider what you want to assemble and what your layout needs.
Before settling on a model, picture it beside your existing stock and check whether the layout has room for its proportions and intended role. If the project depends on a particular fit, use the individual kit description rather than assuming compatibility from the scale name. This makes it easier to choose 3d printed narrow gauge rolling stock that complements your railway and avoid mismatches.
How to Choose and Prepare a 3D Printed Narrow Gauge Kit
A good kit choice starts with the railway you’re building, not just the model that catches your eye. Before committing, compare the individual product description with your layout, existing equipment and the time you want to spend building. This helps you identify separate components to plan for and reduces the risk of a mismatch later.
What to check before selecting a locomotive or wagon kit
Use this checklist to turn your project aims into a practical choice. Work through the points in order, since the scale and kit format shape the fit and build decisions that follow.
- Choose the scale. Match the kit category to your layout’s scale and track arrangement. Don’t treat track gauge and scale as interchangeable, or assume either one alone confirms chassis fit.
- Identify the stock type. Decide whether the project is a locomotive, wagon or scenery item. A locomotive build may involve planning for a compatible chassis and motor separately, while a wagon project has different requirements.
- Check the fit. Compare any stated chassis-fit requirements in the product description with your existing equipment. If you already have a chassis, use its exact details rather than relying on its scale label alone.
- Review the instructions. Read the product-specific information before starting. Kit contents and assembly steps can differ, so don’t assume another kit’s instructions or parts list will apply.
- Plan the build and finish. Consider the tools you have, the time available and your confidence with assembly and finishing. Set aside time for each stage, and follow the kit’s own guidance rather than applying a generic process.
For a locomotive project, write down which compatible components you already own and which you’ll need to source separately. Narrow Minded Railworks sells kits, not chassis or motors, and some kits are designed to fit commercially available chassis. Use the specific description for the model you’re considering; don’t infer a fit from scale alone. The same project-first approach applies to wagons: think about how the model will sit alongside your current stock and what role it will play on the layout.
How to plan painting and finishing without duplicating the build guide
Finishing is its own stage, so include it in your project plan rather than treating it as an afterthought. Preparation depends on the individual kit, and assumptions about material or surface treatment can lead you astray. Follow the product-specific guidance for preparing and finishing its parts. If you’re new to this stage, the beginner’s guide to painting 3D printed models offers further direction.
Taking these steps before you select 3d printed narrow gauge rolling stock makes it easier to match the model, build requirements and layout. Explore narrow-gauge model railway kits and compare the product details with your project plans.
Explore Narrow Minded Railworks 3D Printed Narrow Gauge Kits
Narrow Minded Railworks specialises in 3D printed model railway kits and accessories for narrow-gauge projects. Its range spans several scales and project types, so start with the railway you’re planning: consider whether you need a locomotive, wagons, scenery or a kit in a particular scale. This helps narrow your options before you compare product-specific requirements.
These are kits for hands-on modelling, not ready-to-run models. Assembly and finishing are part of the project, and a locomotive kit may need a compatible chassis and motor sourced separately. Narrow Minded Railworks sells kits, not chassis or motors. Some kits are designed to fit commercially available chassis, with fit requirements depending on the individual kit.
Find the kit category that matches your narrow-gauge project
Use the categories as a starting point, then compare individual kit details with your layout and the model you want to build. Narrow Minded Railworks offers:
- OO9 locomotive and wagon kits for projects focused on OO9 motive power or rolling stock.
- GN15 locomotive and scenery kits for a project that brings together a locomotive model and layout surroundings.
- O-16.5 / 7mm scale kits for modellers planning in this scale category.
Think about how the finished model will contribute to your railway. A locomotive can become a focal point, while a wagon may complement motive power you already have. Scenery offers another way to develop the layout’s setting. These categories help you identify a direction, while the specific product information guides you through a particular model’s requirements.
What happens after you choose a kit?
Read the individual product information before building. It explains the specific kit, its stated fit requirements and details relevant to assembly. For a locomotive, compare those requirements with the chassis and motor you plan to use. For any kit, consider the assembly and finishing work involved so you can prepare the tools and time your project needs.
Narrow Minded Railworks ships worldwide. For a locomotive kit, plan any separately sourced compatible components around the requirements for that model.
Once you’ve identified your scale and project type, browse the categories and compare the kit descriptions with your layout plans and existing equipment. Browse Narrow Minded Railworks kits to find a starting point for your narrow-gauge build.
Turn Your Next Layout Idea into a Build Plan
Before choosing a model, picture the role you want it to play on your railway. A locomotive, wagon or scenery piece can shape a layout in a different way, so start with one clear aim rather than trying to solve every part of the project at once. Then note the scale, available space, components you already have and the time you can set aside for assembly and finishing.
This simple plan gives you a useful way to assess 3d printed narrow gauge rolling stock: does the kit suit the railway you want to build, and are you ready for the work involved? Use the individual kit information to guide decisions about fit, contents and assembly. A considered first project can help you build confidence and make future modelling choices easier.
Browse Narrow Minded Railworks kits to explore options for your project. Take the next step at your own pace, and enjoy shaping a narrow-gauge railway that feels distinctly yours.
Frequently Asked Questions
What does OO9 mean in narrow gauge modelling?
OO9 describes narrow-gauge modelling that uses 9mm track with models built to OO scale proportions. The “OO” refers to the model scale, while “9” refers to the track gauge in millimetres. The two parts of the name tell you different things. Before adding a model to your railway, compare its scale and intended track with your existing layout rather than relying on the label alone.
Can 3D printed narrow gauge rolling stock run on an existing layout?
It can, if the model’s track, dimensions and running components suit your layout. For example, a locomotive body designed for a particular chassis won’t automatically fit another chassis just because both are associated with the same scale. Check the kit’s stated fit, then consider clearances, curves and how the model relates to your existing stock. Test-fit components before assembly where the instructions recommend it.
Are 3D printed narrow gauge kits ready to run?
No. A kit is a modelling project, not a ready-to-run vehicle. A locomotive body kit, for example, doesn’t by itself provide powered running gear. Narrow Minded Railworks sells kits, not chassis or motors, so plan to source separately any compatible parts required by the individual model. Read its product information before ordering to understand what the kit covers and what your build may still need.
Do I need experience to build a 3D printed railway kit?
Not necessarily, but it helps to choose a project that matches your current skills, tools and patience. If you’re new to kit building, allow time to study the instructions and organise the parts before starting. A project involving fewer unfamiliar tasks may feel more manageable than one that also requires sourcing and fitting a chassis. Follow the guidance for that kit, and build steadily rather than rushing assembly.
Can I customise 3D printed narrow gauge rolling stock?
Yes, modellers can often personalise a finished model through choices such as paint, weathering or layout-specific details. Keep any changes compatible with the kit’s intended fit and assembly. Before cutting, drilling or altering parts, consider whether the modification could affect alignment or how the model works with its chassis and other components. Use the product instructions as your starting point, especially if you’re adapting parts that have a defined purpose.
How should I store an unfinished 3D printed model kit?
Keep unfinished parts together in a clean, dry place, away from direct sunlight, heat and pressure that could distort or damage them. Use a container that protects small components, and keep the instructions with the kit so you can identify parts when you return to the build. Storage needs can depend on the material, so follow any product-specific handling guidance and avoid assuming all printed kits need identical care.